Author Archive

How to switch from WP Bakery to Elementor?

Unfortunately there’s no way to transfer your homepage from WP Bakery Page Builder to Elementor. You have to rebuild homepage using Elementor from scratch.

How to use new homepage demos from elementor after upgrading from WP Bakery builder?

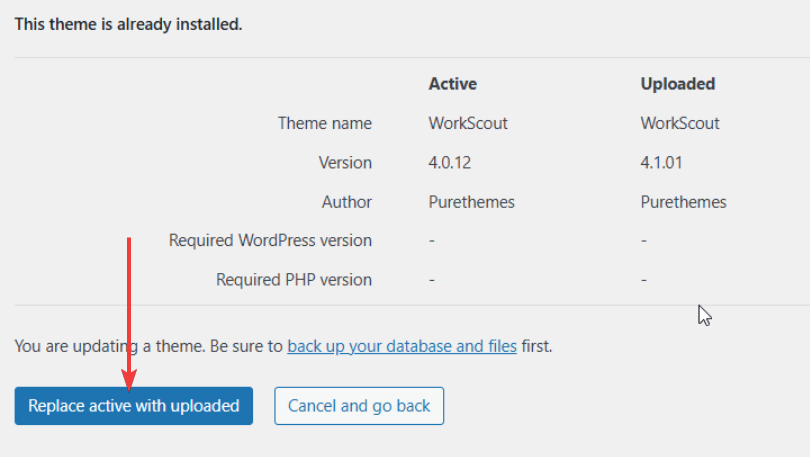
  1. Update theme and all plugins to the latest version (don’t forget to activate WorkScout Elementor plugin that comes in latest version)
  2. Install elementor
  3. Download homepages import .zip file: workscout-elementor-homepages.zip
  4. Import templates from .zip file in Templates / Import Templates
  5.  Create new page, disable titlebar then publish and click “Edit with Elementor“:
  6. Import home template you want to use from template library:


Theme layout shifted to the left after theme installation

If theme layout after theme installation is misaligned most likely your hosting pre-installed Page Optimize plugin. We highly recommend disabling and removing it (there are much better plugins).

If you want to keep this plugin please go to its settings, uncheck “concatenate styles” and save.

How to enable social login?

We integrated Nextend Social Login plugin with WorkScout

Nextend Social Login and Register

After installing it you can configure it in Settings → Nextend Social Login


Step 1: Configure Global Settings

Create page with shortcode and assign it to “page for register flow”. Then create another page without any content and assign it to “Oauth redirect URL proxy page”.

You can also configure default redirect page.


Step 2: Configure Provider

You have to create proper API keys for those services that you want to use. You will find instructions about creating API keys after selecting provider.

Company Profiles & Reviews

With this feature employers can create complex profiles for their companies and build the most fair and accurate company reputation with public reviews.

Employees  can browse through companies catalogue with advanced filters and leave public ratings ⭐ using multi-criteria reviews.


Company list page with filters page can be configured in in Job Listings → Settings → Company

Users that updated theme from older to newer version need to create 3 new pages (Company Listings Page, Company Dashboard Page and Submit Company Form).

Dashboard Page and Submit Company requires shortcodes in their content:
[mas_company_dashboard]
[mas_submit_company_form]


Company Review settings can be found in Job Listings → Settings → Company Reviews

Job Alerts

With the Job Alerts plugin, registered users on your site can create job alerts based on searches (by keyword, location keyword, category) which are delivered by email either daily, weekly or fortnightly.

Setup

Head over to Job Listings > Settings > Job Alerts to configure the plugin’s settings.

  1. Alert Email Content – This option controls the content of your alerts emails. Emails are plain text.
  2. Alert Duration – Entering a number here will cause a users alerts to expire are X days. When expired, the user can login to their alerts page to re-enable them for another X days.
  3. Alert matches – Enable this to ensure that an email is only sent if jobs are found that match your alert. If this is disabled, an email will be sent every time the alert is checked, even if there are no matches.
  4. Alerts Page ID – Select the page where you have placed the [job_alerts] shortcode, so the add-on knows where to link users to view their alerts.

How alerts are sent

Once an alert is created (or enabled) a WordPress cron event will be scheduled. When this event is triggered, the alert will be sent and another cron will be scheduled. This process will repeat whilst the alert is active.Ensuring cron jobs are triggered for low traffic sites

WP Cron jobs are triggered when the site is visited by a user or bot. If you want cron jobs to trigger more often or more reliably, consider this tutorial: https://tribulant.com/blog/wordpress/replace-wordpress-cron-with-real-cron-for-site-speed/


How user can enable alerts

Users can enable job alerts either by clicking “alert me to jobs like this” on job page or manually in dashboard


Emails aren’t getting send

Ensure WP cron is not disabled. Check for this in your wp-config file:

define('DISABLE_WP_CRON', true);

If you see this, remove it!.


Wrong “from” email address

Alert emails are set up to be sent from “noreply@yourwebsite.com“

However, with some hosts, if this address doesn’t exist as a mail account on your server, then it may be replaced, so you will find alert emails being sent from an email address belonging to your hosting provider.

If this happens, you can fix it by creating a mail account with your host for “noreply@yourwebsite.com“

Why I can’t see jobs on the map?

A job listing will be shown on the map only if it includes geographical coordinates (specifically latitude and longitude). To enable this functionality, you must generate an unrestricted Google Maps API key and then insert it within the “Google Maps API” in Job Listings → Settings.


Getting an API key

You can get a Google Maps API by following our instructions here (make sure it’s not restricted to domain)


How to verify if Geocoding is working?

  1. First make sure you key is properly created (not restricted to domain). Open following link and add your API key at the end of URL: https://maps.google.com/maps/api/geocode/json?address=%22New%20York%22&key=ADD_YOUR_API_KEY_HERE
  2. Then create a new job listing with a location name, view the job listing in wp-admin. It should contain the location details in custom fields. For example:

When are API calls made?

Calls to the Google API are made when:

  • A job is submitted.
  • The location of a job is changed.
  • Jobs are imported (using WP All Import) that have location data.

Geolocation data for a particular location is cached for 1 week, so an API call is not necessarily made every time in the above instances.


Geolocation Info and Custom Fields settings

Please note that to view what is saved as geolocation data in WP Jb Manager from the backend of your site, you need to enable the Custom Fields option in the WordPress Admin for the job post type.

You can do it by doing the following:

  • Head to your job listing post
  • Click on the three vertical dots at the far right of the screen (the settings option)
  • Click on Preferences
  • Select the Panel tab
  • Under Additional, toggle on the Custom Fields option.

Here’s a screencast to guide you through it (the short video will be downloaded upon clicking on the link below):

Geolocation Info and Custom Fields settings


Is this optional?

The API key is required if you want your job listings to contain geolocation data. Without the key, the location entered in the Location field when submitting a job will be stored as a single text string in the _job_location custom field.

Having problems with your WordPress site not sending emails?

If you have problems with receiving emails sent from your site, first please install this plugin

WP Mail Logging


It will log any outgoing emails from your site, so you will see if they are actually sent. If they are logged in but you don’t receive them, the problem is with your server.

This is a common issue for WordPress sites since they rely on the PHP mail function for emails. Most WordPress hosting providers lack proper server configuration for sending PHP emails, leading to delivery problems.

To avoid that use WP Mail SMTP by WPForms plugin:

WP Mail SMTP by WPForms – The Most Popular SMTP and Email Log Plugin


How to update theme and plugins?

Please always remember to update not only the theme itself but also the plugins, such as WorkScout Core and WorkScout Elementor.

It’s recommended to configure Envato Market auto-updates plugin. It’s installed automatically with theme and you’ll find in your WordPress Dashboard → Envato Market


Theme & Plugins Update

Go to your downloads section on ThemeForest http://themeforest.net/downloads and download theme (Installable WordPress file only) – it will be the lastest version.

  1. Update Theme

    Recommended method: upload .zip with new theme version through WordPress and confirm that you want to update theme.

    Alternatively you can use FTP and extract the zip file and upload all files directly on your server to wp-content/themes/workscout/

  2. Update Plugins

    After uploading new version of theme you also have to update plugins. You will see a list of plugins that require update in Appearance → Install Plugins.

You won’t loose any content or settings, but if you’ve made any customizations to source files they will be lost, so please use Child Themes http://codex.wordpress.org/Child_Themes to modify theme .php files. 😉

Creating Google API Key

Do I need to generate API key?

You need 1 unrestircted API key for WP Job Manager geocoding to run theme properly.
Please refer to Step 6 in this tutorial

If you prefer OpenStreet Maps and won’t be using Google Maps, Google Autocomplete or the radius search feature in our theme there’s no need for a second Google API key. But if you do want to use these features, you’ll require an extra key.


Step 1: Create New Project

Go to Google Developer console and create new projec: click “Select Project” then “New Project”

Select a name for your API key and click “Create”


Step 2: Generate API Key

Click “APIs & Services”

Then select “Credentials” tab, click on “Create Credentials”

You’ll see generated API key. Copy and save it. You will need it later.


Step 3: Configure API Key

After generating the key, simply click on it to access its configuration options.

You need to restrict key to domain by checking “Websites” under application restriction section.

Afterward, select the “Add” option and input your domain in the correct format. Please remember to enclose your domain with asterisks (*) at both the beginning and end (after / slash). This step is crucial as it ensures access to the API key for all subdomains and subpages.

Here’s an example of the correct format (without a dot before the domain): *workscout.in/*


Step 4: Enable APIs for your project

Important!

To use APIs you have to enable billing which can be done separately (see Usage and Billing) or when obtaining your API key. The initial $200 of monthly usage is free, and you’re unlikely to surpass this limit.

Charges are based on actual usage, and you can monitor rates and spending in your Google Cloud Platform Console. Set daily quotas to prevent unexpected spikes and configure billing alerts to receive email notifications for customizable charge thresholds.

Open menu button in top left corner, click “More Options” then scroll down to Google Maps Platform and select Overview

Click “Enable APIS”

To make sure that all required APIs are enabled head over to APIs & Services, select “Enabled” filter and check if Places API, Maps JavaScript API and Geocoding API are enabled (you should see “DISABLE” sign which means they are enabled).


Step 5: Add API Key in WorkScout Core

Go to WorkScout Core → Map Settings and paste your API key in “Google Maps API Key” field.


Step 6: Unrestricted API key for WP Job Manager

You need an unrestricted API key for geocoding when filling out job submission forms. To generate such key skip the first step in this tutorial. Instead, follow steps 2 through 3, but when you reach step 3, do not restrict the key to your domain. This key will be exclusively utilized on the backend and will not be visible to anyone.

Then add unrestricted key in Job Listings → Settings → Google Maps API Key

If you’re having issue with jobs not being displayed on map please read this article: Why I can’t see jobs on the map? → 


Step 7: Unrestricted API key for search radius functionality

If you’ve already generated an unrestricted API key for WP Job Manager in step 6, you can also use it for the radius search feature.

Radius search functionality requires key without domain restriction. To generate such key skip the first step in this tutorial. Instead, follow steps 2 through 3, but when you reach step 3, do not restrict the key to your domain. This key will be exclusively utilized on the backend and will not be visible to anyone.

To make sure you key is properly created (not restricted to domain). Open following link and add your API key at the end of URL: https://maps.google.com/maps/api/geocode/json?address=%22New%20York%22&key=ADD_YOUR_API_KEY_HERE

Add unrestricted key in WorkScout Core → Map Settings → Google Maps API Key

Chosing Map Provider

Google Maps API pricing got you down? You can use alternatives like OpenStreetMaps, MapBox, Bing Maps, Thunderforest or HERE maps.

What’s more WorkScout supprorts also location autocomplete feature powered by OpenStreetMap which means that you don’t need to use Google API even for this.  It’s exclusive to WorkScout – not found in other job board themes!  We took care to develop it with best UX/UI practices and it works as good as Google’s autocomplete.

An example of map and location autocomplete field powered by OpenStreetMap:

Please note that OpenStreetMap location address suggestions work only on “type and hit enter”.  OpenStreetMap usage policy doesn’t allow generating address propositions on each key press (like Google does).  That would generate too many requests per second and could overload their servers. Technically it’s possible but OSM foundation shares their api for free so we wanted to respect their usage policy.

An example of map and location autocomplete field powered by Google Maps:


You will find all map settings in WorkScout Core → Map Settings: