Author Archive

Adding a custom field to a listing and using it as a search filter

This guide will helps you create a new field for you listing and explain how you can use as a filter in search form.

In this guide we will add new field for service type listing named “Color” and choose this filter to be multi-select.

Let’s start! First, create Custom Field. Let’s got to your wp-admin → Listeo Editor → Listings Fields. Go to Listeo Editor and click  green “add field” button  and apply some settings.

Available Fields:
1. Input
2. Dropdown Select
3. Dropdown Multi Select
4. Upload Field
5. Checkbox
6. Multi Checkbox
7. Date Time
8. Textarea

Please note the Name is what user will see, the Value is what will be saved in database, so try to not use any special characters for it.

With this new field defined, if we go to one of our listings in WordPress editor, we will see it as new field option:

Now let’s add it to Add Listing Form. Go to Listeo Editor → Add Listing Form, scroll to section you want and click Add Field, and select the field we added

Click Save Changes at the bottom of the page, now edit that field again, if you want to make it multiple choice, make sure it’s set as this:

Now our Submit Listing form should present our new field:

The last step would be to make a filter from that field in the search forms. Let’s add it to sidebar search form. To do this, go to Listeo Editor →  Search Forms -> Sidebar Search tab, and from Available Searchable Elements in the right side, drag and drop the Colors field to the Main Elements. Save the changes, now edit the field again and make sure it’s set like on this screenshot


and here we go, working search form:


Related article: Add Listing Form Editor


How to use mega menu?

Mega menu can be enabled by ticking “enable megamenu” option in menu item. Then you need to select how many columns your mega menu will contains – each column is basically a submenu.

How to add / remove pages from dashboard menu?

If you would like to hide some of the pages available in user dashboard go to Listeo Core → Pages and unselect page you want to hide by selecting “-Disabled-” from the dropdown then save changes.

If you want to add some custom pages to used Dashboard Menu, you can assign custom menus in Appearance -> Menus to one of several location that exists for Dashboard Menu:
Any page you create for that menu should have Page Template set to “Dashboard Page”

What are recommended PHP configuration limits?

If you’re experiencing issues during theme installing or importing demo data via setup wizard and you see message like that: “Are you sure you want to do this? Please try again” please make sure that your PHP configuration is set at least as below:

max_input_time = 300
max_execution_time = 300
memory_limit = 258M
upload_max_filesize = 256M
post_max_size = 257M

Here’s a list of possible WordPress errors, including HTTP errors, database errors, and other common issues when your PHP/server settings are too low.

Error 500 - Internal Server Error
Error 403 - Forbidden
Error 404 - Page Not Found
Error 401 - Unauthorized
Error 400 - Bad Request
Error 502 - Bad Gateway
Error 503 - Service Unavailable
Error 504 - Gateway Timeout
Error Establishing a Database Connection
White Screen of Death (WSOD)
Maximum Execution Time Exceeded
Memory Exhausted Error
429 Too Many Requests
Connection Timed Out
Destination Folder Already Exists

WP All Import / Export

WP All Import plugin allows you to import or export listings into CSV and XML files.

This guide is useful if you already have CSV/XML with listings data (e.g. you’re switching from other theme) and you would like to import them to Listeo.

Install WP All Import Plugin and our Add-On

  1. Install WP All Import plugin
    Plugins → Add New → Search → WP All Import → Install & Activate
    https://wordpress.org/plugins/wp-all-import/
  2. Go to https://purethemes.net/license/ and download WP All Import Listeo Add-on plugin
    You’ll need purchase key: How to find my license key?
  3. Then install our extension:  Plugins → Add New → Upload Plugin → Install & Activate

Importing your CSV or XML file

If you have thousands of records in your database it might takes a while to import them and because of that we suggest to test importing process with only a few listings to verify if everything got imported correctly. 😉

CSV or XML template
There’s no one “template” for CSV to import, you create it in the plugin, all that matters is that you have a file in which each row represents a listing and each column represents the listing data, so you have column for title, for address, for content, for phone number, for price etc etc. Then in the plugin as described below, you drag&drop the columns to the import fields

First go to the WP All Import section and choose New Import

You’ll then be prompted to upload your CSV or XML file. You should also choose to create new Listings for the items dropdown. Once you have done it click Continue to Step 2


Once the file has uploaded successfully it will show you a preview of your CSV fields. Click Continue to Step 3 after ensuring it has uploaded correctly and can be read.


For step 3, you will need to tell WP All Import how to import each of the columns in your CSV file. Simply drag the data from right to left.

Start with the post title and content. These need to be mapped to property title and description:

Then go to Listeo Add-On section and map the rest of the data:

Images need to be mapped in Gallery Images:


Once you have mapped all fields Continue to Step 4. Choose an Unique ID (use Auto Detect) and click Continue.

Then you can review your import data and click Confirm & Run Import

If everything went well your data will be imported 🙂


Automated user creation from listings

All imported listings will be assigned to admin but you can use plugin created by one of Listeo users and create user for each listing after import.

Use Cases:
Automated user creation from listings.
Assign listings to existing users without duplication.
Manage owner roles separately from other user types.

https://github.com/Koulouridhs/Listeo-Listing-User-Assign
Click “Code” then “Download ZIP”

  • Admin Page: Adds a “Listing User Assign” page in WordPress, visible only to admins.
  • Owner Role: Creates an “owner” role if it doesn’t exist.
  • Listing Filter: Hide/show admin-owned listings; default hides them.
  • Pagination: Displays 30 listings per page with navigation.
  • User Creation & Assignment:
    • Bulk or single user creation based on the listing’s email.
    • If the user exists, the listing is reassigned; otherwise, a new user is created.
    • No emails sent during user creation.
  • Redirects & UI: Redirects after submission, keeps filter settings, and provides quick edit/view links.

Data Variables 

Data you need in your CSV to map to fields in Listeo.
You can create also custom fields (please refer to Listeo Fields Editor ) and these fields will be automatically added to the list below during import.

  • Listing Data Variables

Customizing Templates (Child Theme)

You can download listeo-child.zip here.
To install it, simply upload it as a new theme, install it, and activate it.

1. Child Theme

It allows you to modify a theme without risk of losing changes after theme update.

You can override specific files (like header.php or functions.php) instead of editing these files directly in main theme folder, keeping things modular and manageable.

For example, if you would like to make some changes to header.php file simply copy it from parent theme and paste in child theme:

wp-content/themes/listeo-child/header.php


2. Child “Theme” for Listeo Core

You can do the same for all files in /templates/ directory in Listeo Core plugin. To override a template, move it to yourtheme/listeo-core/, keeping the path within ‘templates’ intact.

So for example, you’d like to change the part that displays Gallery on single listing view. To do that, copy file

wp-content/plugins/listeo-core/templates/single-partials/single-listing-gallery.php

to

wp-content/themes/listeo-child/listeo-core/single-partials/single-listing-gallery.php

You have to skip /templates/ in the path. It will be used instead of the core template file. This also supports child themes, so you can put that file directly to your child theme.

If these files are updated in the core plugin, you may need to update your custom version in the future to maintain compatibility.


Editing single listing page via Elementor

Editing single listing page using Elementor

Having problems with your WordPress site not sending emails?

If you have problems with receiving emails sent from your site, first please install this plugin

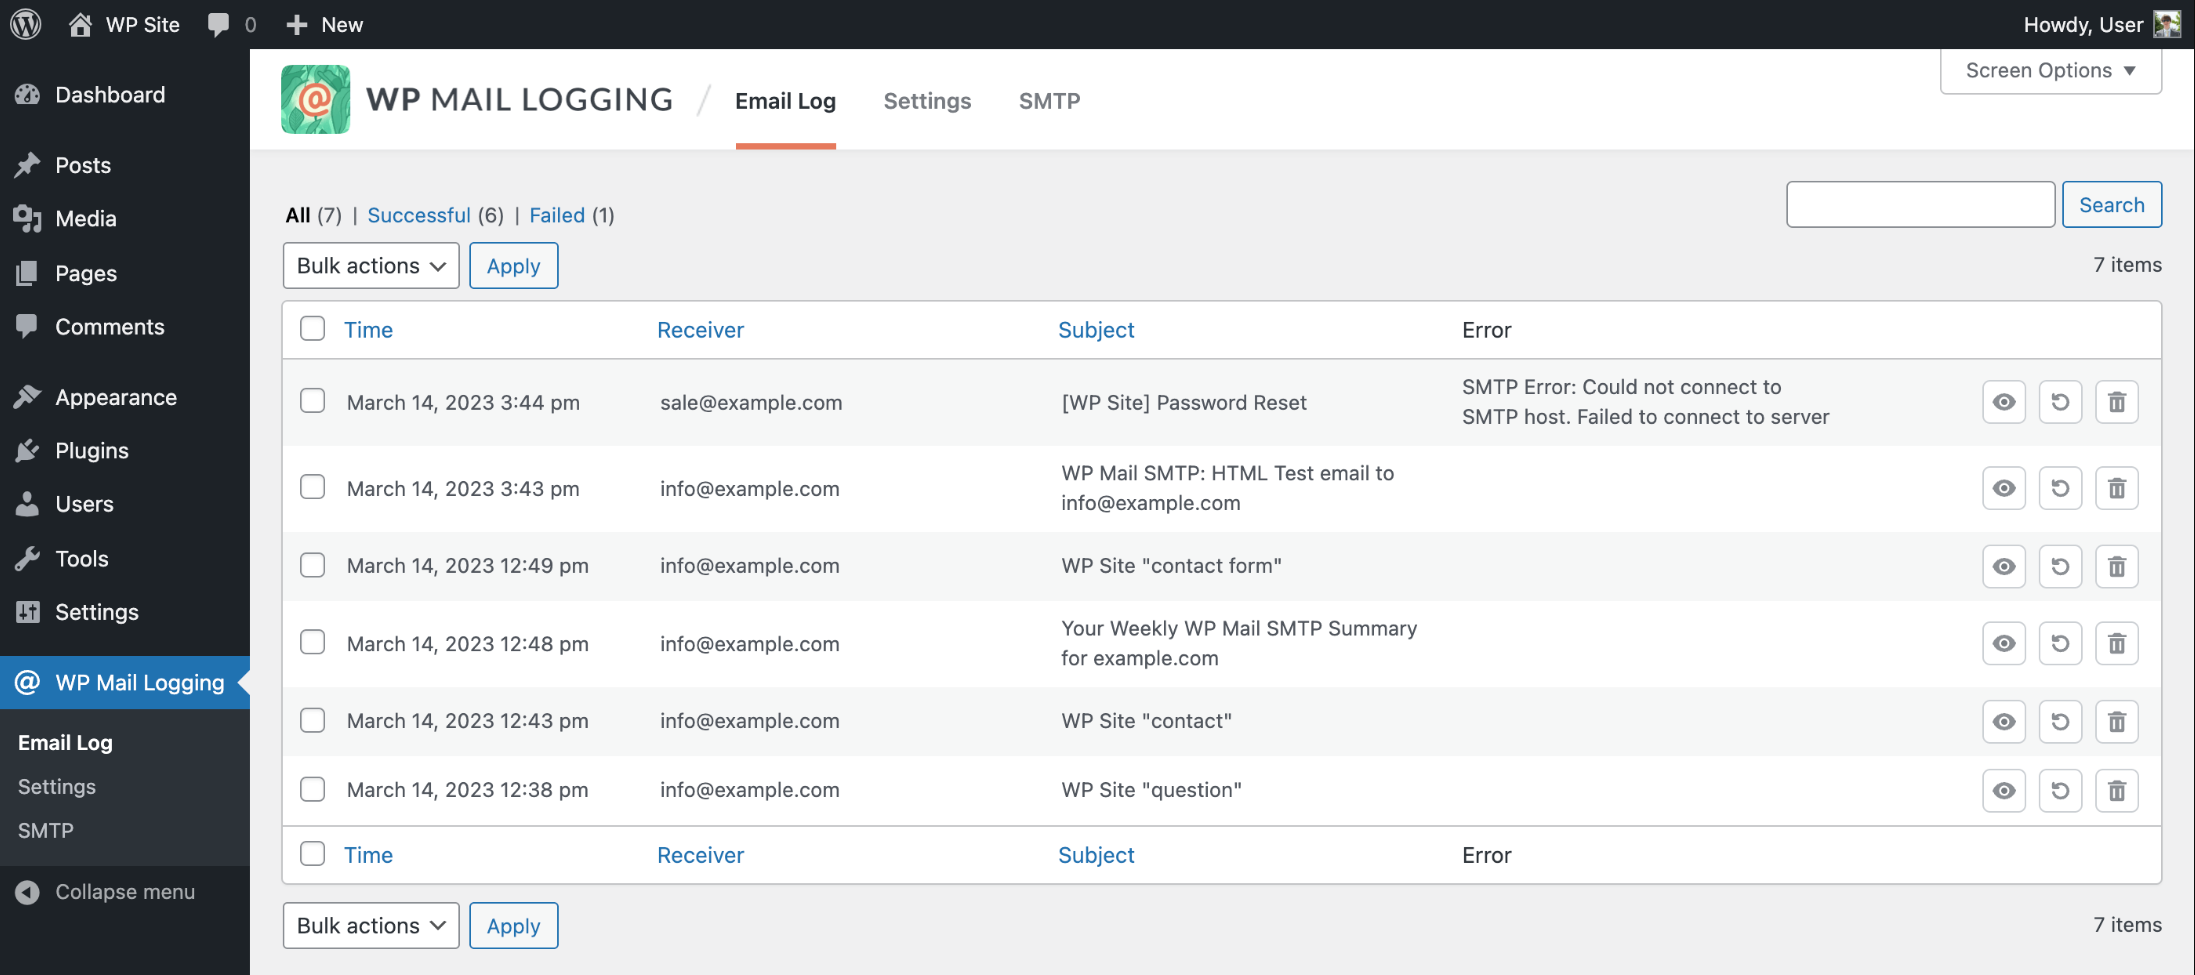
WP Mail Logging


It will log any outgoing emails from your site, so you will see if they are actually sent. If they are logged in but you don’t receive them, the problem is with your server.

This is a common issue for WordPress sites since they rely on the PHP mail function for emails. Most WordPress hosting providers lack proper server configuration for sending PHP emails, leading to delivery problems.

To avoid that use WP Mail SMTP by WPForms plugin:

WP Mail SMTP by WPForms – The Most Popular SMTP and Email Log Plugin


PS. If you use “message vendor” contact form – don’t bother about syntax error that will be shown next to [custom-post-author-email-shortcode] 

How to change some texts/words?

If you would like to change some texts from english to english (translating to another language is described here) you can do it using SayWhat? plugin that allows you to alter strings on your site without editing WordPress core:

Say what?

After installing SayWhat? plugin go to Tools → Text Changes and click “Add New“. In “Original string” field write original text, then in “Text domain” field add listeo_core or listeo and in “Replacement string” field add new text.

Some texts might come from other plugins. Please click here to find instructions on how to find text_domain.

In this example we changed text in claim listing button from “Own this business? Claim it now” to “Not Verified. Claim this listing now!”.

Click “Add” and voila:


How to find text_domain?

Install Text Domain Inspector: https://wordpress.org/plugins/text-domain-inspector/

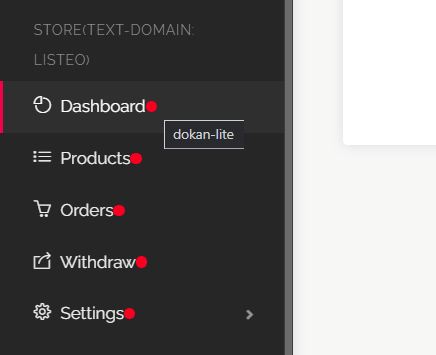
Click “Inspect Text Domains” at the toolbar and you will see red dots. Hover over a dot and you will see text domain relevant to the text you want to change.

How to configure “Message Vendor” contact form?

This article will guide you on how to enable “Message Vendor” contact form that allows contacting vendors directly via email.

P.S. Because we care about user experiecne when user is logged-in form automatically populates data from his profile (name, email and phone). 😉


Create new contact form in Contact Form 7 plugin


Don’t bother about syntax error that will be shown next to [custom-post-author-email-shortcode]

In WordPress dashboard go to Contact → Add New and in “Form” tab paste following code:

<div class="col-lg-12">
<div>[text* your-name default:user_display_name placeholder "First and Last Name"]</div>
<div>[email* your-email default:user_email  placeholder "Email"]</div>
<div>[tel tel-300 placeholder "Phone"]</div>
<div>[textarea* textarea-637 40x3 placeholder "Message"]</div>

<!-- Preferred Contact Method Radio Buttons -->
<div class="preferred-contact-method">
     <h5>Preferred contact method</h5>
     <div class="preferred-contact-radios">
          [radio radio-950 use_label_element default:1 "Email" "Phone"]
     </div>
</div>
<!-- Recaptcha Holder -->
<div class="captcha-holder">[recaptcha]</div>
<!-- Submit Button -->
<div class="message-vendor-submit-button">[submit "Request Pricing"]</div>
</div>
<div class="clearfix"></div>[dynamichidden custom-post-author-email-shortcode "CUSTOM_POST_AUTHOR_EMAIL"]

Then go to “Mail” tab and in “To” field add this code (it’s responsible for sending message directly to the listing owner):

[custom-post-author-email-shortcode]

and then in Message Body paste this code:

From: [your-name] <[your-email]>

Message Body:
[textarea-637]
Phone - [tel-300]
Preferred contact [radio-950]
-- 
This e-mail was sent from a contact form on from your listing page on Listeo.

Click “Save” and go to the next step below.


Adding Widget


Go to Appearance →Widgets then add “Listeo Contact Form” to “Single Listing Sidebar” and select contact form created in previous steps.


Enabling reCaptcha


If you want to use recaptcha v3 all you need to do is adding API keys for reCaptche v3 in Contact → Integrations. However if you would like to use reCaptcha v2 (this one where user has to click on the recaptcha checkbox) you need to install plugin from the link below and add reCaptcha v2 (it’s important to not confuse v2 with v3) API keys in Contact Integrations.

ReCaptcha v2 for Contact Form 7


Displaying Widget


Each listing owner can enable “Message Vendor” widget on his own in listing submission form.


Special tags / shortcodes for contact form

Special tags you can use e.g. to include listing name in email

[_url] — This tag is replaced by the URL of the page in which the contact form is placed.

[_date] — This tag is replaced by the date of the submission.

[_time] — This tag is replaced by the time of the submission.

[_site_title] — This tag is replaced by the title of the website.

[_site_description] — This tag is replaced by the description (tagline) of the website.

[_site_url] — This tag is replaced by the home URL of the website.

[_site_domain] — This tag is replaced by the site domain (hostname without “www.”).

How to enable social login?

We integrated Nextend Social Login plugin with Listeo

Nextend Social Login and Register

After installing it you can configure it in Settings → Nextend Social Login


Step 1: Configure Global Settings

Create page with shortcode and assign it to “page for register flow”. Then create another page without any content and assign it to “Oauth redirect URL proxy page”.

You can also configure default redirect page.


Step 2: Configure Provider

You have to create proper API keys for those services that you want to use. You will find instructions about creating API keys after selecting provider.