Before you pick a payment provider, it helps to understand one big idea: who is the legal seller of your subscriptions. That single choice changes who handles taxes, where your money lands, and what you set up.
Author Archive
Membership & Paywalls
Lock any part of your site behind a paid membership. Pick the content you want to hide, group it, and sell access as a recurring subscription.
Listing Packages
Turn one of your Listeo listing packages into a recurring subscription by adding a few billing settings on top of it.
Customer Experience
Here is exactly what your customers see when they buy a recurring package, how they manage or cancel it later, and the few settings you control behind the scenes.
Getting Started
Welcome! This guide gets Listeo Subscriptions installed and shows you how it fits into your site, so you can start selling auto-renewing listing packages.
Listeo Booking Plus Changelog
1.0.13
Fixes
- Availability Calendar on the resource form saves reliably (was broken/collapsed, toggle didn't persist).
- "Import slots from main listing" now persists.
- Popup bookings now save custom booking fields (requires companion Core update).
- Multi-step submit form: Ticket Types & Recurring Schedule now assignable to a step (requires companion Core + Forms & Fields Editor).
- Kept the existing mobile sticky "Book Now" fix.
Improved
- Styling improvements
- Tems support
1.0.12
New
- "Lock end time to services duration" option (hourly listings): End picker is locked to the sum of selected extra-services' durations, in widget + popup.
- Per-service duration badge + duration-adjusted display price in the service picker (correct on initial load and on resource switch).
Improved
- Recurring events no longer generate zero occurrences on non-US date sites (event dates parsed with the site date format instead of raw strtotime).
- Popup now saves Booking Fields Builder custom fields (parity with the widget).
- Popup now stores the itemized price breakdown (parity with the widget).
- "Import slots from main listing" enables the Time Slots section toggle before populating, so imported slots aren't dropped on save.
- Recurring-event occurrence list has dark-mode styling.
Fixes
- PHP 8 fatal when submitting a popup booking with a wp-editor custom field (static call to an instance method in persist_custom_booking_fields).
- Coupon min/max-spend message no longer shows raw HTML in the event modal.
- Admin Listings page no longer white-screens when WooCommerce is deactivated (WC() guarded + clear notice).
1.0.10
New
- Start/end time selection for rentals in the booking popup (respects 12h/24h format and interval; reflected in availability, price, and saved booking). Also works for resource bookings.
Updated
- Booking popup re-validates listing-level blocks on the server (owner bookings and iCal imports are now blocked even on a forced or stale request).
Fixes
- Date-range calendar now greys out rental dates imported from iCal feeds (previously skipped for the date-range type; checkout/turnover day stays bookable).
1.0.9
Updated
- Booking-widget rating now uses the same source as the rest of the site (_combined_rating via listeo_get_rating_display()); no more mismatch like 4.3 in the widget vs 5.0 on the page.
Fixes
- Events, recurring event on classic widget, widget expiration, and showing date if listing is in the past.
1.0.8
New
- Features
- Sidebar booking widget (type-aware CTA). The popup's old bare "Book Now" button is replaced by a rich, listing-type-aware card that opens the booking popup:
- Service: host card + rating, 7-day availability strip, "next free slot" tag.
- Rental: price/night header, 7-day strip, constraints tag (min nights, units).
- Event: from-price + tier names + next occurrences with ticket scarcity.
- Every element (button, strip day, occurrence row) opens the popup and pre-seeds its pickers. Data layer in class-lbp-booking-widget.php; theme-overridable markup at
- templates/booking/widget.php. 10-minute availability cache, auto-flushed on booking insert/cancel.
- Per-listing "Use booking popup for this listing" opt-in (admin checkbox, meta _lbp_enable_popup). Forces the popup on for a single listing regardless of the global toggle; unchecked
- follows the global setting. Resource listings always use the popup. Loaded on both free and premium tiers.
- Booking widget microcopy settings (new "Booking Widget Notes" section, on both tiers): toggle/customize the "You won't be charged yet" note (service/rental) and the event-widget note.
- Listings that charge immediately never show the charge note.
Improved
- Manual multi-slot extendable cue. In multi-slot mode without a duration-service, the adjacent (prev/next) slots now get the dashed "tap to add" lbp-slot-extendable affordance, matching what the click handler already accepts. Brings the popup/grid path in line with the classic dropdown picker.
- Event ticket "Coming soon" badge. Long localized on-sale dates no longer stretch the ticket card; the badge shows short "Coming soon" with the full date in a hover/focus tooltip and
- aria-label.
- Shared blocked-dates computation. Refactored compute_blocked_dates() so the AJAX endpoint and the widget's 7-day strip always agree on bookable days.
Fixes
- Corrupted slot separators healed. Slot strings are now saved with JSON_UNESCAPED_UNICODE and normalized (en/em dash → hyphen; the literal u2013/u2014 left by the prior encode/unslash
- bug healed back to -). Previously a non-ASCII separator could store as u2013, making slot times unparseable and blocking all bookings on a listing. Applies to listing saves, resource
- saves, and the "import from listing" path.
Security
- iCal export feed now HMAC-token authenticated (was an unauthenticated PII leak); subscribe URLs rotate.
- CSRF nonces on iCal add/remove/refresh AJAX; SSRF hardening via wp_http_validate_url.
- Popup respects "Allow booking without login" (Login-to-Book button + AJAX rejection); guest checkout registers a proper "guest" account with captcha/terms/welcome-email; email
- force-required; price breakdown escaped; currency-symbol entity decode fix; dark-mode stepper fix; clock-format (12/24h) summary fix; resource slot-capacity respected.
1.0.7
New
- Guest checkout in the popup now registers a WordPress account with role "guest" instead of saving the booking with no author. Includes username/password fields per Theme Options, reCAPTCHA v2/v3, hCaptcha and Turnstile verification, Privacy Policy and Terms checkboxes, welcome email, and optional auto-login. If the email already has an account, the popup asks the customer to log in.
Updated
- Booking popup now respects the "Allow user to book without being logged in" theme option. When it's disabled, logged-out visitors see a "Login to Book" button instead of the booking popup, and the booking/ticket-hold AJAX endpoints reject logged-out submissions outright.
- Email is now force-required in the popup for logged-out guests.
- Resource cards also swap their Book buttons for "Login to Book" when login is required; next-available slot chips render as plain text.
Fixes
- Captcha verification requests (reCAPTCHA v2/v3) now use POST so the secret key never appears in server access logs.
- Guest passwords are no longer altered by text sanitization before hashing.
- Price breakdown amounts are HTML-escaped before rendering in the popup summary.
1.0.6
New
- Resource Types per listing type — define multiple named resource types (e.g. Service → Barbers, Cars), each with its own labels and Fields Builder tab.
- Listing owners/admins pick a resource type when creating a listing (auto-selected when only one exists).
- Admin approval for resources — new options "Admin approval required for new/editing resources".
- Approve / Reject actions for resources in wp-admin (dedicated Actions column + bulk actions), mirroring listings.
- Pending count badge on the "Booking Resources" admin menu item.
- Admin email notification when a new resource is awaiting approval.
- Resource submission success screen shows an "awaiting admin approval" message when pending.
- Listing Types list shows which types have resource types defined.
- Coupons now apply to resource bookings — promo-code field in the booking popup, validated against the listing's coupons (admin/owner scope), with the discount shown in the breakdown and applied to the order.
Improved
- Resource form now loads the fields and labels of the selected resource type (per-type Submit Builder / Fields Builder config).
- Resource type is locked once a listing has resources to prevent orphaned fields.
- Reject captures an optional reason and emails the resource owner.
- Booking summary "Extras" row now shows a compact count with the itemized list (and prices) on hover.
- Coupon UI restyled to match the classic widget (joined input/Apply, green confirmation, dashed code chip); success message auto-dismisses and the form collapses after applying.
- Service duration surfaced in the classic widget for multi-slot bookings.
- Resource bookings now respect Listeo Core's "15 minutes lock after booking" option (resource-aware).
- The Book Now button's post-booking lock is now tied to the same lock option.
Updated
- Listing types with booking type "None" no longer show booking sections/meta in the resource form or resource list.
Fixes
- Fixed resource thumbnail mismatch between the listing resource cards and the booking popup (featured image used first).
1.0.5
New
- New: "+N more" chip on resource cards when a resource has more tags than fit; the detail popup lists them all.
- New: shareable resource links — #lbp-resource-detail-{id} URLs now auto-open that resource on load; the whole card is clickable (Book button still opens booking directly).
- New: mobile sticky footer "Book Now" opens the booking popup when it applies (was scrolling to the old widget).
Fixes
- Fix: resource card "From $X" now matches between the listing card and the booking popup (was higher in the modal); honors required/Individual services.
- Fix: Date & Time step now blocks "Next" and shows an inline message when the selected slot is unavailable (no longer only at Confirm).
- Fix: date picker defaults to the first available day instead of an unavailable/disabled date.
- Fix: selected time-slot now uses the popup Accent Color (was hardcoded).
- Fix: popup calendar weekday/month names now localized to the site language.
- Fix: per-resource guest limits — adults can no longer exceed the resource's max; Children/Pets pickers hide for resources that don't allow them.
- Fix: dark-mode service price pills restyled (were washed-out light chips).
1.0.4
Fixes
- Various fixes
1.0.3
Changes
- Per-service duration shown in booking popup picker + confirm summary (only when set)
- Hour pickers honor listeo_clock_format (12h / 24h)
- Resource Book button seeds picker with next_slots[0].date instead of always defaulting to today
- Detail popup with no gallery collapses to single-column 560px card (is-no-gallery modifier)
- Resource detail popup gets a per-day Hours section; card hides chip when hours are non-uniform
- "This listing has Spaces" info box + dropzone elements + status chips dark-mode styled
Managing Resources from the Front-End
Owners can manager their booking resources the same way they already control listing. On plugin activation, Listeo Booking Plus will automatically create a Manage Resources page and set correct content and template for that. In case it didn’t happen, here’s instruction
Setting up the page
- Create a new page (e.g. “Manage Resources”).
- Drop the shortcode in:
[lbp_manage_resources]- Add the page to the owner’s dashboard menu (you can configure the dashboard menu under Listeo Core → Pages → Resource page).
What owners can do from this page
- Submit a new resource
- Edit any of their own resources.
- Duplicate a resource to spin up a near-identical one quickly.
- Import/Export iCal – import or export bookings to their personal calendar
- Pause a resource — temporarily takes it out of the booking pool without deleting it.
- Delete a resource permanently.

Each resource has its own availability calendar and its own iCal export / import URLs. This mirrors Listeo Core’s per-listing iCal flow — if you already use it for listings, the resource version will feel identical.
Each resource gets its own subscribe URL so external calendars (Google, Apple, Outlook, Airbnb, Booking.com) always see the right slice of the schedule.
Exporting a resource’s bookings
- Open the Manage Resource page for your listing
- Find the iCal Export section.
- Copy the subscribe URL.
- Paste it into Google Calendar (Other calendars → From URL), Apple Calendar (File → New Calendar Subscription), or any iCal-compatible app.
The feed updates every time the external app re-fetches it (the cadence is controlled by the receiving calendar — typically a few hours).
Importing external calendars into a resource
- In the iCal Import section, click Add Calendar.
- Enter a friendly name (e.g. “Airbnb — Apartment 4”) and the external
.icsURL. - Save.
Listeo Booking Plus pulls events from each imported URL on a schedule and creates blocked bookings on the resource. Imported events are tagged so a later re-fetch can update or remove them cleanly without disturbing real bookings.
Conflict rules
- A booking from your site always wins — imported events never overwrite an existing booking.
- An imported event that overlaps with an existing import is updated, not duplicated.
- Removing an imported calendar removes only its events; manually-added bookings stay put.
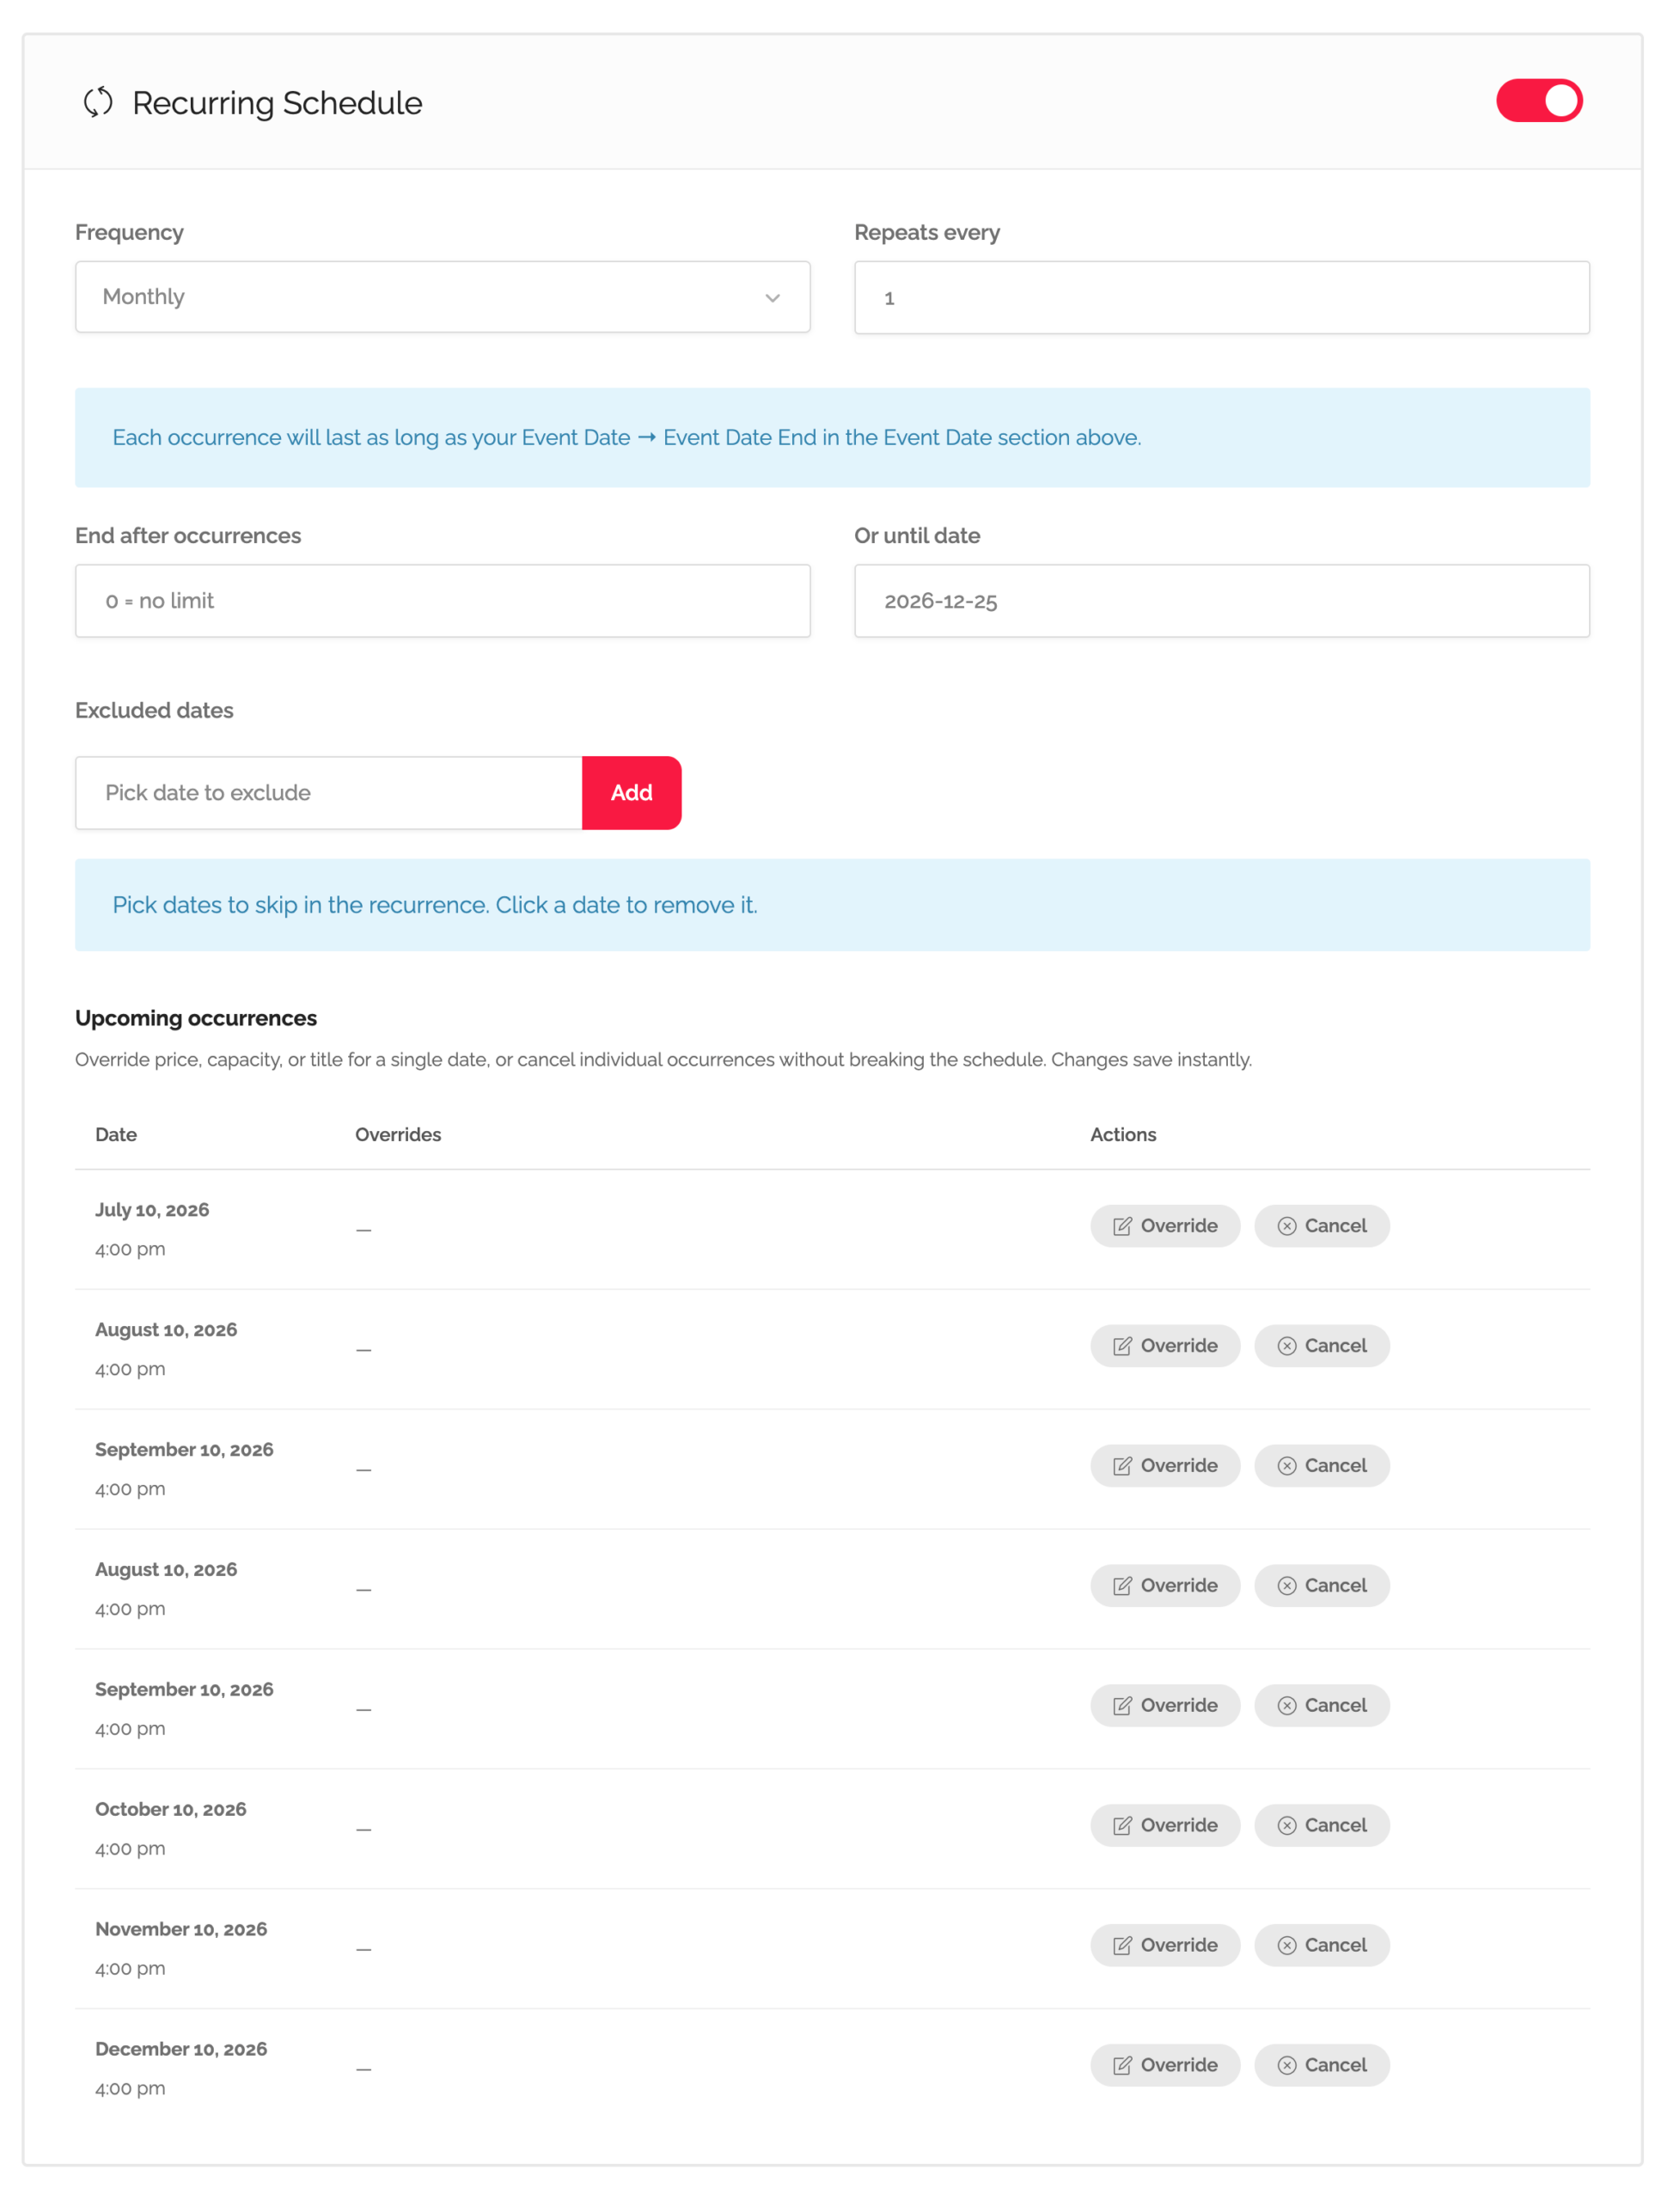
Recurring Events
If you run the same event every week, you don’t need to create 52 listings. Listeo Booking Plus generates occurrences from a single rule and lets you override any individual date without touching the rule itself.
Defining a recurrence rule
- Edit an Event listing.
- Scroll to the Recurrence meta box.
- Pick a pattern: Daily, Weekly, Monthly, or a Custom rule.
- For Weekly, pick the days of the week. For Monthly, pick the day-of-month or a Nth-weekday rule.
- Set the start date and (optionally) an end date.
- Save.
How occurrences are generated
A background cron job materialises future occurrences up to the Recurrence lookahead window – 12 months by default, configurable in Listeo → Settings → Booking. As time passes, the cron extends the window so there’s always ~12 months of bookable dates ahead.
You don’t need to “regenerate” anything manually — saving the listing triggers an immediate refresh of upcoming occurrences.
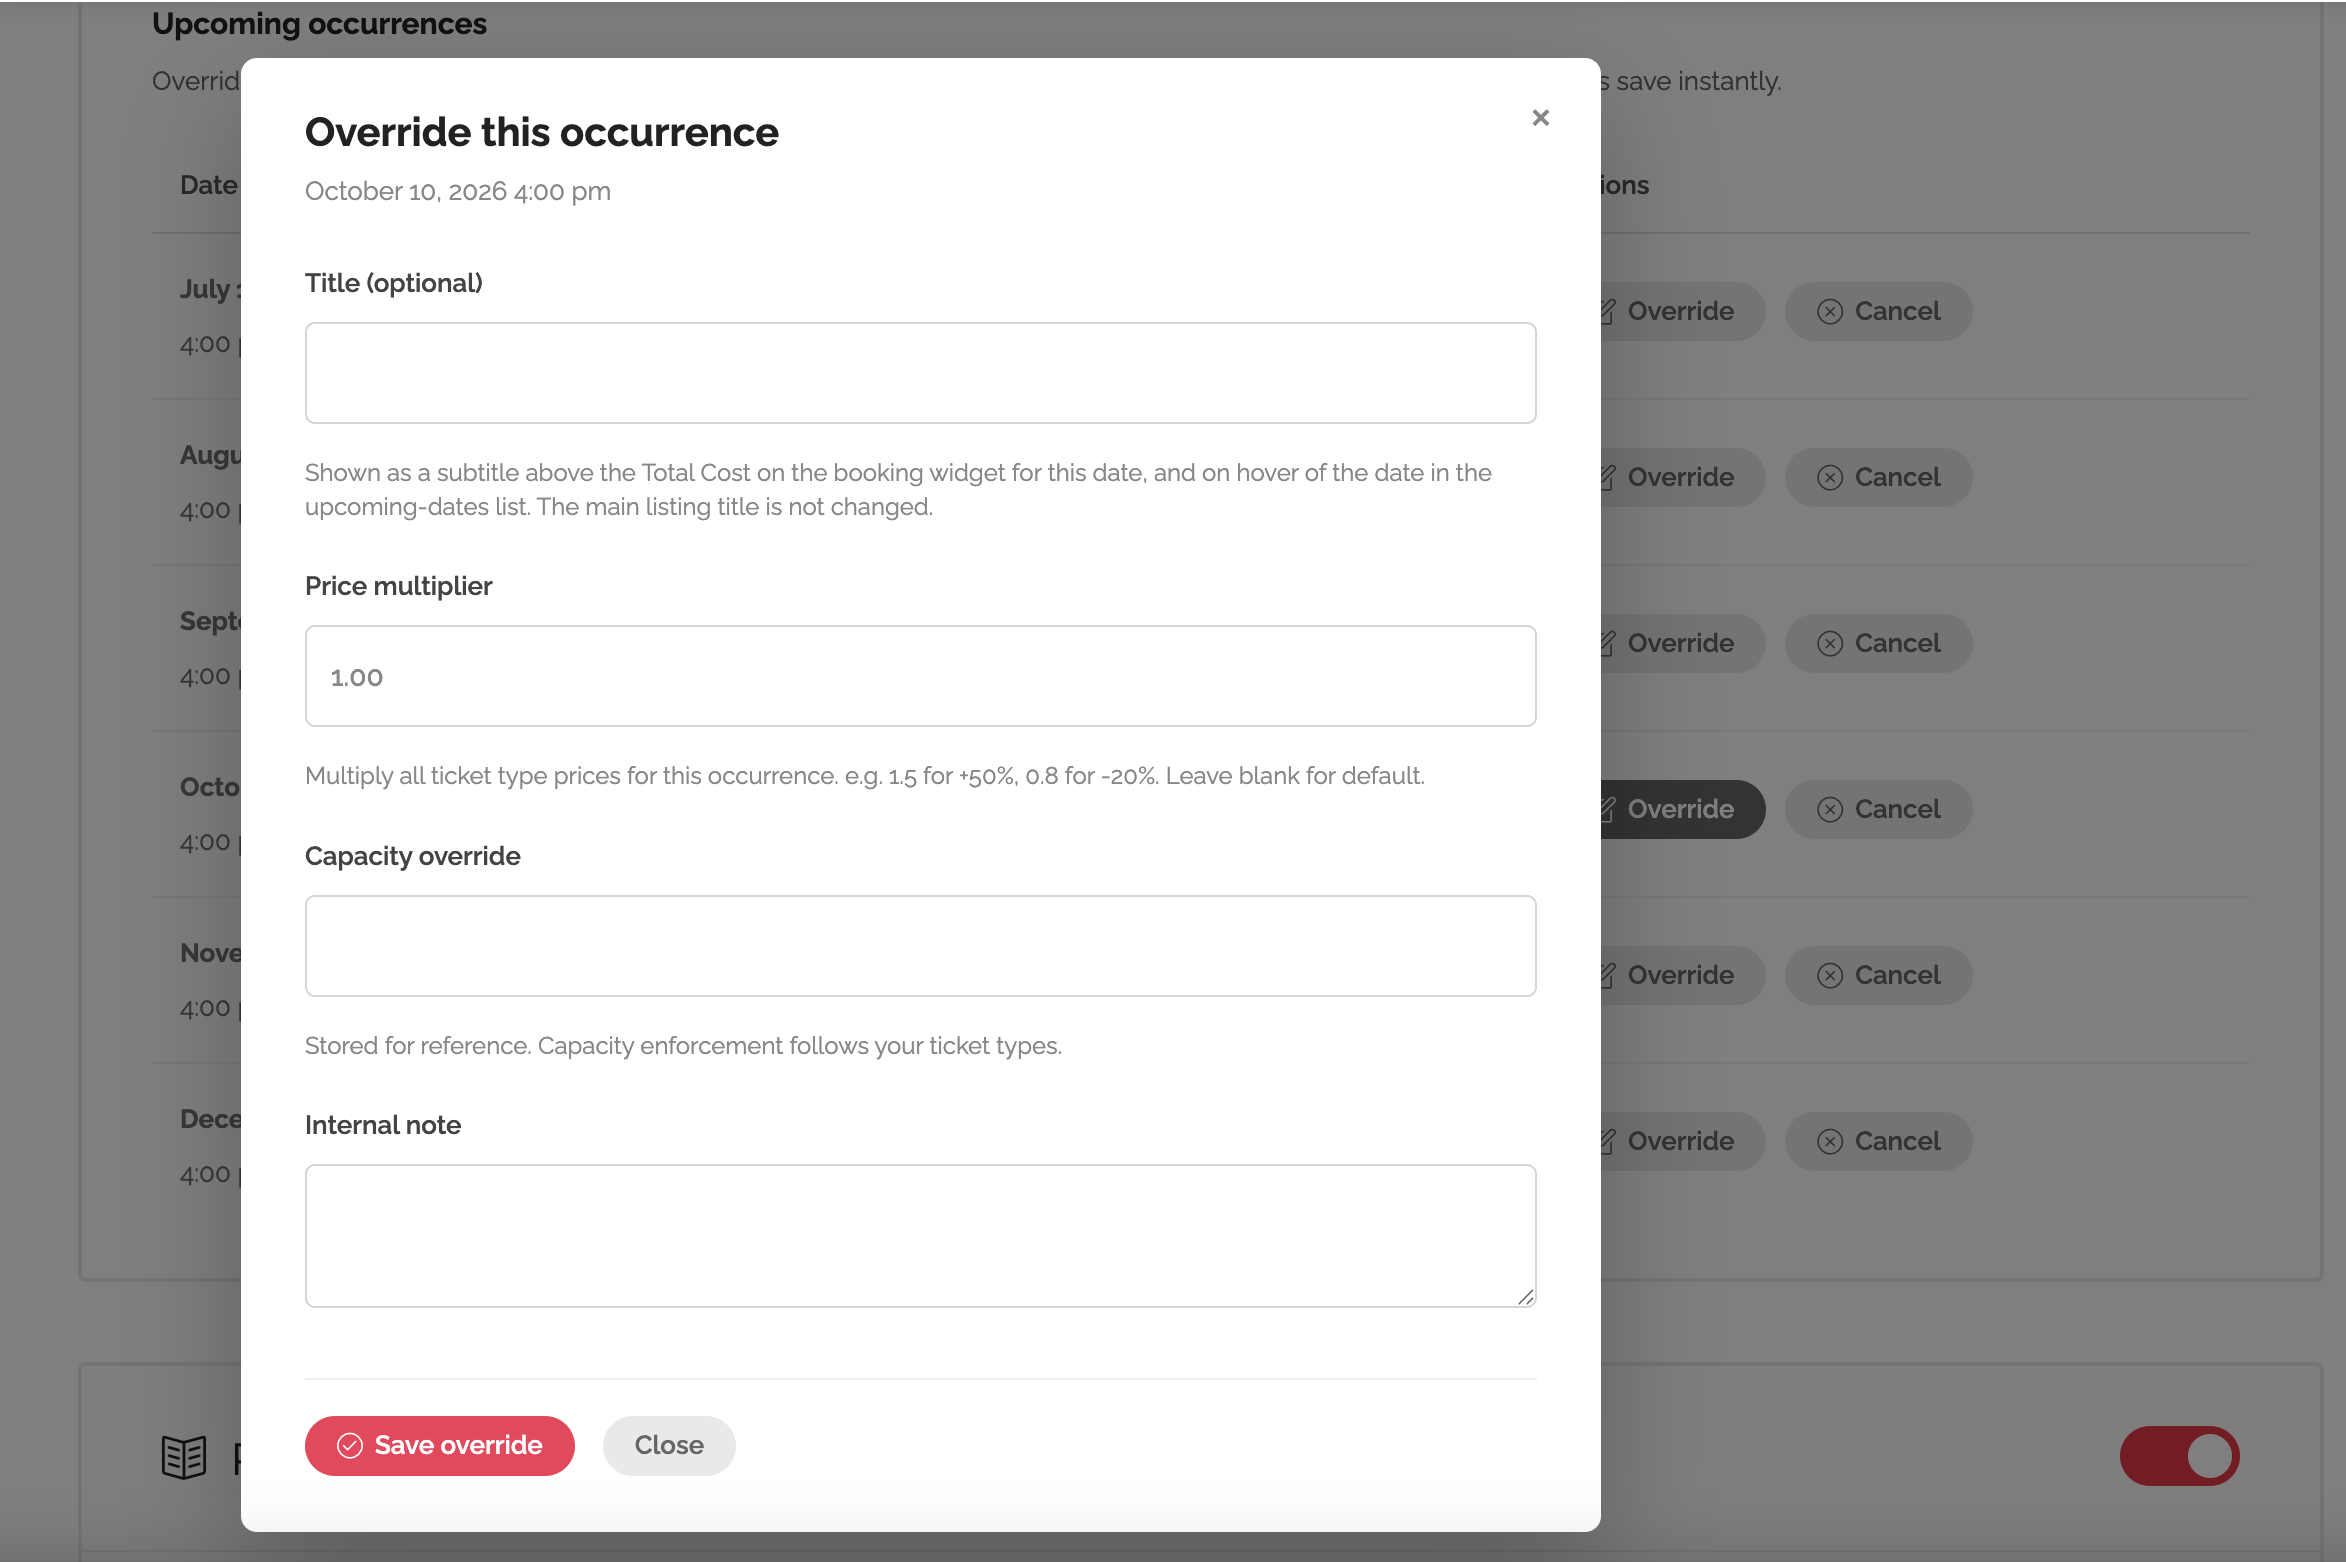
Per-occurrence overrides
Sometimes one specific date needs to be different — a higher price for New Year’s Eve, a smaller capacity because half the venue is being renovated, or just cancelling a single class because the instructor’s on holiday.
- In the Occurrences panel on the listing edit screen, find the date you want to change.
- Click Override.
- Set the override price, override capacity, or Cancel this occurrence.
- Save.
The recurrence rule itself stays unchanged — the override applies only to that one date. Remove the override and the date falls back to the rule’s defaults.
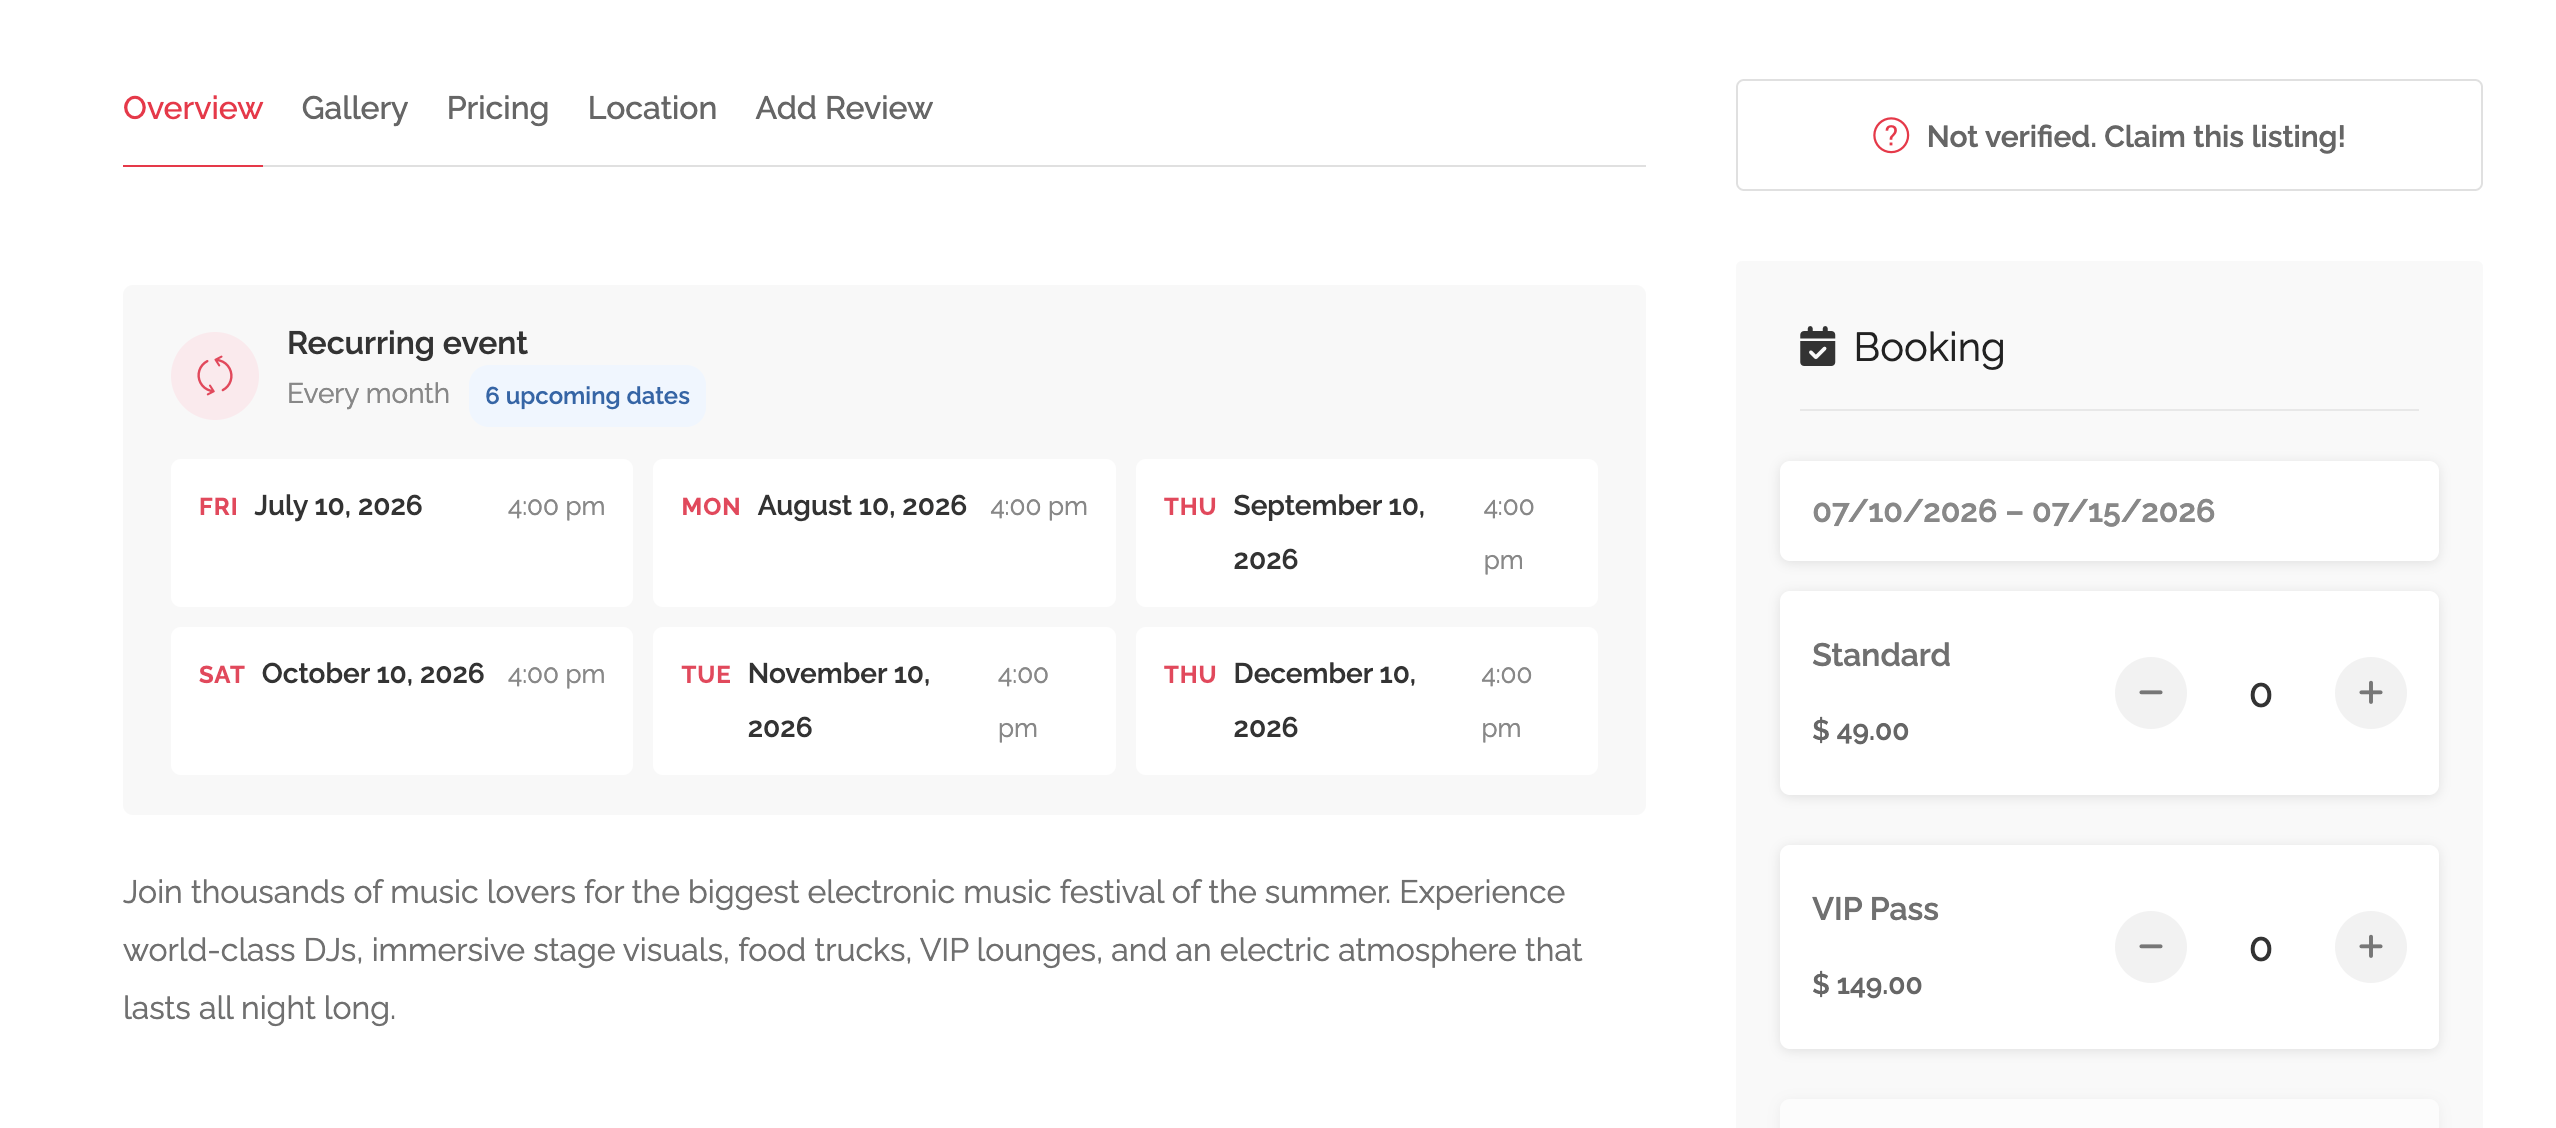
What customers see
The single-event page shows a date picker with all upcoming occurrences. Cancelled occurrences disappear; occurrences with overridden prices show the override price; sold-out occurrences are greyed out.
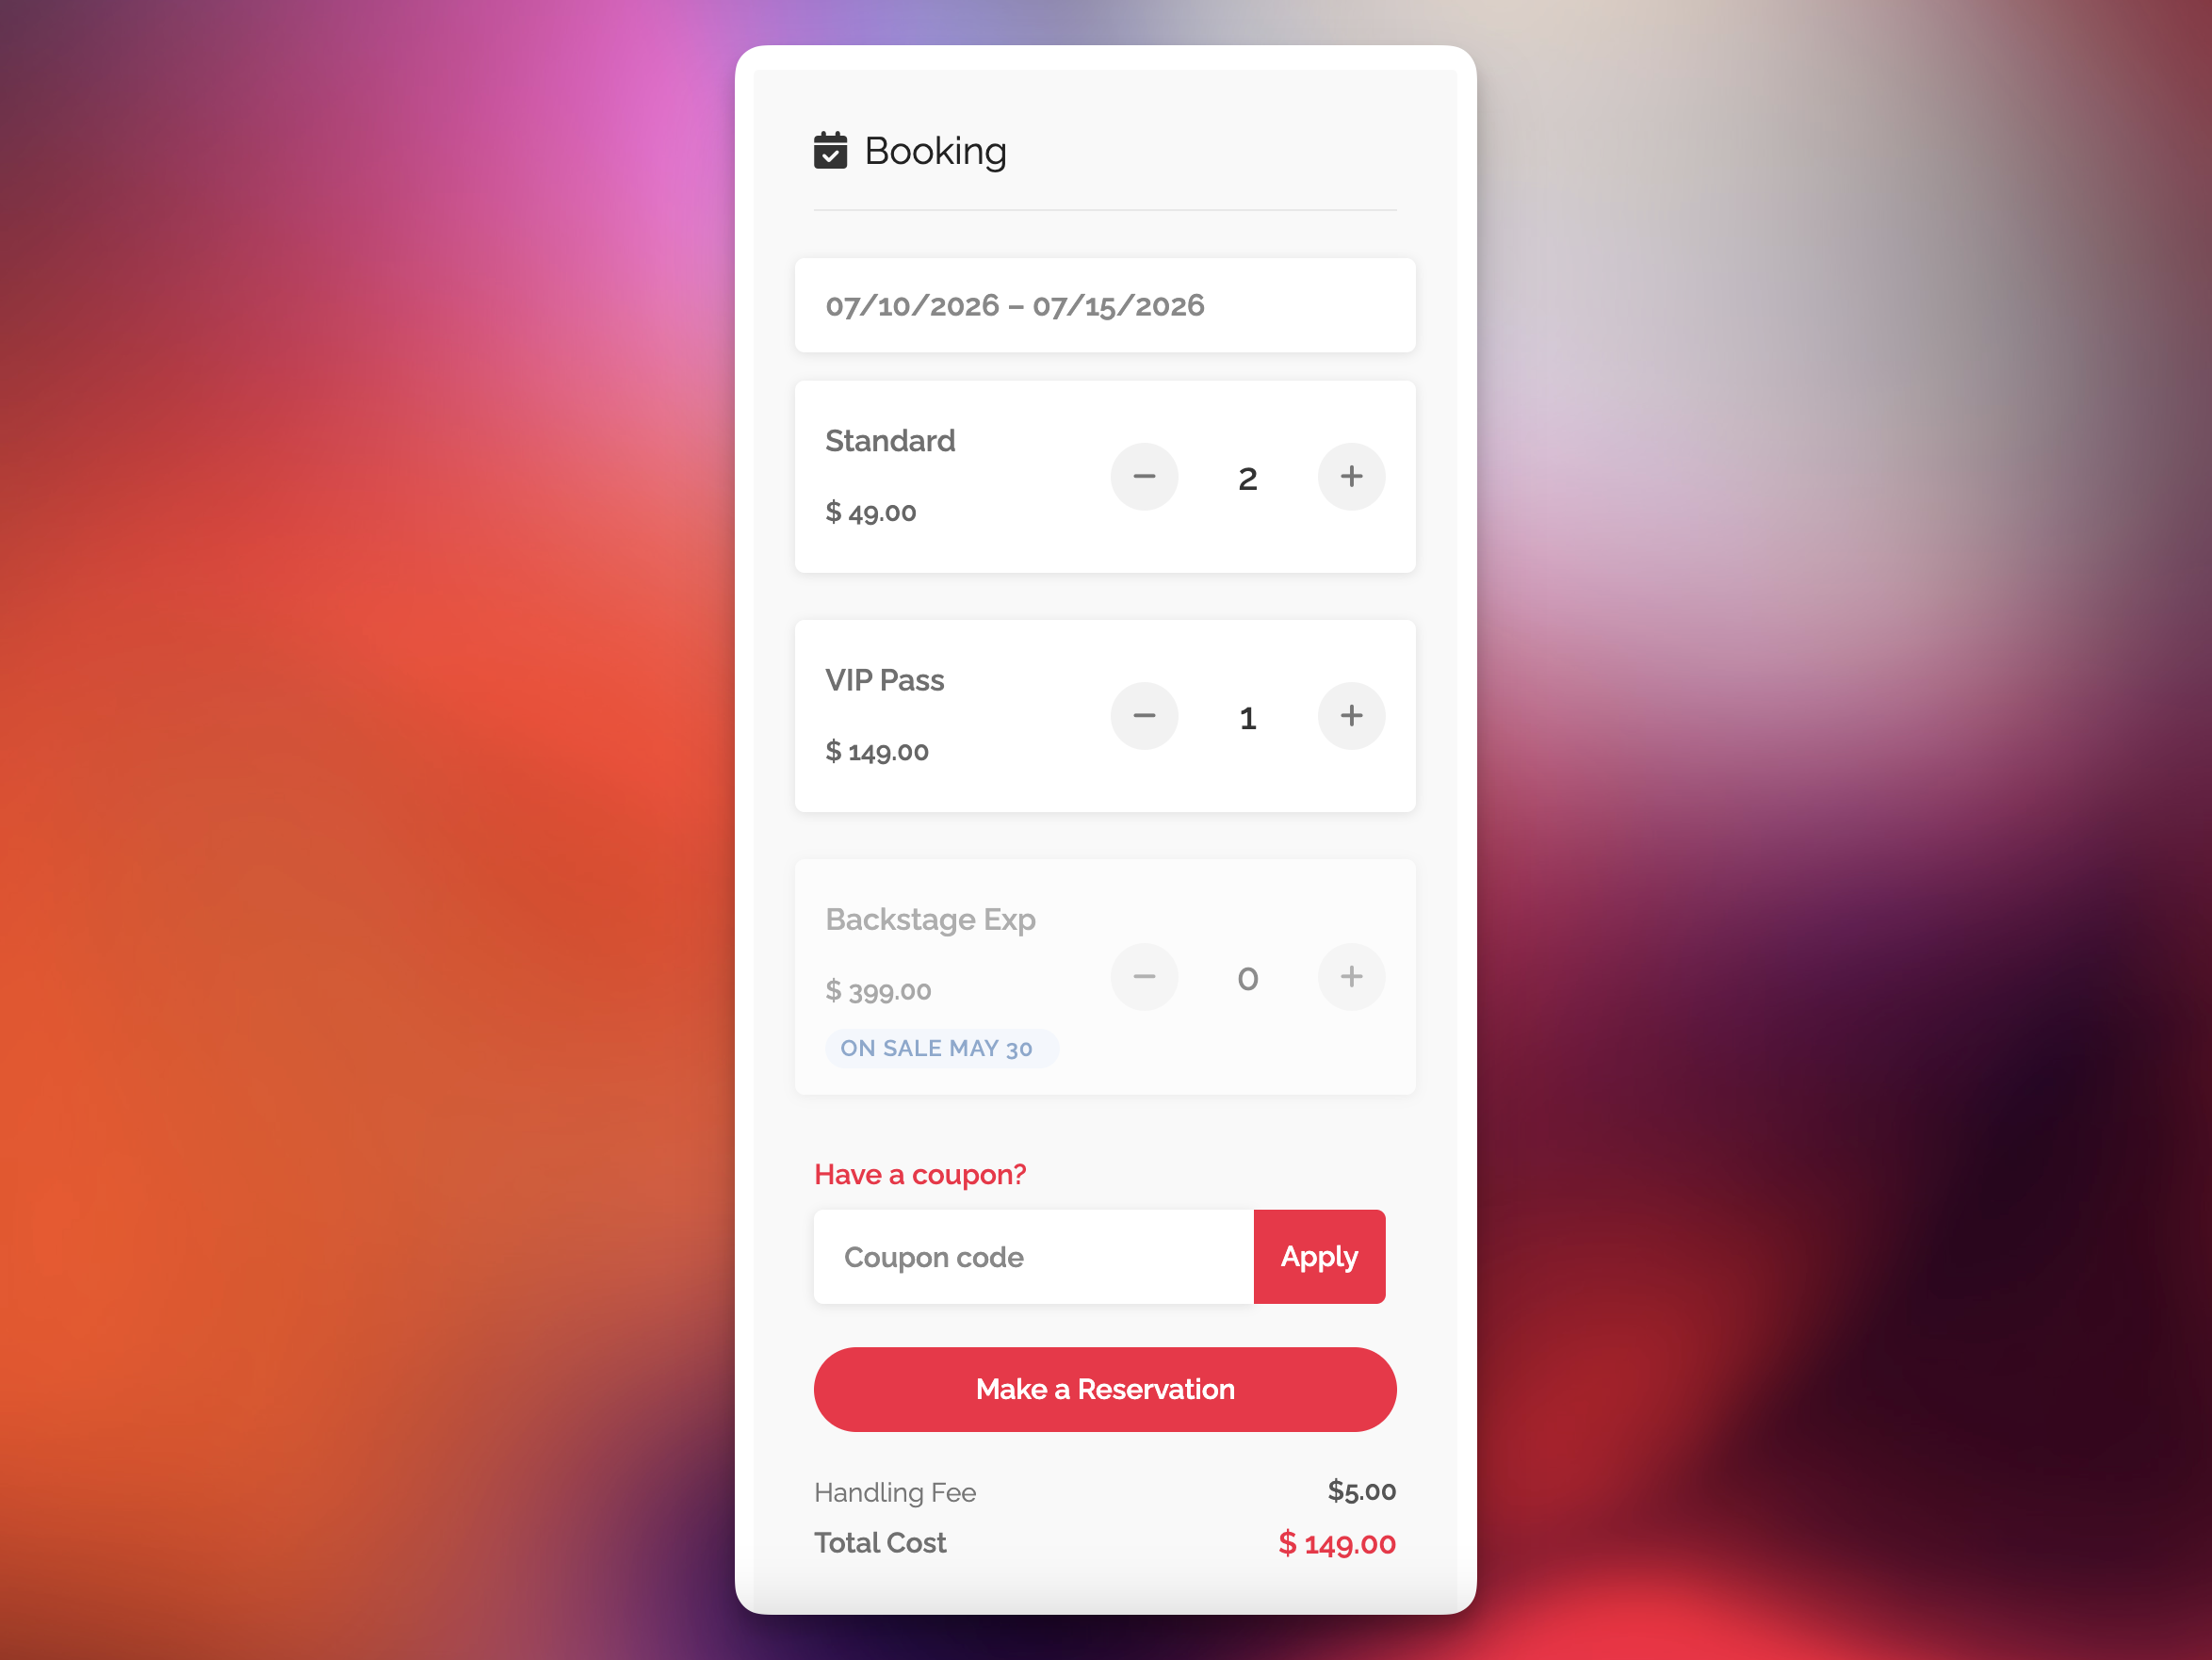
Event Listings & Ticket Types
Listeo Booking Plus turns Listeo’s Event listing type into a real ticketing system. You can define multiple ticket types per event, set capacity per type, control sale rules, and (optionally) collect attendee details at checkout.
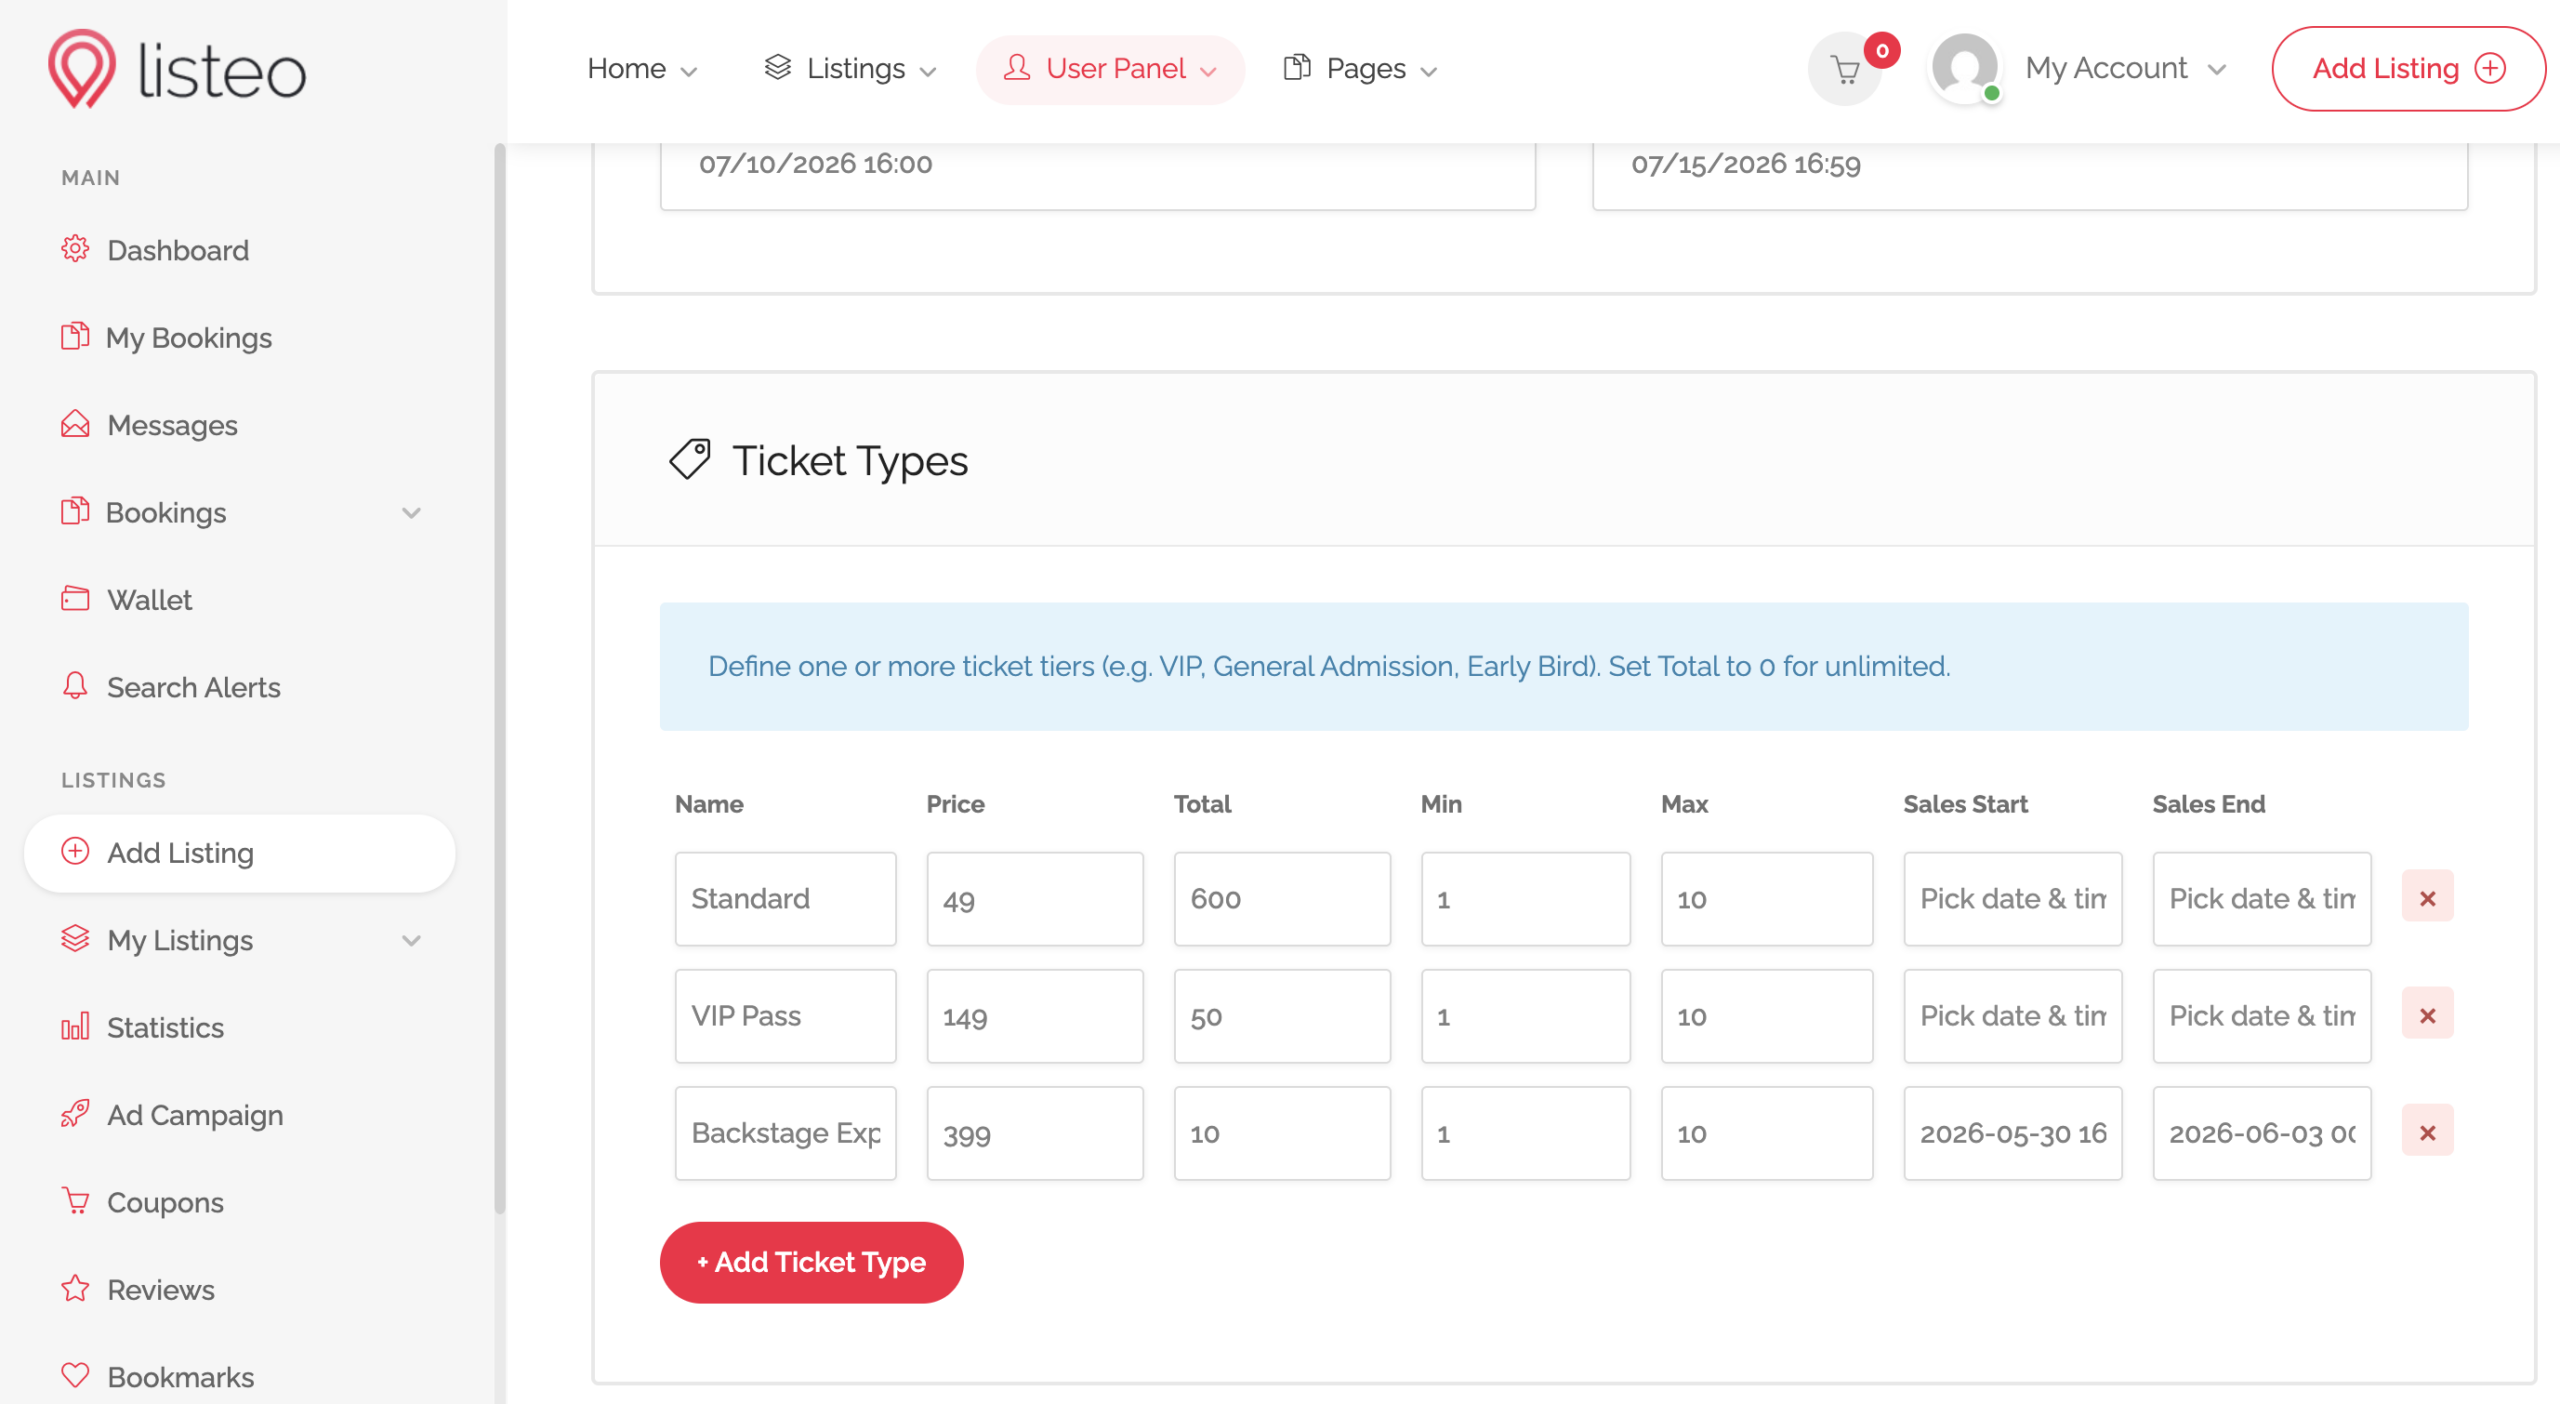
Defining ticket types
- Edit an Event listing.
- Scroll to the Ticket Types meta box.
- Click Add ticket type for each tier — for example: Adult, Child, VIP, Early Bird.
- For each tier set:
- Label — what customers see (“Adult”, “VIP”).
- Price — per-ticket price in your store currency.
- Capacity — how many of this ticket type are available. Leave blank for “as many as the event capacity allows”.
- Min & Max – set how many tickets user could buy at once.
- Sales Start and Sales End date – when tickets will be available
How capacity works
Booking Plus respects two capacity limits at the same time: the per-ticket-type capacity (the cap you set on each tier) and the event total capacity (Core’s listing-level field). Whichever is reached first stops sales for that tier.
Example: an event with total capacity 100 and a “VIP — 20 tickets” tier. Once 20 VIP tickets are sold, the VIP tier shows as sold out even if total ticket sales are well below 100.
The front-end ticket selector
Customers see a quantity selector per ticket type. They can mix tiers in a single booking (2 Adult + 1 Child + 1 VIP), and the booking summary breaks each line out for transparency.
Collecting attendee names and emails
Toggle Collect attendee names and / or Collect attendee emails in Listeo Core → Listeo Booking Plus Settings. When on, the confirmation step shows one name (and / or email) field per ticket. Names appear on the individual e-tickets; emails are stored against the booking so each attendee can be contacted directly.
Reservation holds
When a customer clicks “Book” and lands on the confirmation step, Booking Plus puts a temporary hold on the tickets they’ve selected. While the hold is active, those tickets are invisible to other customers — the inventory shows fewer seats, and the ticket selector won’t let anyone else buy them.
If the customer completes checkout, the hold becomes a real booking. If they abandon the page (or the timer runs out), the hold expires and the seats go back into inventory.
Configuration
- Reservation hold time (minutes) — Listeo → Settings → Booking. Default: 15.
- Raise it if your checkout requires a slow third-party step (a complex payment redirect, a manual approval).
- Lower it on high-demand events where seats need to recycle quickly when checkout is abandoned.
What happens when a hold expires
The customer doesn’t get an aggressive error — when they submit the form, the system re-checks availability and tells them politely that their hold expired and to pick again. No silent overselling.
Individual ticket codes
When Generate individual ticket codes is on (default), Booking Plus creates one unique scannable code per ticket — not per booking. A family that buys 4 tickets gets 4 codes.
Where customers see their codes
- In the booking confirmation email.
- On the booking detail page in their dashboard.
- Each code includes a QR for the door scanner.
Why per-ticket and not per-booking
Door scanning works ticket-by-ticket: each attendee can arrive separately, get their own code scanned, and the system marks just that ticket as used. With one code per booking, a single scan would either let the whole family in (no count) or block subsequent scans (annoying).
If you really do want per-booking codes (small private event, you trust the headcount), switch the setting off and the legacy single-code-per-booking behaviour comes back.
The Booking Popup – Appearance & Steps
The booking popup is the customer-facing modal used by every booking type — Services, Rentals and Events. Booking Plus replaces Listeo Core’s inline booking widget with this multi-step popup whenever the listing is configured to use Booking Plus features (resources or ticket types).
The steps
| # | Step | When it appears |
|---|---|---|
| 1 | Resource | When the listing has resources attached. Picks which resource to book. |
| 2 | Date/time | Always. Picks the date(s) and (for time-aware bookings) the time slot. |
| 2 / 3 | Tickets | Event listings. Pick ticket types and quantities. |
| Last | Confirm | Always. Reviews the booking, collects guest info, optional attendee details. |
| Last+1 | Success | After a successful booking. Shows confirmation + next steps. |
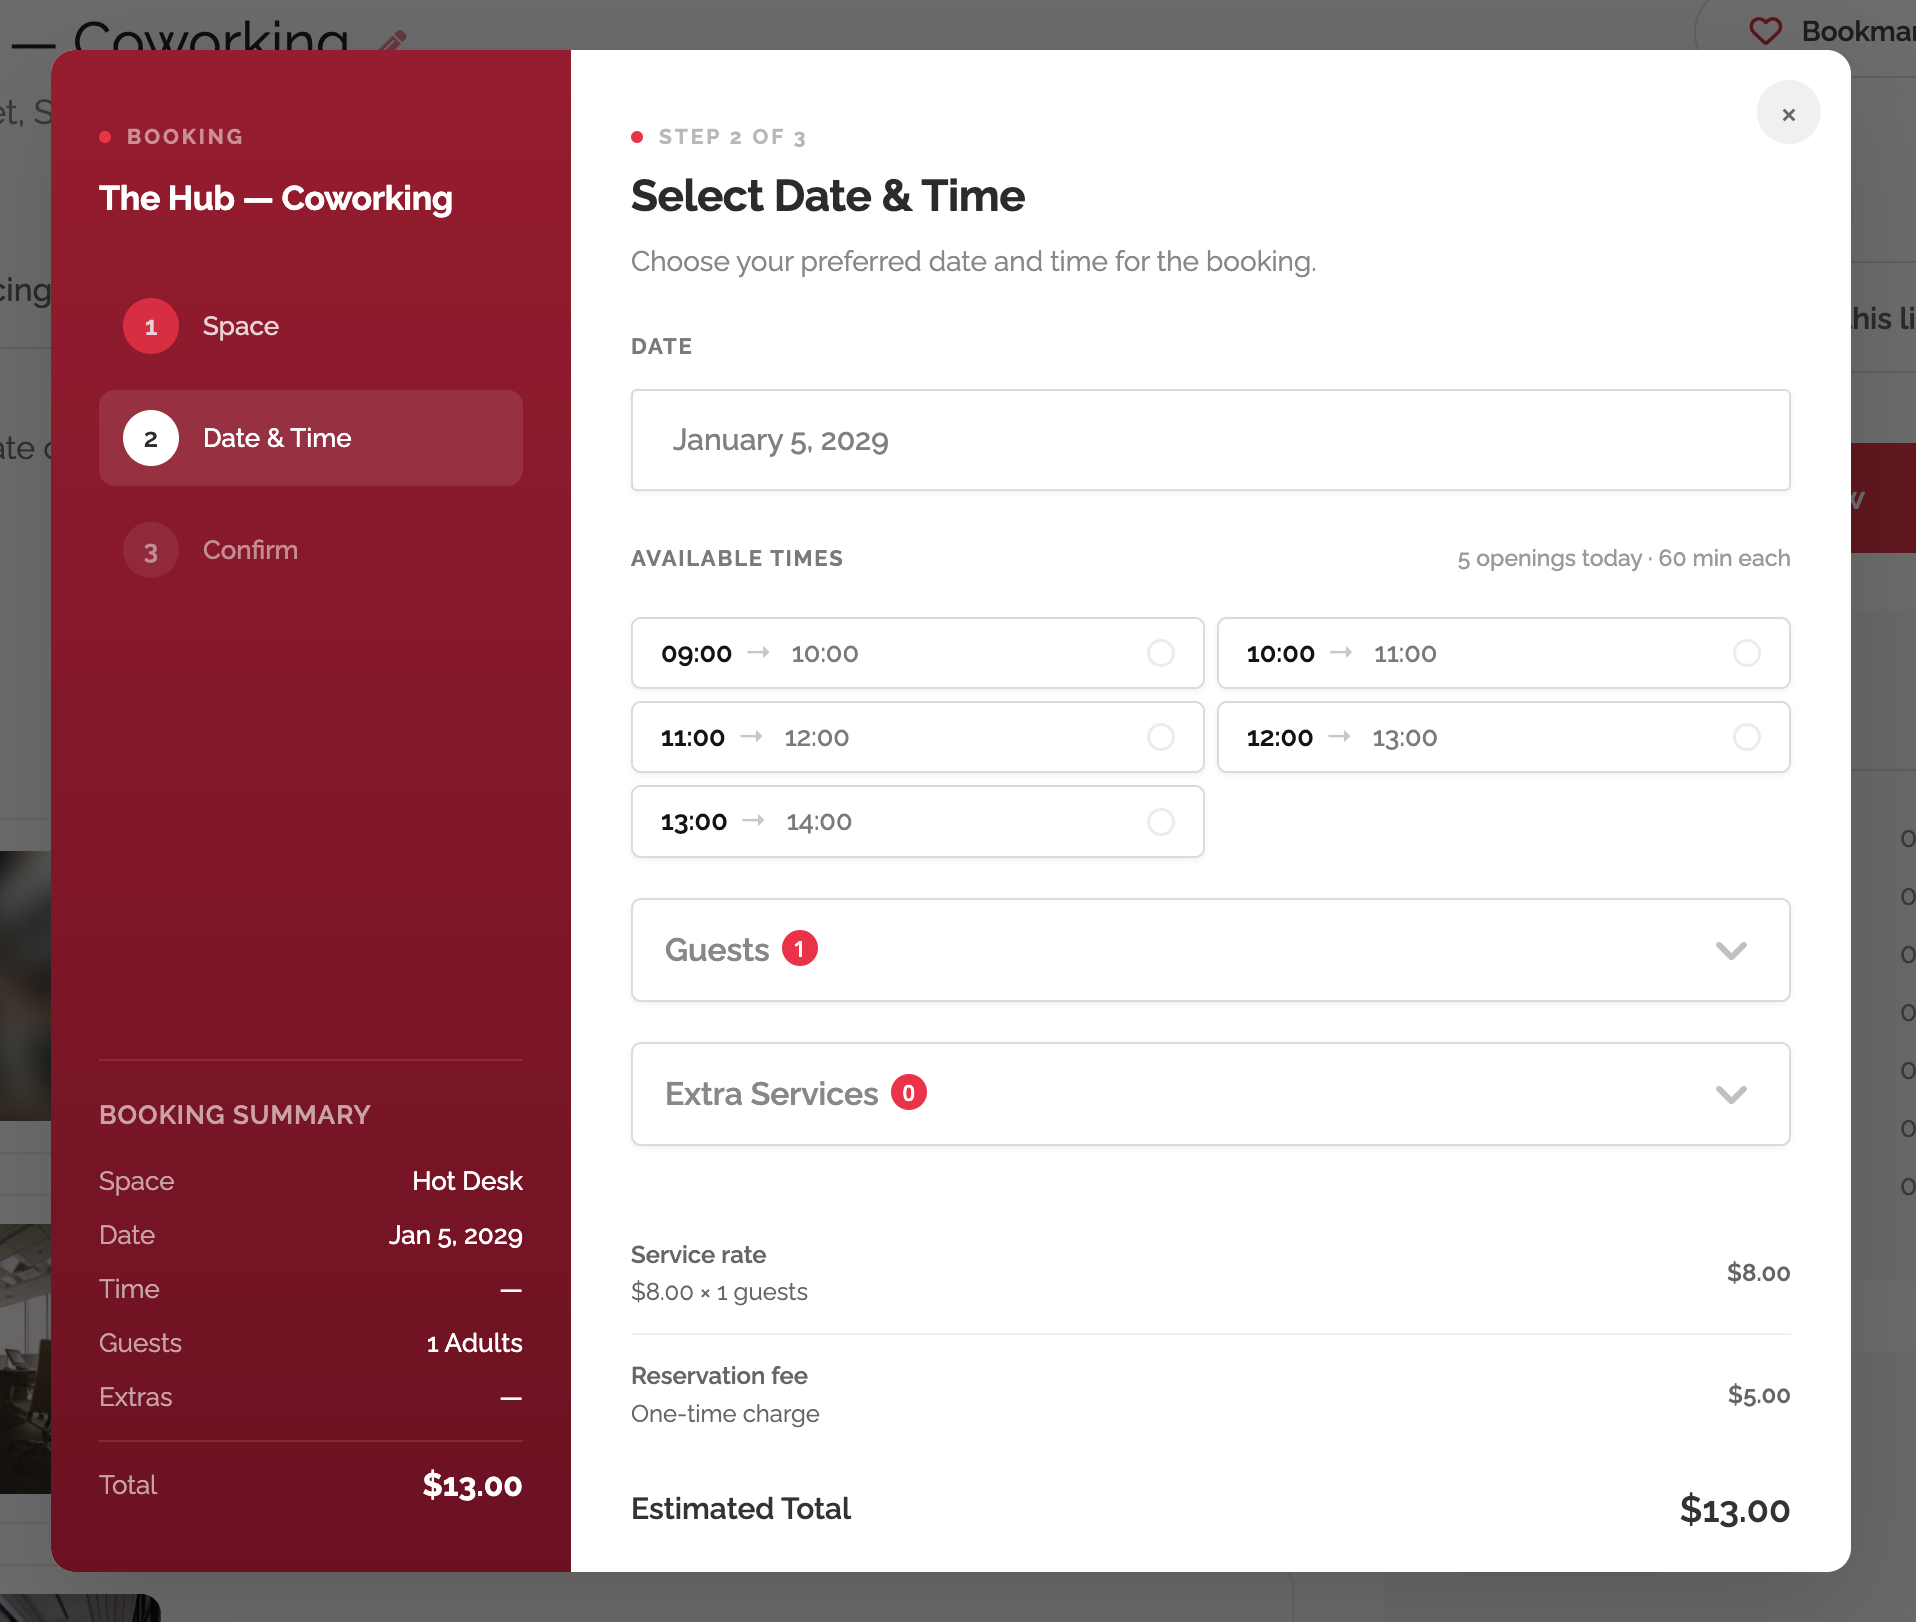
Customising appearance
Three colors in Listeo → Settings → Booking → Booking Popup Appearance control the look:
- Popup sidebar — color — main sidebar background. Defaults to
#2d2d32(close to black). - Popup sidebar — gradient end (optional) — set this for a gradient sidebar; leave blank for solid.
- Popup accent color — used for the dot before each section label, the active step number, the “Next” button, and selection highlights. Defaults to
#3b82f6(blue).
Values are injected as CSS custom properties before the popup paints — no flicker of the old color when the page loads.
Mobile behaviour
The popup goes full-screen on mobile and the multi-step navigation collapses to a top progress bar. Sidebar content moves to a collapsible header so the form always has the full screen width.
Overriding the templates in a child theme
Every step is a separate template file you can override (see Customizing Templates):
templates/booking/modal.php— the popup shell.templates/booking/modal-sidebar.php— the left sidebar.templates/booking/modal-step-datetime.phptemplates/booking/modal-step-resource.phptemplates/booking/modal-step-confirm.phptemplates/booking/modal-step-success.php
