Author Archive

Listeo Health Check

The Listeo Site Health (click Listeo Health in admin toolbar) page provides a diagnostic dashboard for monitoring your WordPress site’s technical status and resolving issues quickly.

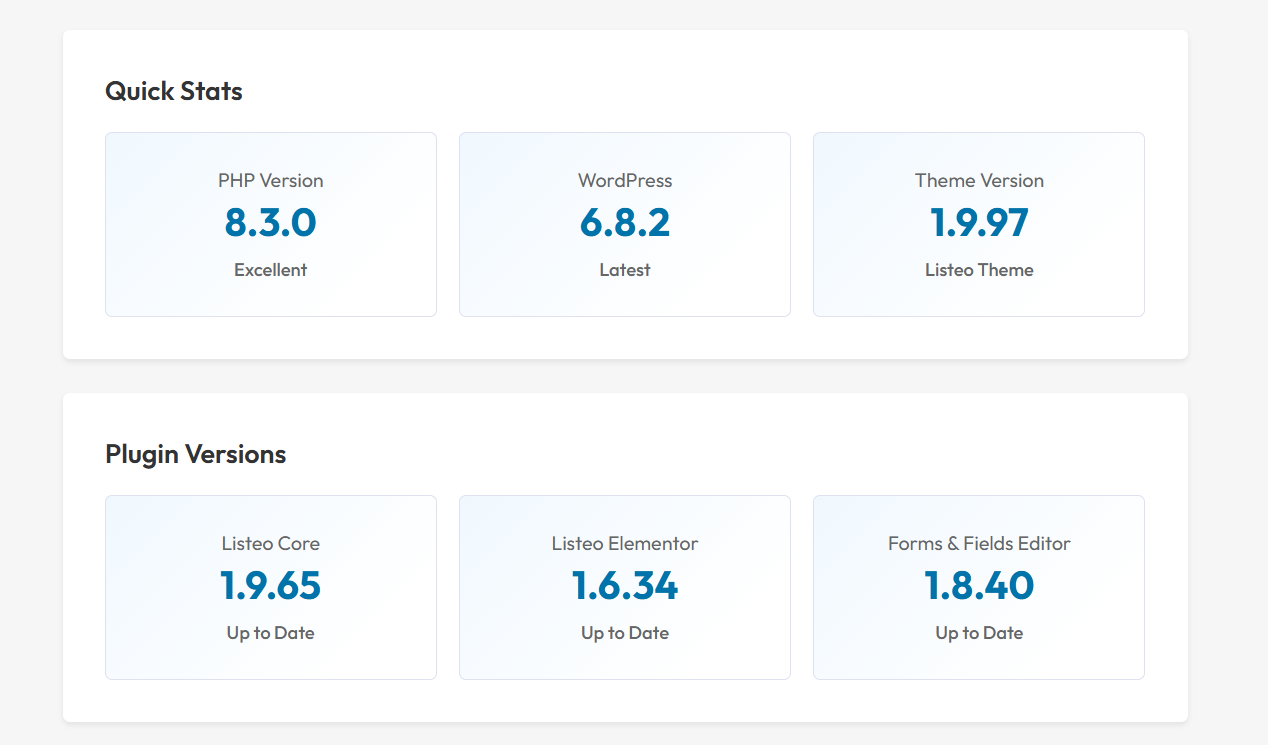
Quick Stats & Plugin Versions

Shows version information for PHP, WordPress, and Listeo theme with color-coded status indicators (green = good, yellow = warning, red = critical).

Monitors essential Listeo plugins and flags version mismatches. Keep all plugins updated to maintain compatibility.


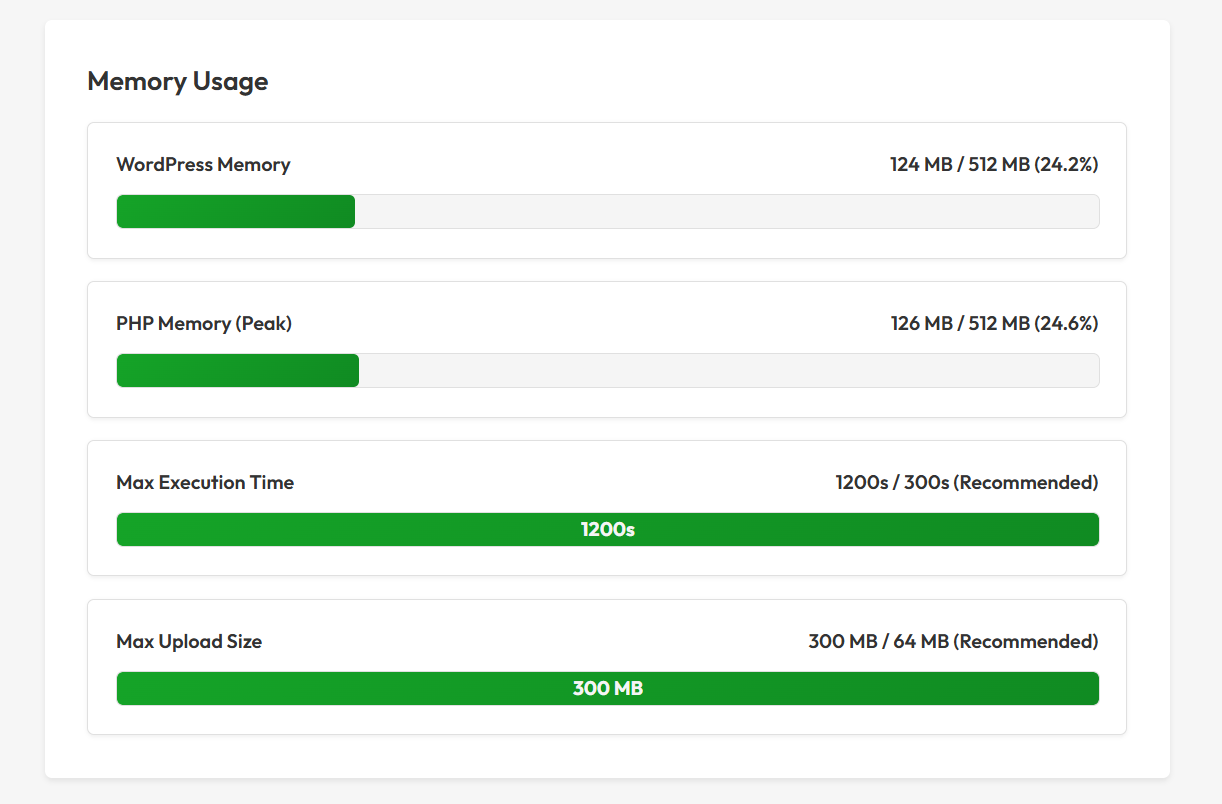
Memory Usage

Tracks server resource consumption including WordPress memory, PHP memory, execution time, and upload limits. Visual bars show usage percentages.
Common issues with too low memory limit:

  • Fatal error: Allowed memory size exhausted – The classic white screen with memory error message
  • Plugin activation failures – Plugins won’t activate or suddenly deactivate themselves
  • Admin dashboard won’t load – Blank pages or incomplete loading in wp-admin area
  • Media upload failures – Can’t upload images or files, especially larger ones
  • White screen of death – Completely blank pages on frontend or backend
  • Elementor not loading and asking for safe mode


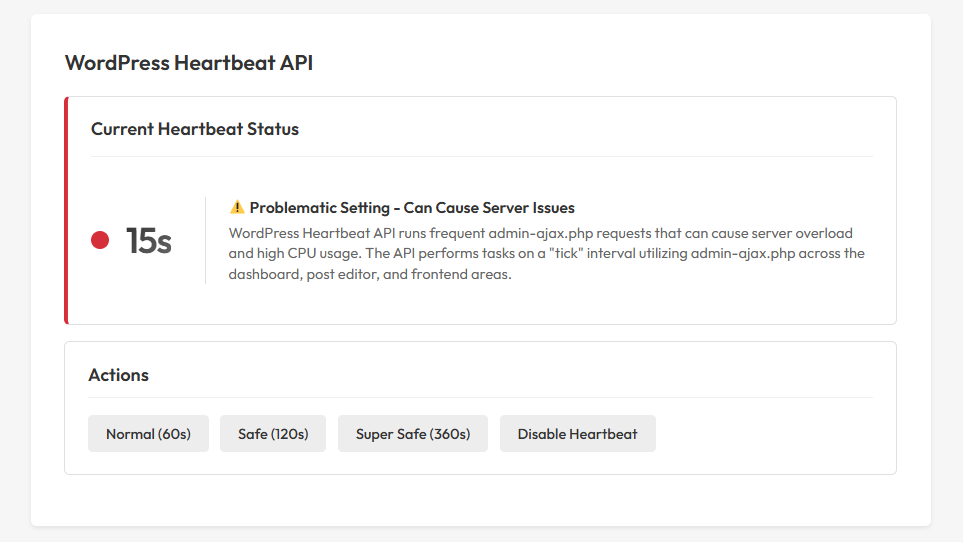
WordPress Heartbeat API

WordPress Heartbeat API runs frequent admin-ajax.php requests that can cause server overload and high CPU usage. The API performs tasks on a “tick” interval utilizing admin-ajax.php across the dashboard, post editor, and frontend areas.


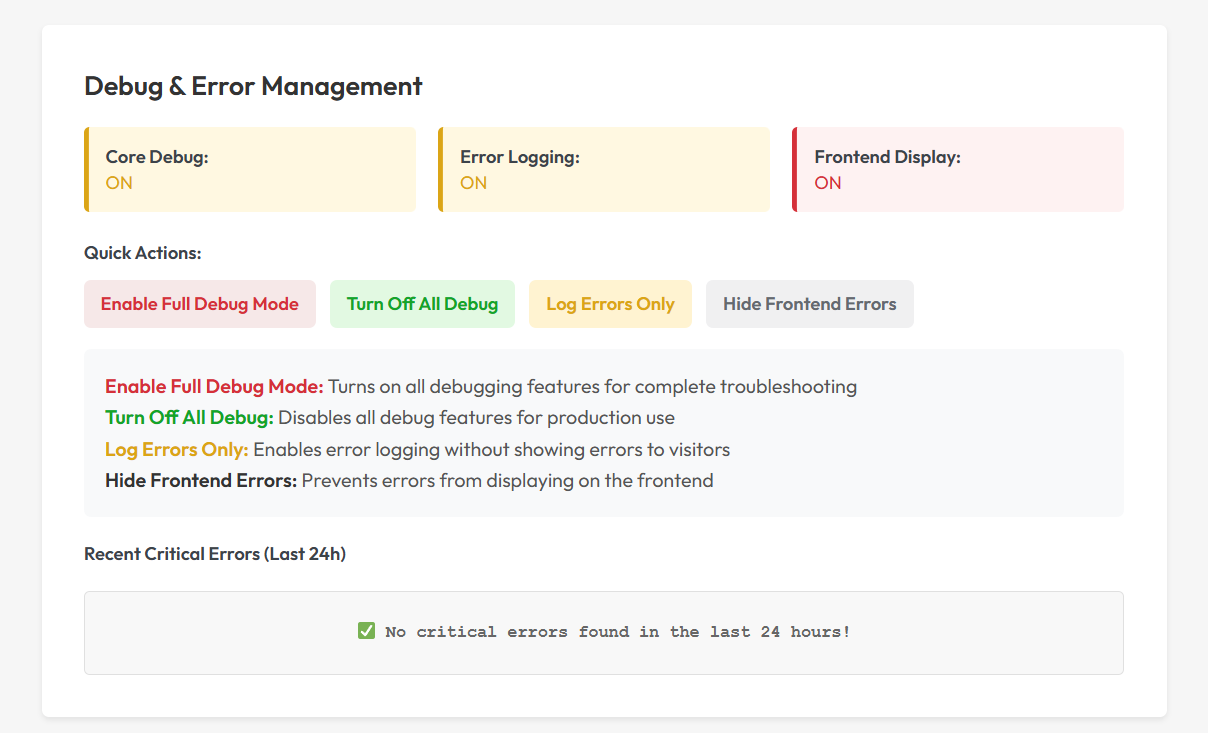
Debug & Error Management

Controls debugging features and displays recent error logs. Quick action buttons:

  • Enable Full Debug Mode – For troubleshooting
  • Turn Off All Debug – For production sites
  • Log Errors Only – Records errors without public display
  • Hide Frontend Errors – Prevents visitor-facing error messages


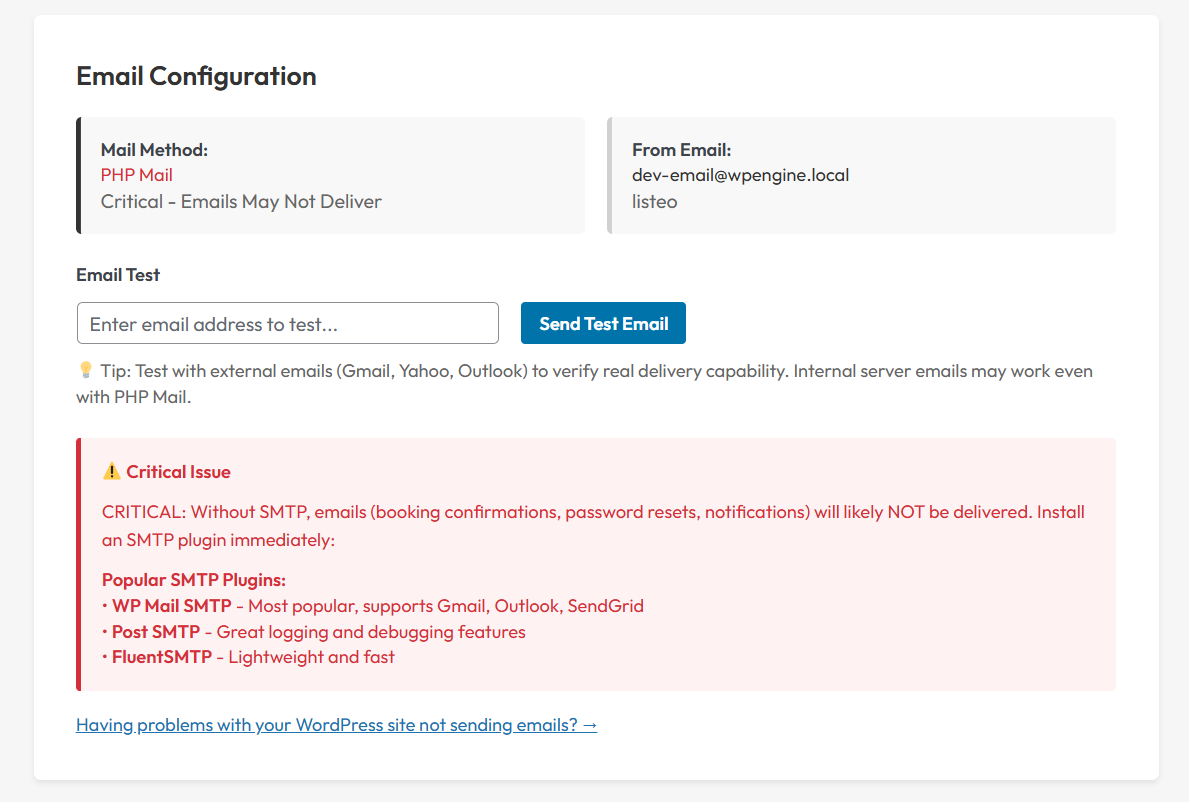
Email Configuration

Monitors email delivery method and provides testing tools. PHP Mail method is unreliable – install an SMTP plugin for better delivery.


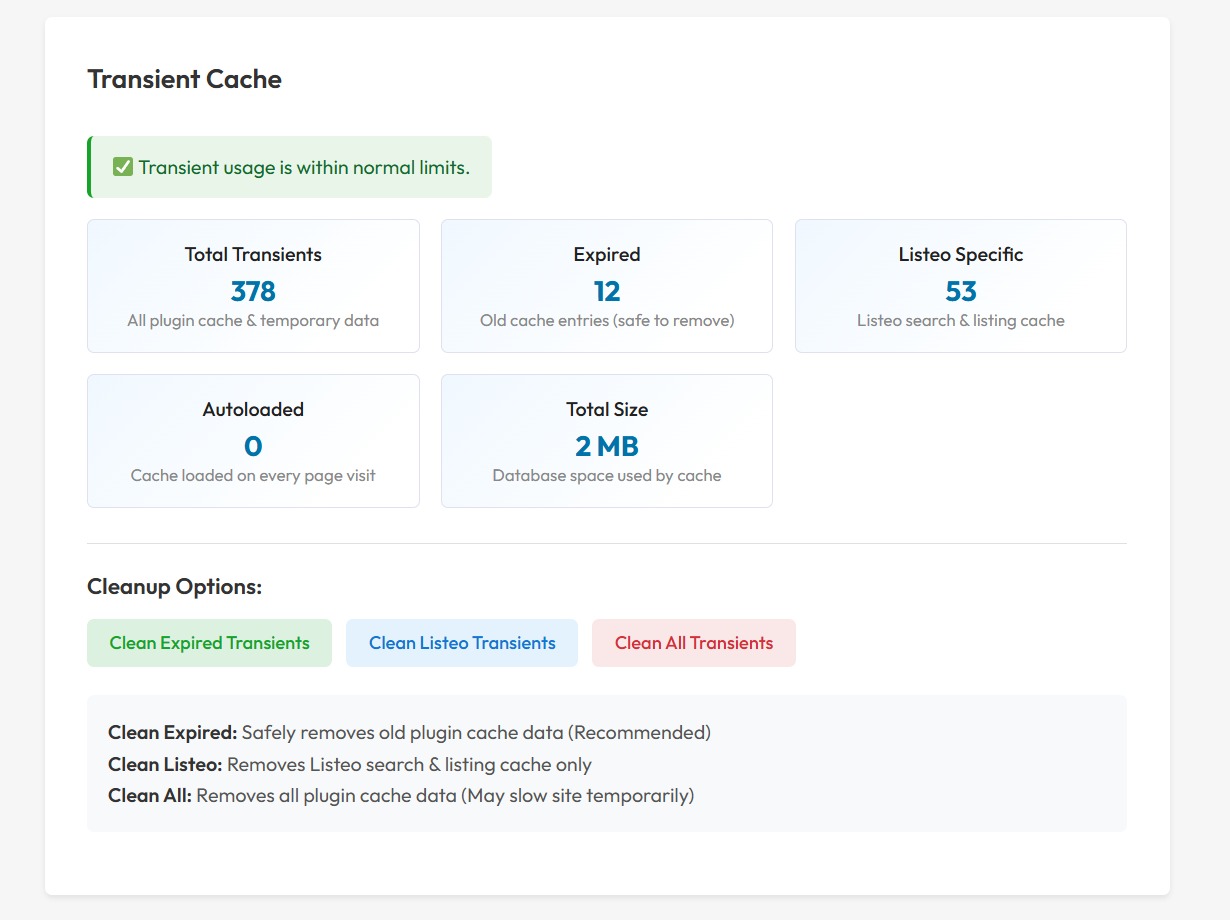
Transient Cache


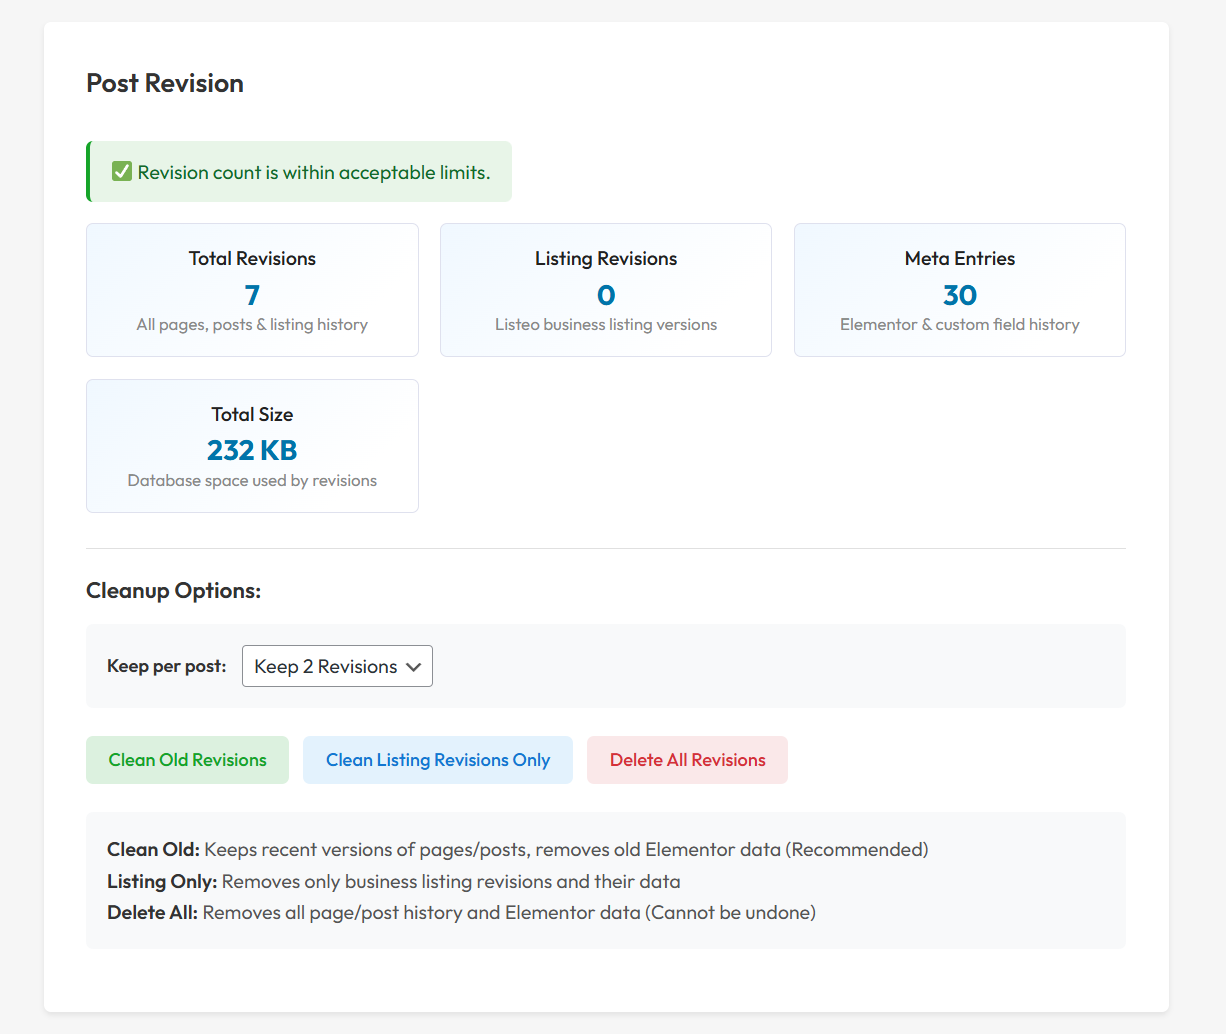
Post Revision


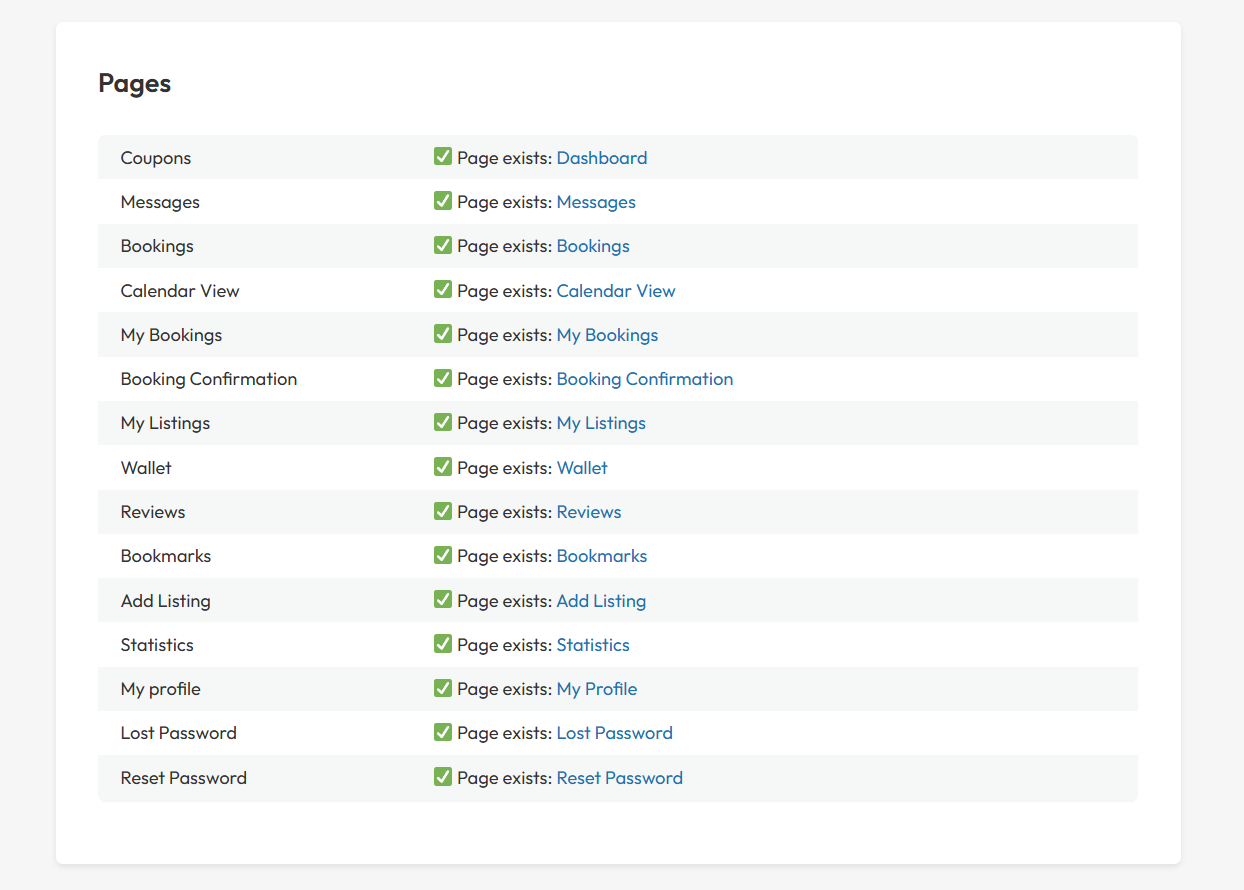
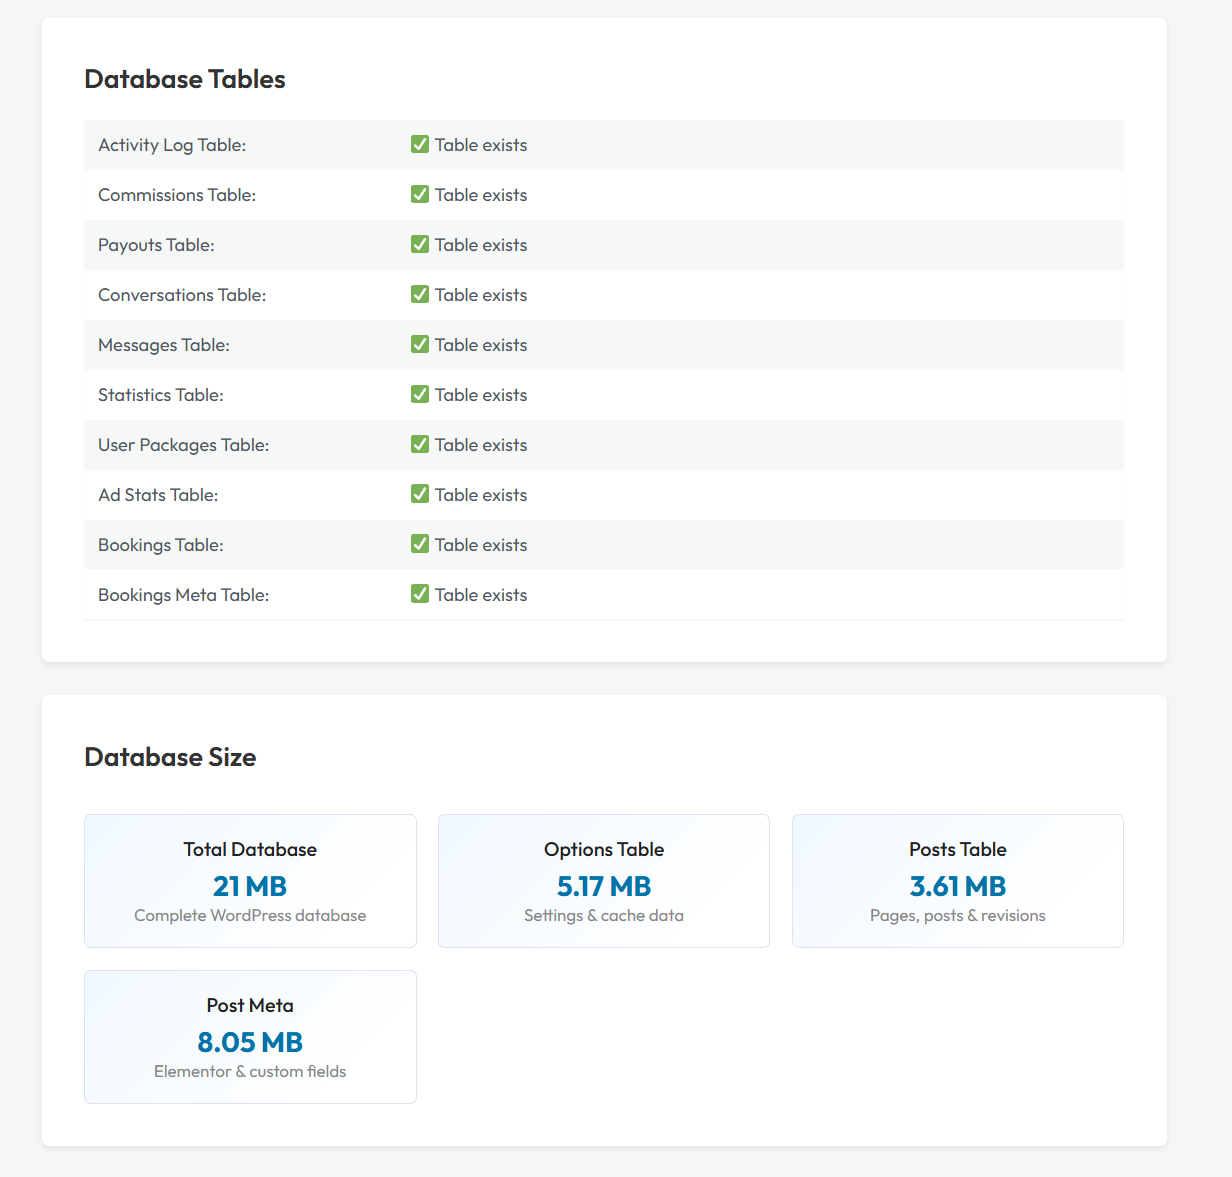
Pages & Database tables


Conditional search filters for categories

In Listeo each custom field added to a taxonomy (category or region) can be also a search filter.
How to use?

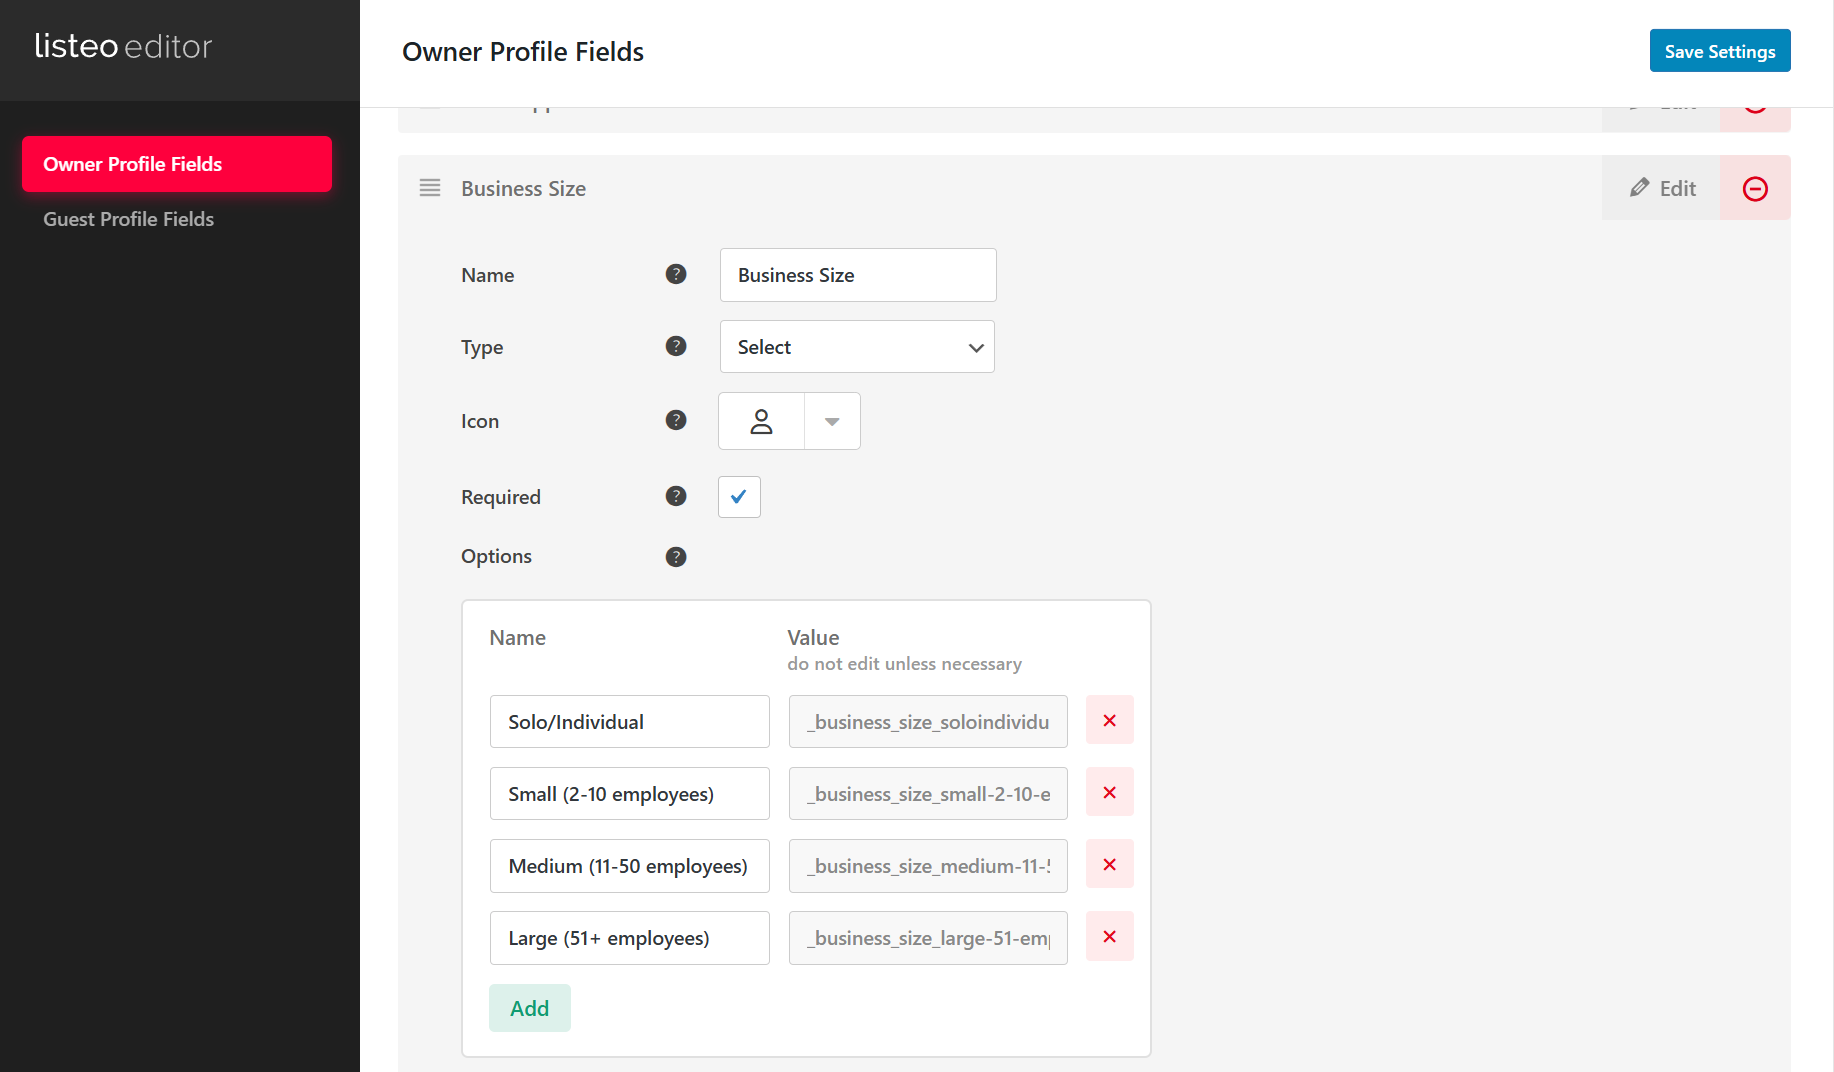
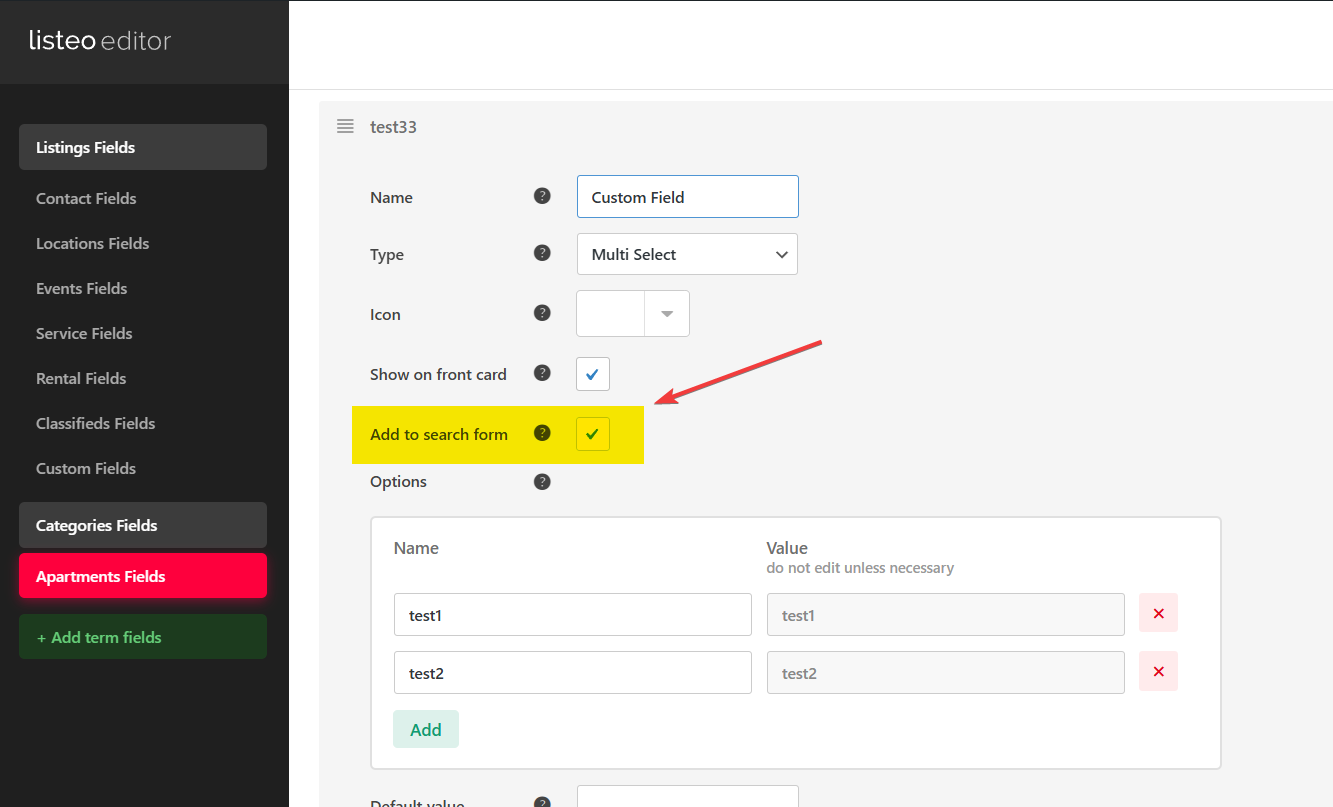
First, navigate to Listeo Editor and add custom fields to categories or regions as described in article below.
Adding custom fields and displaying them on listing page

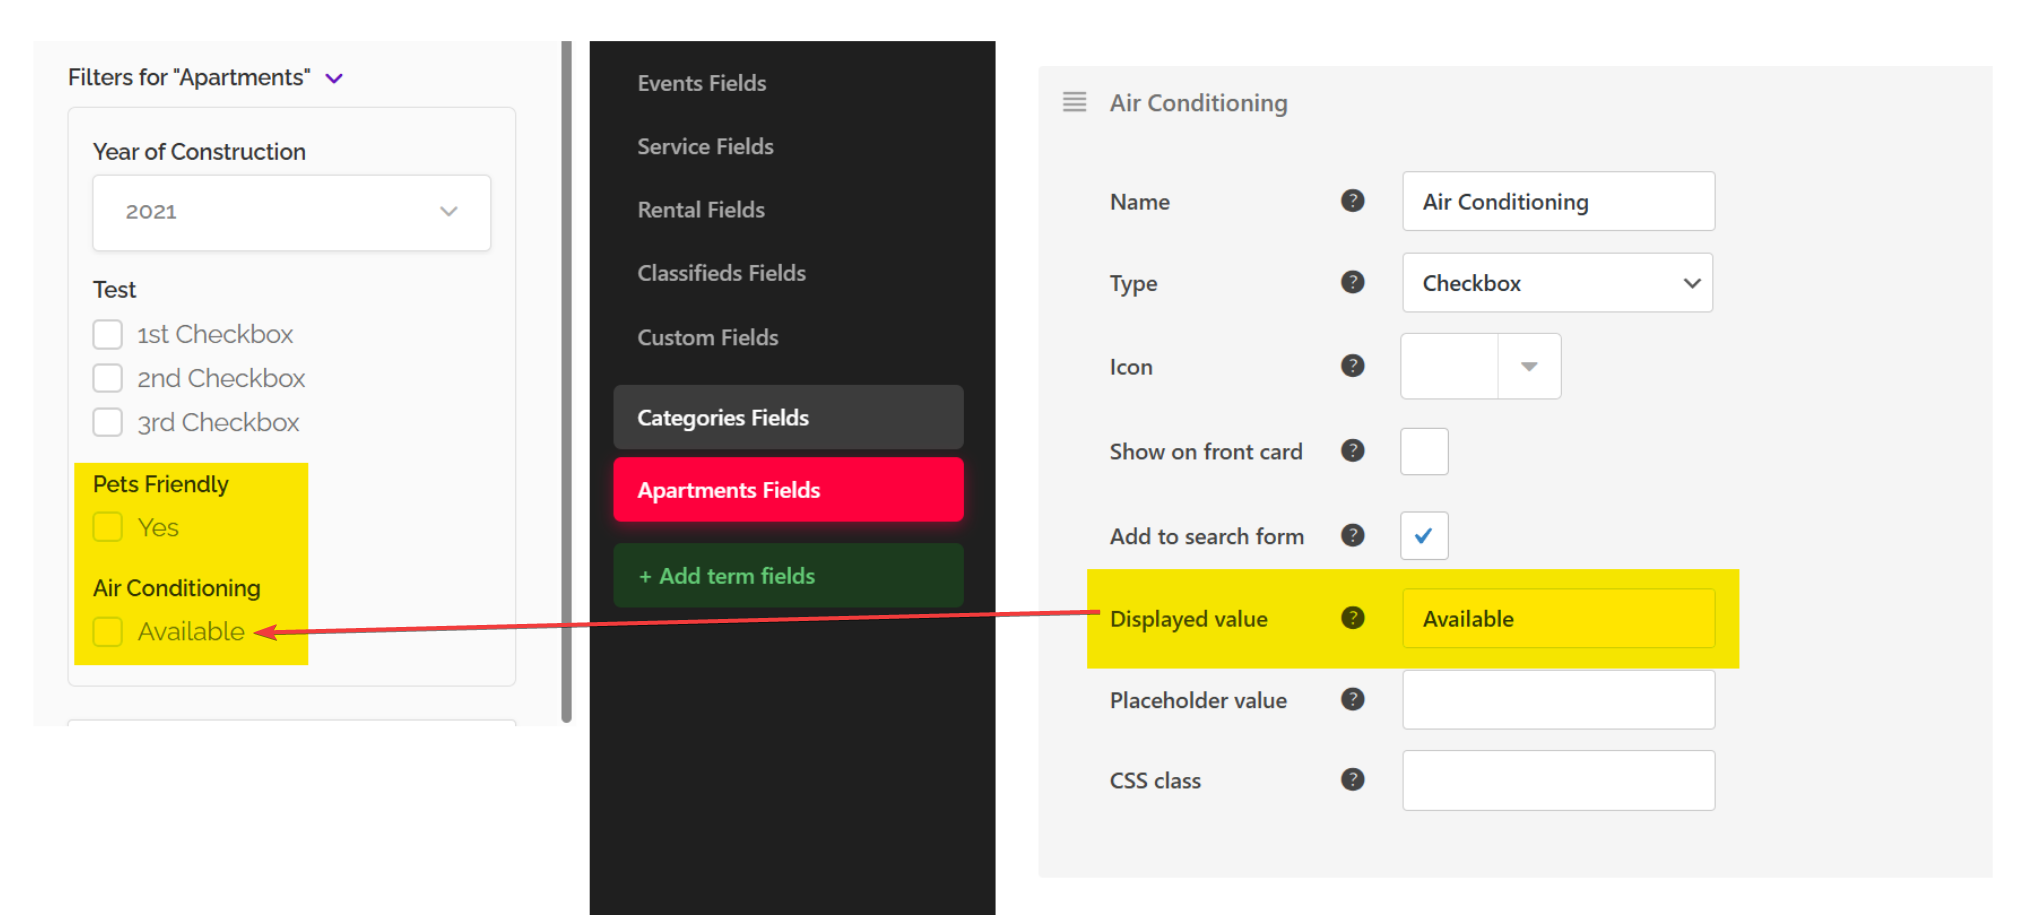
Then check “add to search form” option. This will make field appear below category filter as an additional filter.

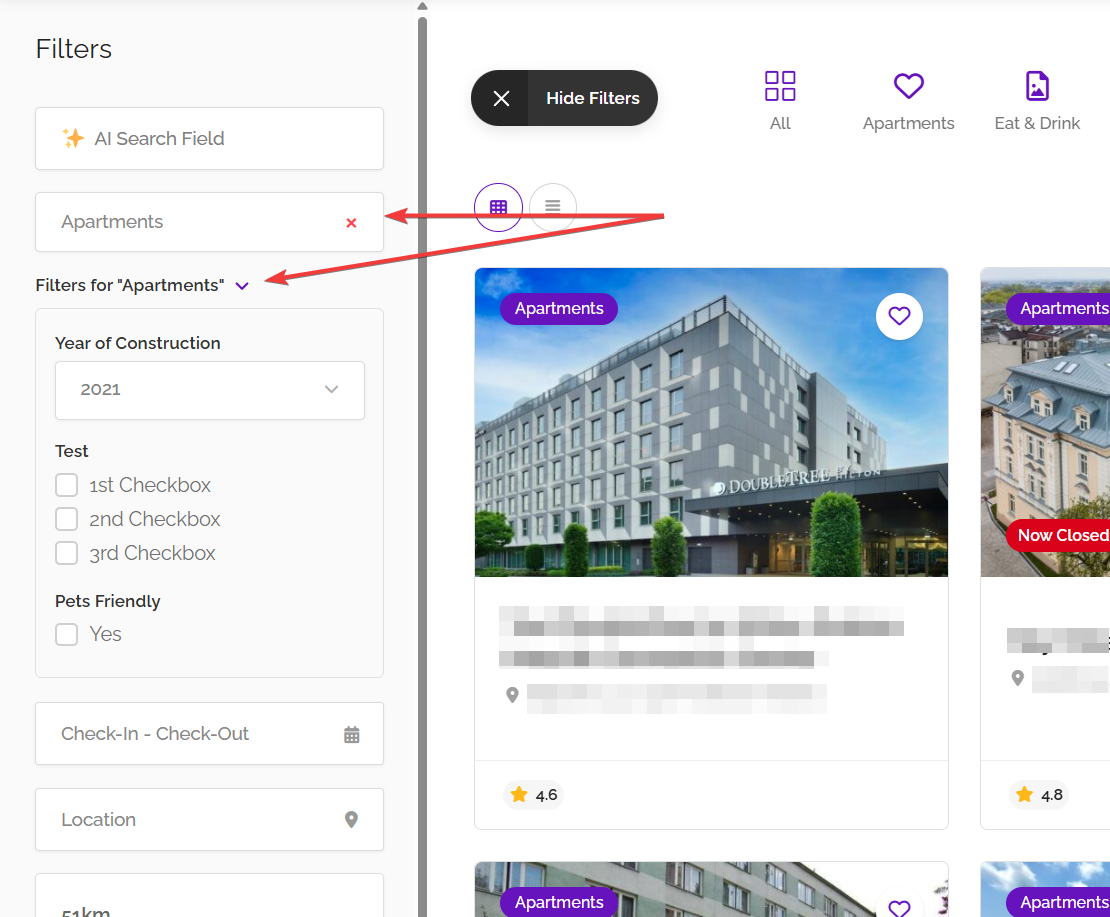
On search results page additional filters will be displayed after selecting category


P.S. If you single checkbox filter/field you can specify displayed value (by defaulty: yes), check screenshot:

SEO / Custom Permalinks

Listeo has SEO optimized permalink settings.

  1. Custom listing permalinks

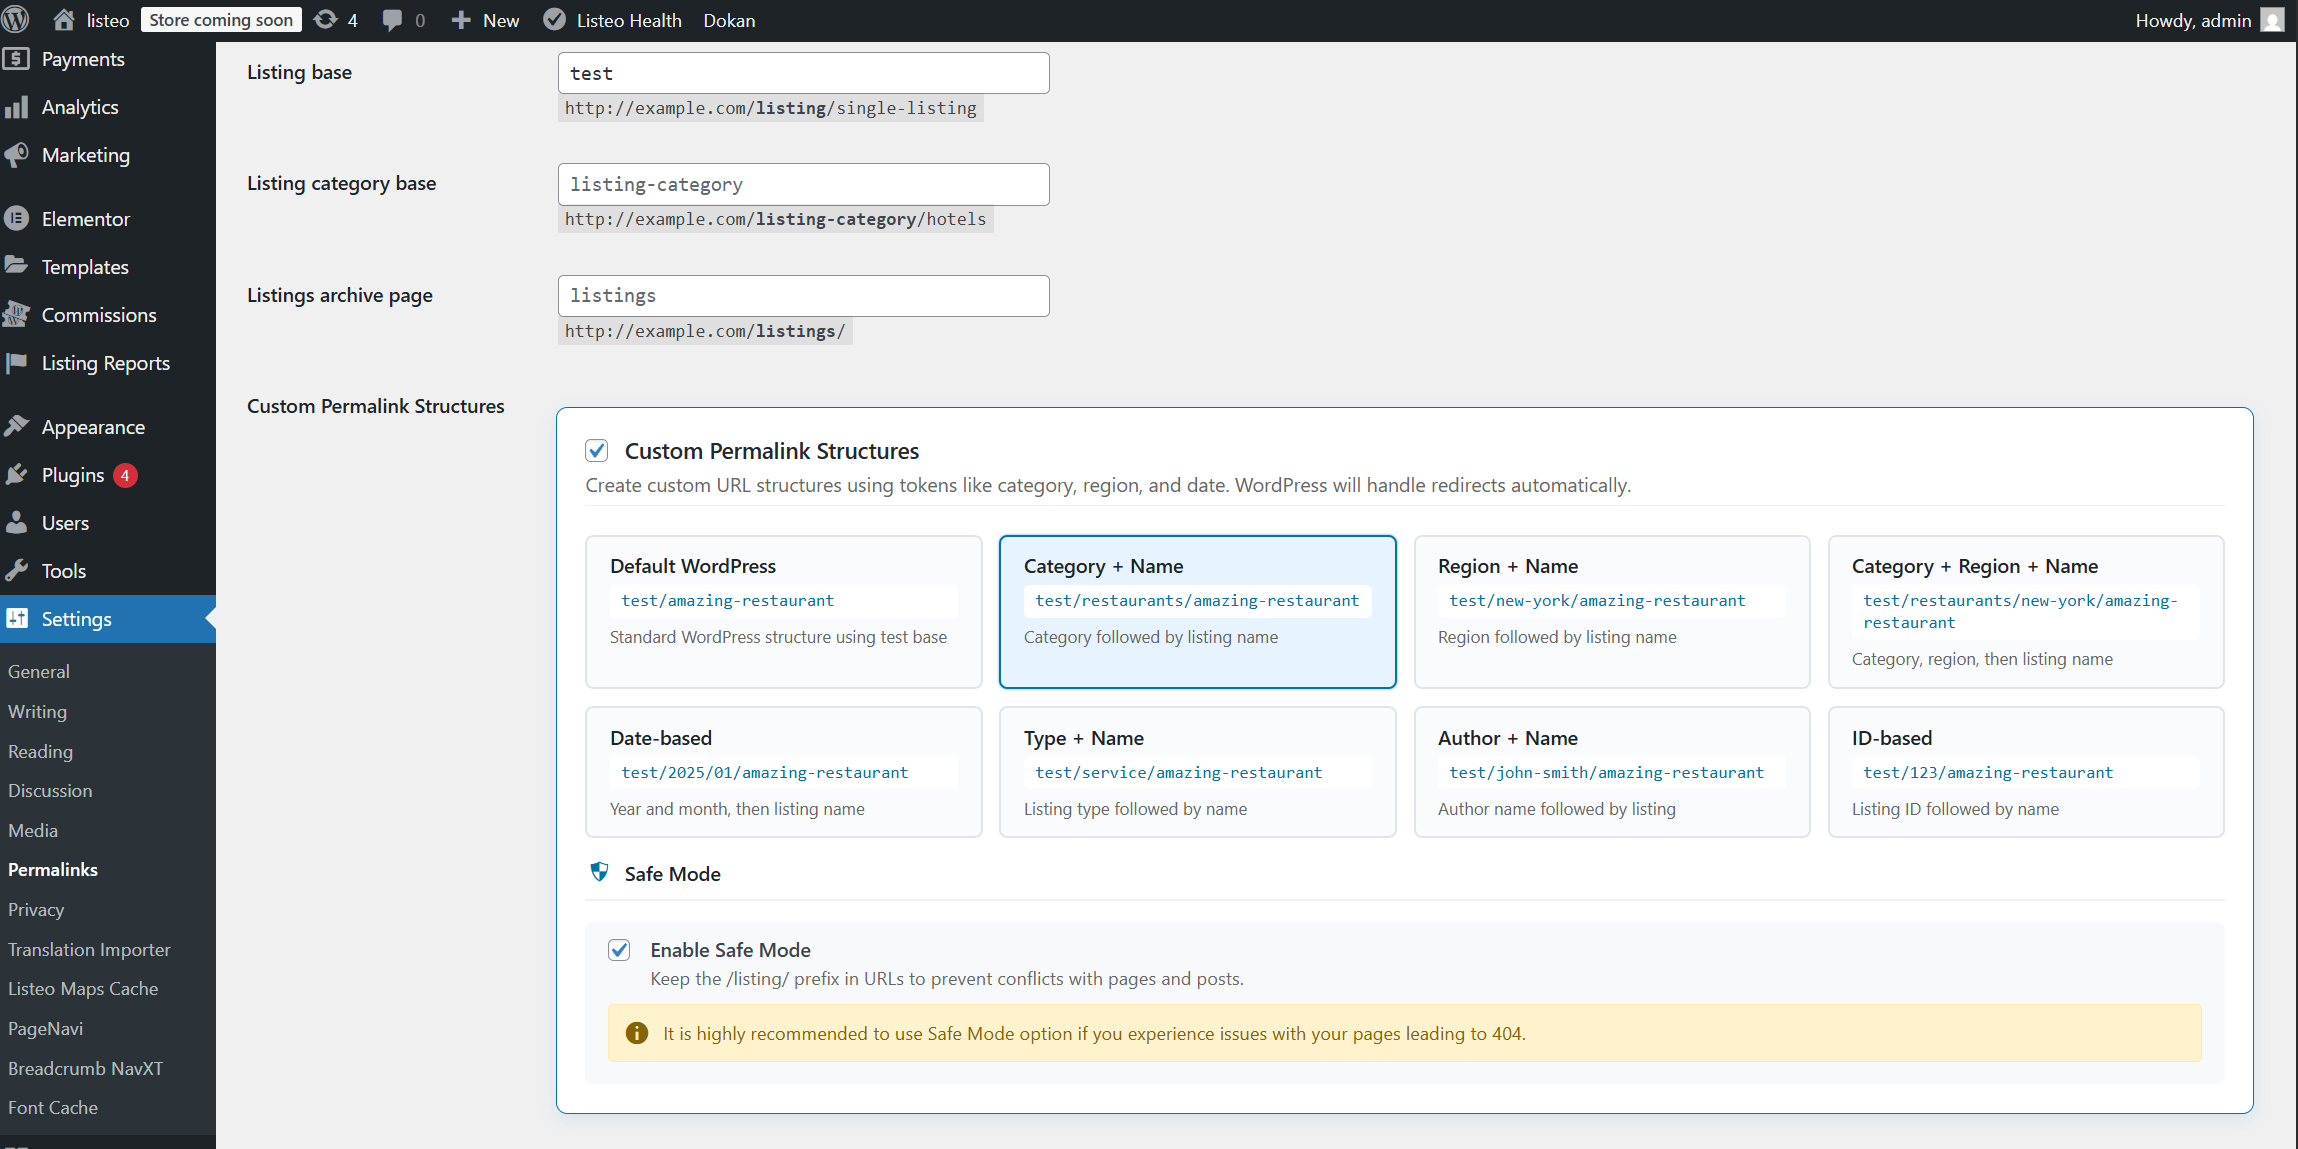
    Navigate to Settings → Permalinks

    Default WordPres: listing/amazing-restaurant
    Category + Name: restaurants/amazing-restaurant
    Region + Name: new-york/amazing-restaurant
    Category + Region + Name: restaurants/new-york/amazing-restaurant
    Date-based: 2025/01/amazing-restaurant
    Type + Name service/amazing-restaurant
    Author + Name john-smith/amazing-restaurant
    ID-based 123/amazing-restaurant

    Safe Mode – It is highly recommended to use Safe Mode option if you experience issues with your pages leading to 404. Safe mode keeps the /listing/ prefix in URLs to prevent conflicts with pages and posts.

  2. Combined region and feature

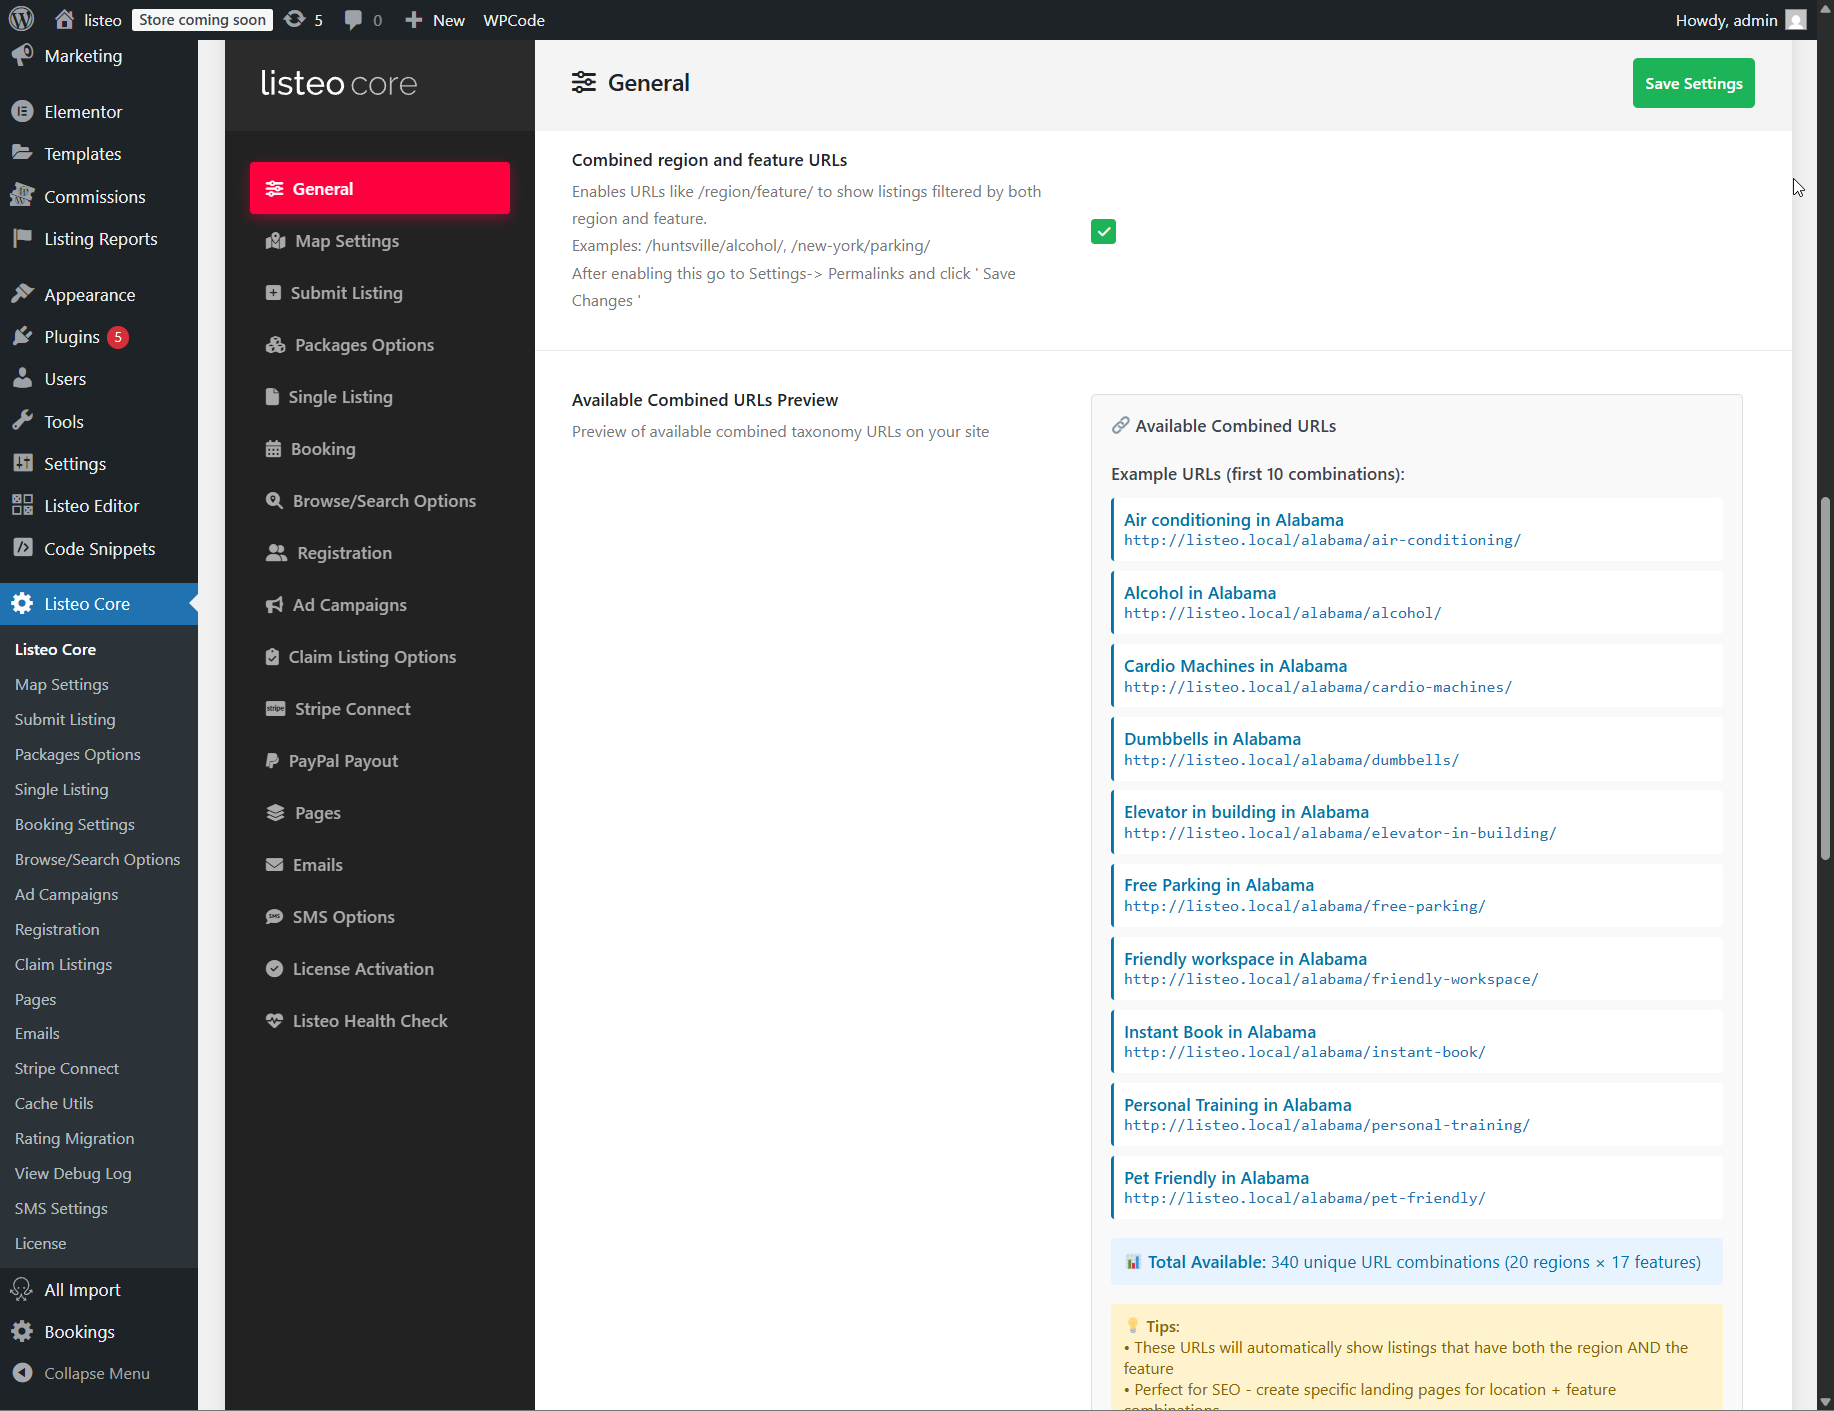
    Enables URLs like /region/feature/ to show listings filtered by both region and feature.
    Examples: /huntsville/alcohol/ or /new-york/parking/
    After enabling this go to Settings → Permalinks and click  ‘Save Changes


If you’re not seeing these settings ensure you have latest theme and Listeo Core plugin.

AI Reviews Highlights

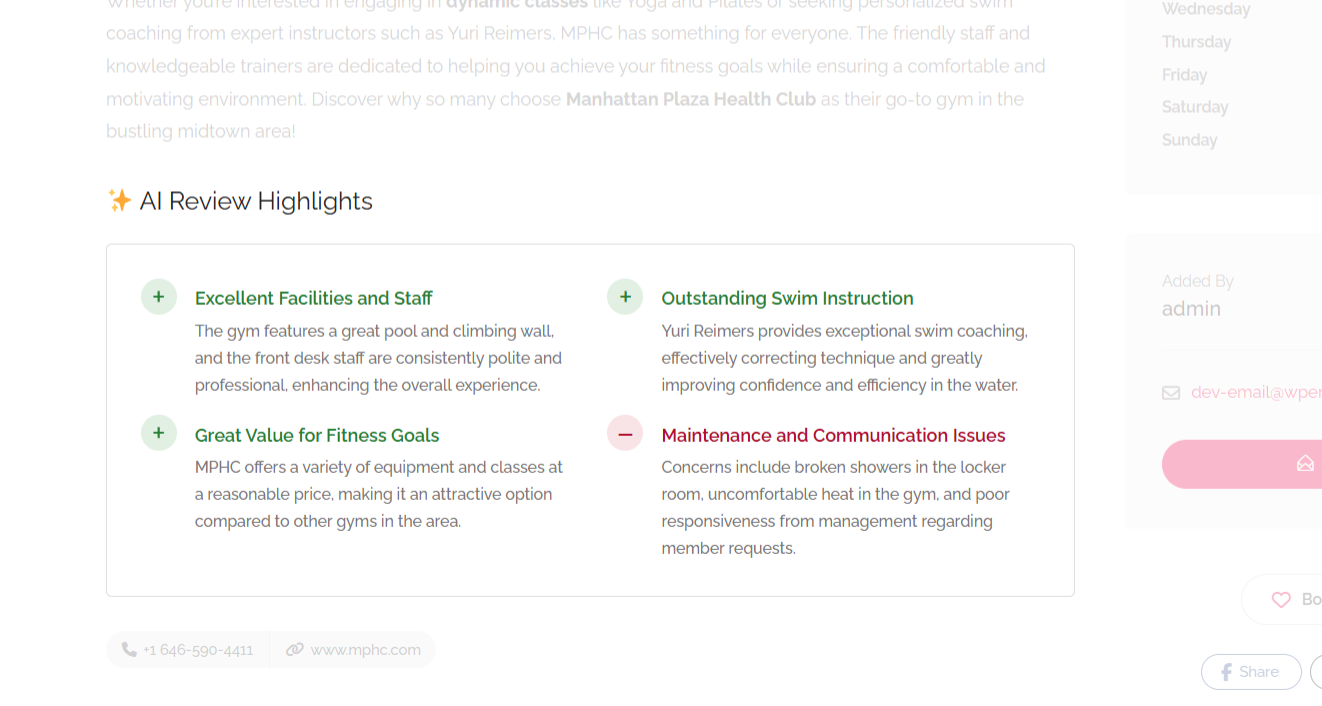
AI Review Highlights plugin reads Google Reviews (if enabled in Listeo Core) and regular reviews and uses AI to generate clear summaries of the most common pros and cons.

Visitors get a quick overview instead of scrolling through reviews.

  1. Go to https://purethemes.net/license/ and download AI Review Highlights plugin
    You’ll need purchase key: How to find my license key?
  2. Upload ai-review-highlights.zip in WP Dashboard → Plugin → Add New and install & activate.
  3. Navigate to Listings → AI Reviews Highlights in your WordPress sidebar.
    Configure plugin to your needs and add your Open AI api key
    How to create Open AI API key? →

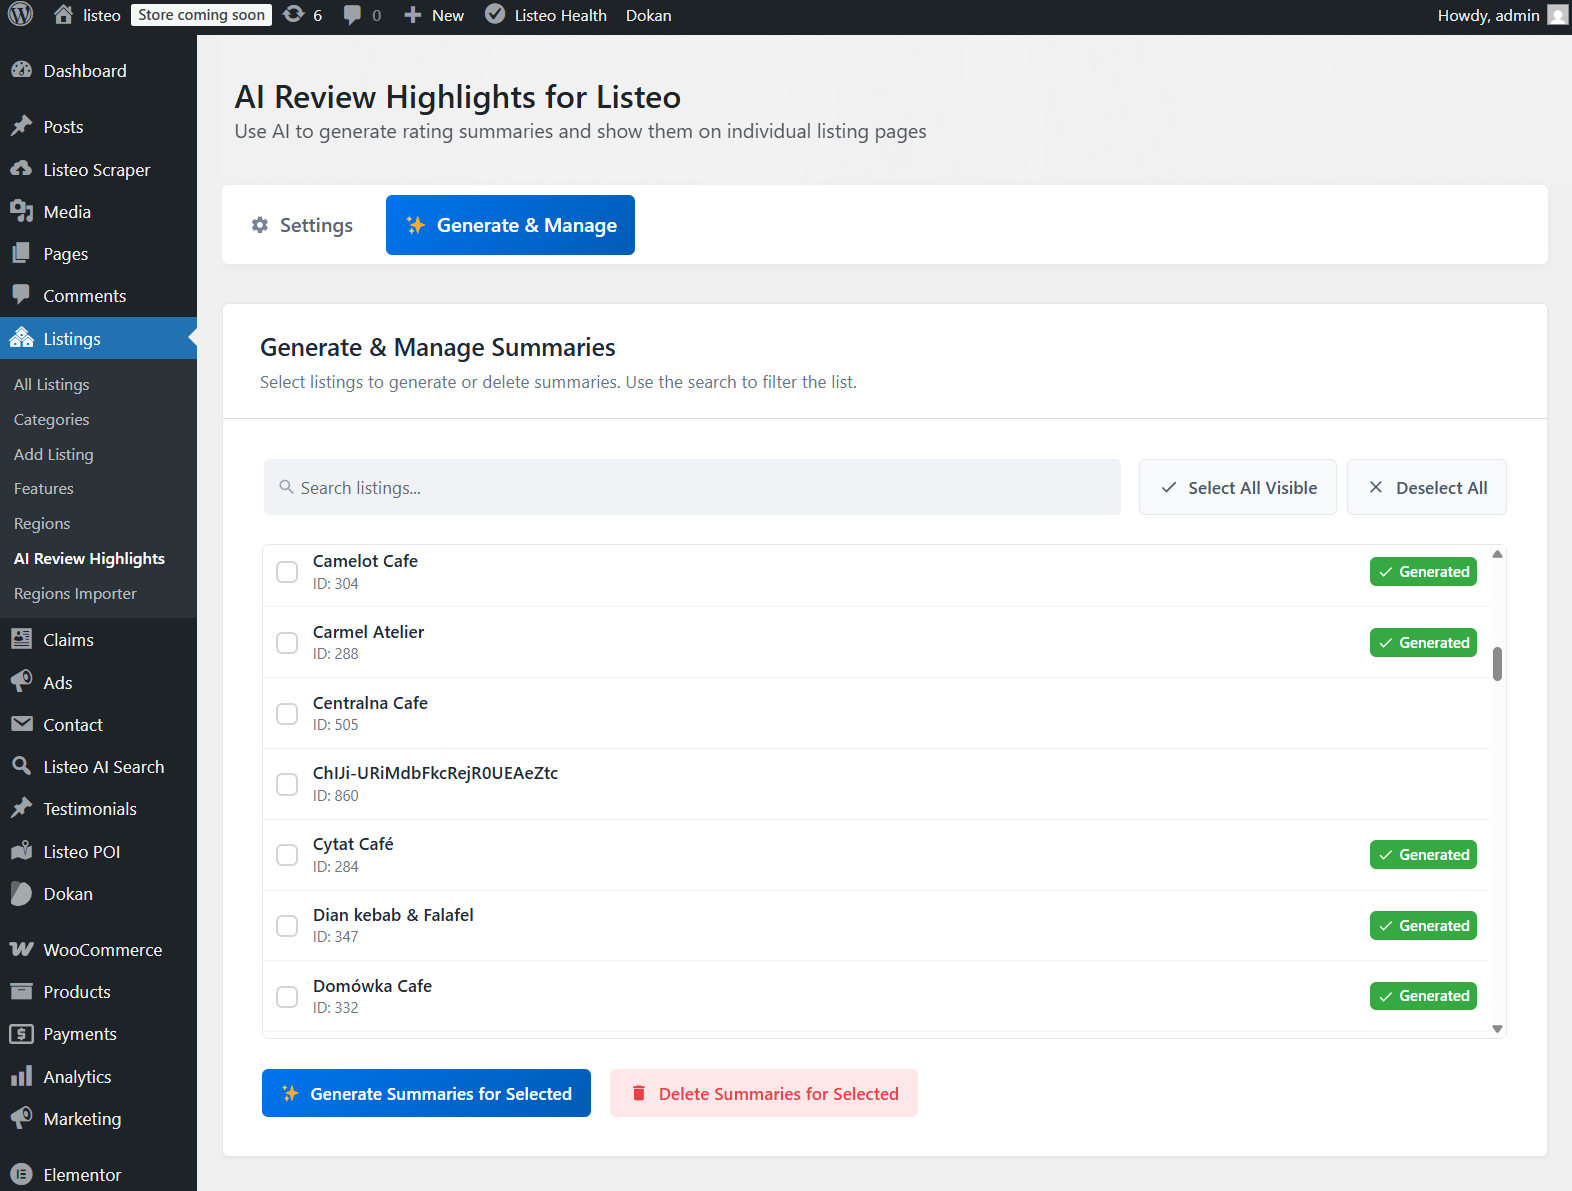
  4. Then visit Generate & Manage tab. You can generate highlights for all or individual listings.

Google API Limitations

The Google Places API enforces a strict limit of 5 most recent reviews per location from Google Places API so AI an see only 5 latest reviews. This is a hard limitation imposed by Google and cannot be increased through paid plans or special requests.

It some scenarios it could generate misleading review highlights, for an example:
If there are no native Listeo reviews and last 5 Google Reviews are negative while overall rating of a place is e.g. 4.8 AI review highlight might show mostly negative highlights


Elementor Widget

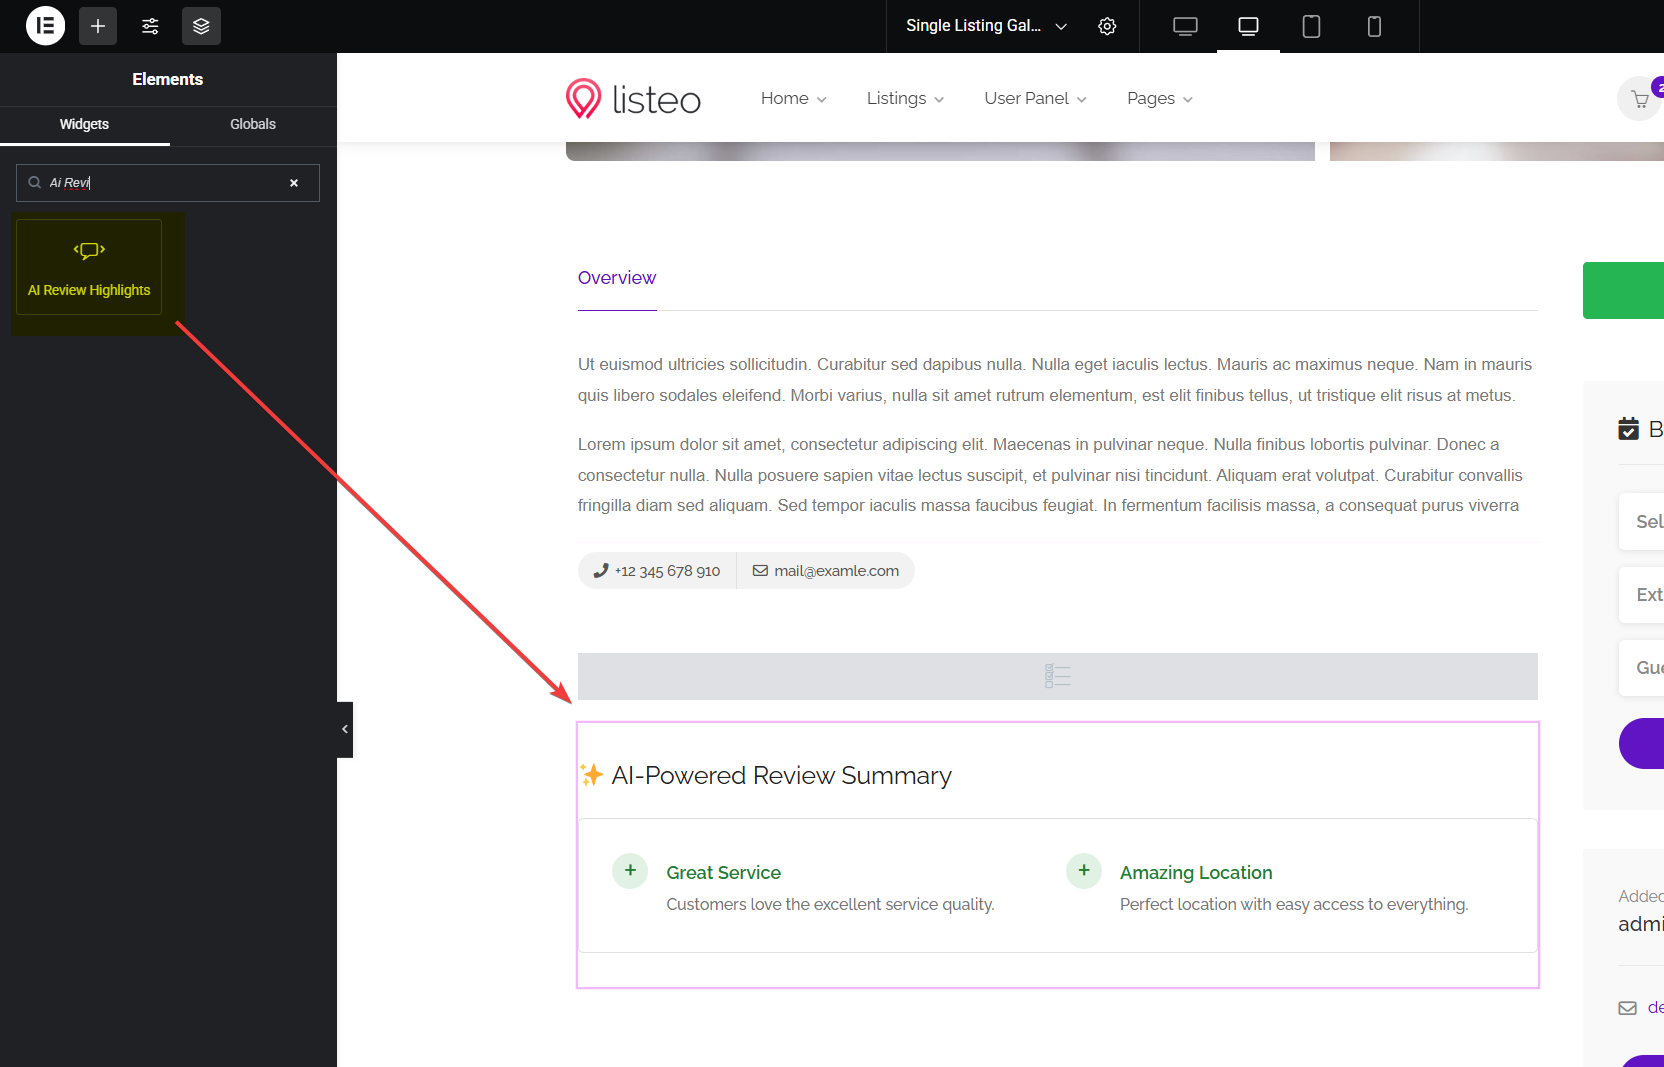
If you modified single listing page using elementor you will need to add AI Review Highlights widget manually:


Plugin Changelog
1.3 - Added Elementor "AI Review Highlights" widget
1.2 - Added AI Model Selection
      Added option to hide highlights for a listing if there are more than X negative points
1.1 - Improved handling negative reviews
1.0 - Initial release

Listing Data Importer

Launch a directory that looks alive from day one!
The Listeo Data Importer fills your site with real listings and rich content in minutes.

It uses the official Google Places API to fetch places and in OpenAI API to generate SEO‑friendly descriptions (in pro version).
Add your API key then type what you want to import – e.g. “coffee shop in New York” – and let the magic happen.

✅ FREE add-on using official Google API (NOT web scraping) imports:
1. Business Name
2. Full Address
3. Geolocation (Latitude & Longitude for Map Pin)
4. Phone Number
5. Website
6. Google Reviews
7. Daily Opening Hours
8. Photo (1)
9. Google Place ID
10. Google Business TypesAdditional features in PRO version→
1. Bulk import up to 100 listings at once and up to 10 photos per listing
2. AI generated SEO friendly descriptions
3. Adjustable AI system prompt
4. Interactive map view
5. Scheduled imports
6. Option to regenerate SEO descriptions or gallery for selected  listings

💰 Cost Example: Importing 100 businesses typically costs $2-4 in Google API fees. Start with small batches and monitor your Google Cloud billing closely.

💡 Text Search costs vary – Finding 50 new listings might require searching through 100+ results due to duplicates. Google returns the same results for repeated searches, so use different queries to find more listings.

📊 Monitor usage – Set up Google Cloud billing alerts at $5, $25, and $50 thresholds

📌 You can find detailed usage here:
Quotas & System Limits
Google Maps Platform Core Services Pricing


Installation & How to use?
  1. Go to https://purethemes.net/license/ and download Listeo Data Importer plugin
    You’ll need purchase key: How to find my license key?
  2. Upload listeo-data-importer.zip in WP Dashboard → Plugin → Add New and install & activate.
  3. Find Listeo Importer in your WordPress sidebar go directly to Settings page where you can tweak some settings. We will not describe each setting here because they are well explained on plugin’s page. 🙂

    You’ll need two API keys
    – one for Google Places and one for OpenAI (optional). Follow the instructions below to set them up:
    Creating Google Maps API Key → – key should be restricted to your domain and Places API (New) enabled (this is important because legacy Places API does not work correctly)
    How to create Open AI API key? →

    ⚠️ You are responsible for all Google API charges and must comply with Google’s Terms of Service. Misuse (eg. hundreds of thousands of calls, data reselling, etc.) can result in account suspension and unexpected charges. We assume no liability for API costs, account bans, or any damages from using this plugin. Monitor your usage carefully.

  4. Then go to “Import” page, specify business type/service you’d like to import and where.

    Hit “Run Import” and let the magic happen
    . For an example, we imported 10 “gym&fitness” places with AI generated description and 1 photo per listing.
    If you selected “Let me manually select places to be imported” you will need to confirm listings to be imported

  5. Once done you should see imported listings

    and here’s sample listing after import with all necessary data including AI-generated SEO friendly description
  6. Missing Google Reviews after import? You need to enable them in theme settings. How to enable Google Reviews?

FAQ
  • How much does it cost to import listings?

  • How can I import more listings?

  • Why can't I import all listings in my city at once?

  • Why does finding 20 new listings may require more than 20 API calls?

  • Photo storage and compliance with Google’s Terms of Service

  • Why Google reviews are cached and not stored in database?


How to create Open AI API key?

New to API keys? It looks technical, but it literally takes 1 min 40 sec to create one 😉

  1. Create an OpenAI Account

    Go to https://openai.com
    – Click the “Log In” button (top right corner) and select API Platform.
    – Register using your email, Google, or Microsoft account.

    After signing up, navigate to API Keys https://platform.openai.com/api-keys
    – Click the “Create new secret key” button.
    – This begins the setup process for your API key.

  2. Generate Your API Key

    In the “Create new secret key” dialog:
    – Enter a name for your key (e.g., demo API key) to identify it later.
    – Choose the project (default is fine unless you have multiple projects).
    – Click “Create secret key”

    Your new key will be shown only once — copy it immediately.

    This key is what you’ll use in our data scraper and other tools that are coming soon

  3. Top up balance

    Minimal amount is $5 – rest assured it $5 will lasts forver in case of our WordPress plugins 😉

    Go to Billing and click Add credits to balance

Regions Importer

This tool automatically adds all regions and major cities for any country in one click. It uses AI to fetch and create the full list—no manual input needed.

How to use?

  1. Navigate to Listings →  Regions Importer
  2. Pick Your Country & What to Import

    Select Country: Don’t see your country? Just add its language pack in Settings → General

    Choose Import Level:
    Regions → 5 Cities: This is the default. It gives you states with their 5 biggest cities nested underneath.
    Regions Only: This just gives you the states.

    Click Import Regions, wait a minute or two and done.

  3.  The page will refresh with a success message. You can now find all your new regions and cities under your ‘Regions’ taxonomy in Listings → Regions).
    And this is how regions look like in front-end with drilldown dropdown, nicely nested list.

Do I need Dokan & multi-vendor marketplace feature?

You only need Dokan if you want to enable the multi-vendor marketplace feature, which allows multiple sellers to list and manage their own products or services.

If you’re only interested in the listings and booking functionality, these are already built into the theme and do not require Dokan. You can simply disable the Dokan plugin if you don’t need the multi-vendor marketplace.


Use Case

For example, in this listing: https://listeo.pro/listing/georges-barber-shop/ the owner not only advertises their local business but can also run a store with barber accessories: https://listeo.pro/store/barbershop/

How to Translate a Theme Manually

We’ve got ready to use translation files however if you’d like to do it precisely on your own here’s guide

We assume that your WordPress is already in your language. If not, go to Dashboard → Settings → General and change the Site language.


Before you start!

To achieve 100% translation you have to translate Listeo Theme and following plugins: Listeo Core and Listeo Elementor

Loco Translate is for translating website from english to another language. If you’d like to have multi-language switcher consider using TranslatePress or Weglot plugin.


Let’s Start

Install plugin  Loco Translate.

Loco Translate

After successful installation go to Loco Translate → Themes you should see this screen:

Click Listeo (not Listeo ChildTheme) and in next step click New Language

Choose your language and select a location, makes sure it’s either System or Custom location, avoid Author location, this way you won’t lose translations if you update theme/plugins (more about it)

Click Start Translating. You should see that screen where you can translate each string that is used in theme

When you’re done, click Save, and it’s also recommended to click both “Po” and “Mo” buttons to save them on your PC as a backup.


Do I need to translate every word manually?

You can either translate each string manually (best accuracy) or use the Loco Auto Translate plugin. Some translations may need correction, but they also offer pro version which provides access to Google, DeepL, ChatGPT, and Gemini for more accurate translations.

Automatic Translate Addon For Loco Translate


Translate Plugins

To achieve 100% translation you also need to translate Listeo Core and Listeo Elementor plugins. The process is the same as translating theme. Go to Loco Translate → Plugins and start there.