Author Archive

How to troubleshoot Stripe Split Payments

Setting up Stripe Connect in Listeo can be a challenging process, and we frequently receive support tickets from users seeking assistance with troubleshooting. Here are a few steps you can take before reaching out to us.


Step 1

Go to Overview of your Stripe Connect dashboard,
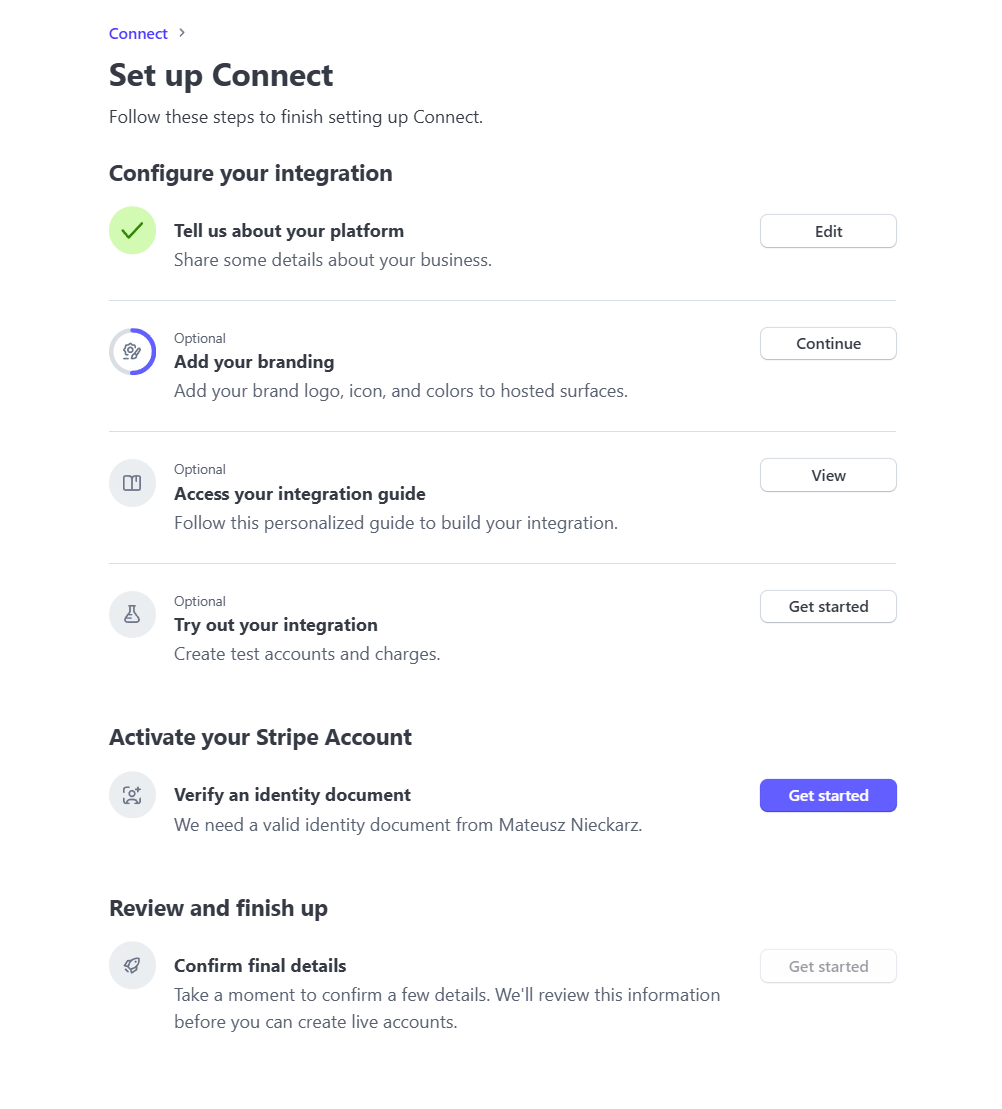
Ensure that there are no tasks on the list tagged as “Required” and that all necessary steps are completed.

This is example of not fully configured account, the platform profile is not completed. That will cause troubles with Connect button on wallet page. The onboarding process won’t be correctly completed.


Step 2

Go to your WordPress admin -> WooCommerce -> Settings -> Payments -> Stripe -> Manage -> Settings

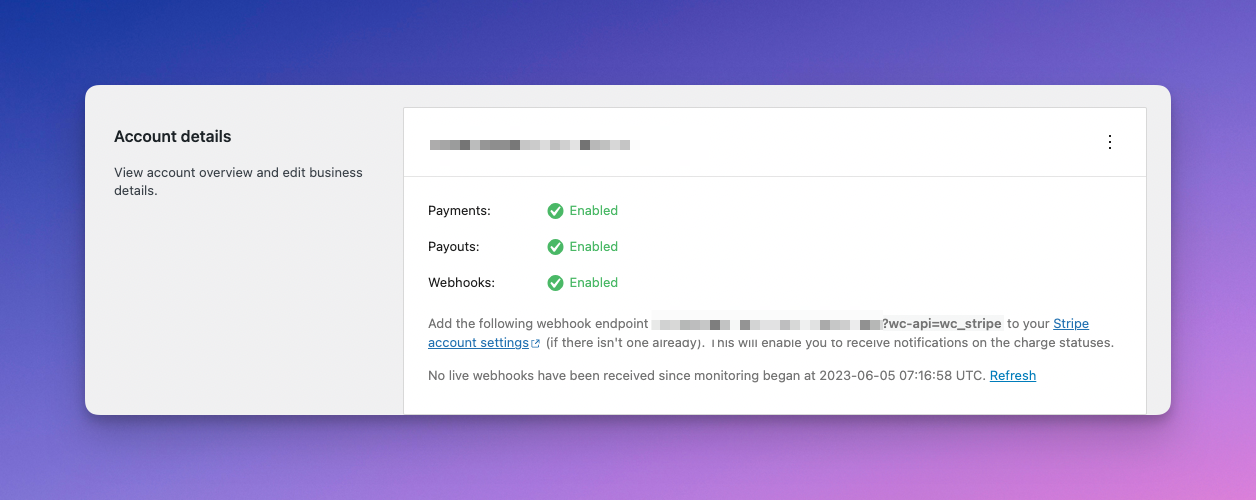
Make sure the payment options are correctly configured and you have green checkmark  in all options

it’s especially important for Webhooks as that what we mainly use in Listeo to work with Stripe API. Make sure it works both in test mode and live mode.

While we’re here you enable log, that will help us debug any issues, it’s below in Advanced Settings.


Step 3

Double check if all keys are set correctly, and they match the settings in your Stripe Dashboard, both for Live and Test mode


Step 4

If you made sure everything above is set and it still doesn’t work, we need admin access to your site.

You can create temporary admin account and delete it later or you can install this plugin https://wordpress.org/plugins/temporary-login-without-password/ and generate for us the link for 1 week admin access (make you’re creating user with ADMIN ROLE as by default it will be regular user).

Please also make sure that:

  1. You’ve set your Stripe payment gateway in Test mode
  2. You have one user with Owner role who has at least 1 published listings, and is connected to your Stripe Platform in the Wallet page. We most likely won’t be able to do that as it usually requires some address/contact data
  3. Please install this plugin https://wordpress.org/plugins/wp-user-switch/ to allow us easy change between users for tests
  4. And if you haven’t already, please contact us via Support Tab


Add a phone number to the listing url

This snippet will alter the listing URL to include phone number of the listing:  www.site.com/listings/3331542847/listing-name/

In your child theme functions.php file add this code.

function listing_post_type_link($permalink, $post)
{
	// Abort if post is not a listing
	if ($post->post_type !== 'listing')
		return $permalink;

	// Abort early if the placeholder rewrite tag isn't in the generated URL
	if (false === strpos($permalink, '%'))
		return $permalink;

	$find = array(
		'%phone%'
	);
$phone = get_post_meta($post->ID,'_phone',true);
	$replace = array(
		$phone
	);

	$replace = array_map('sanitize_title', $replace);

	$permalink = str_replace($find, $replace, $permalink);

	return $permalink;
}
add_filter('post_type_link', 'listing_post_type_link', 10, 2);

function change_listing_slug($args)
{
	$args['rewrite']['slug'] = 'listing/%phone%';
	return $args;
}
add_filter('register_post_type_listing', 'change_listing_slug');

After that go to Settings -> Permalinks, and click Save to renew new permalinks

How to add PHP snippets?

You can add code into your functions.php file in child-theme or use WP Code plugin


function.php method

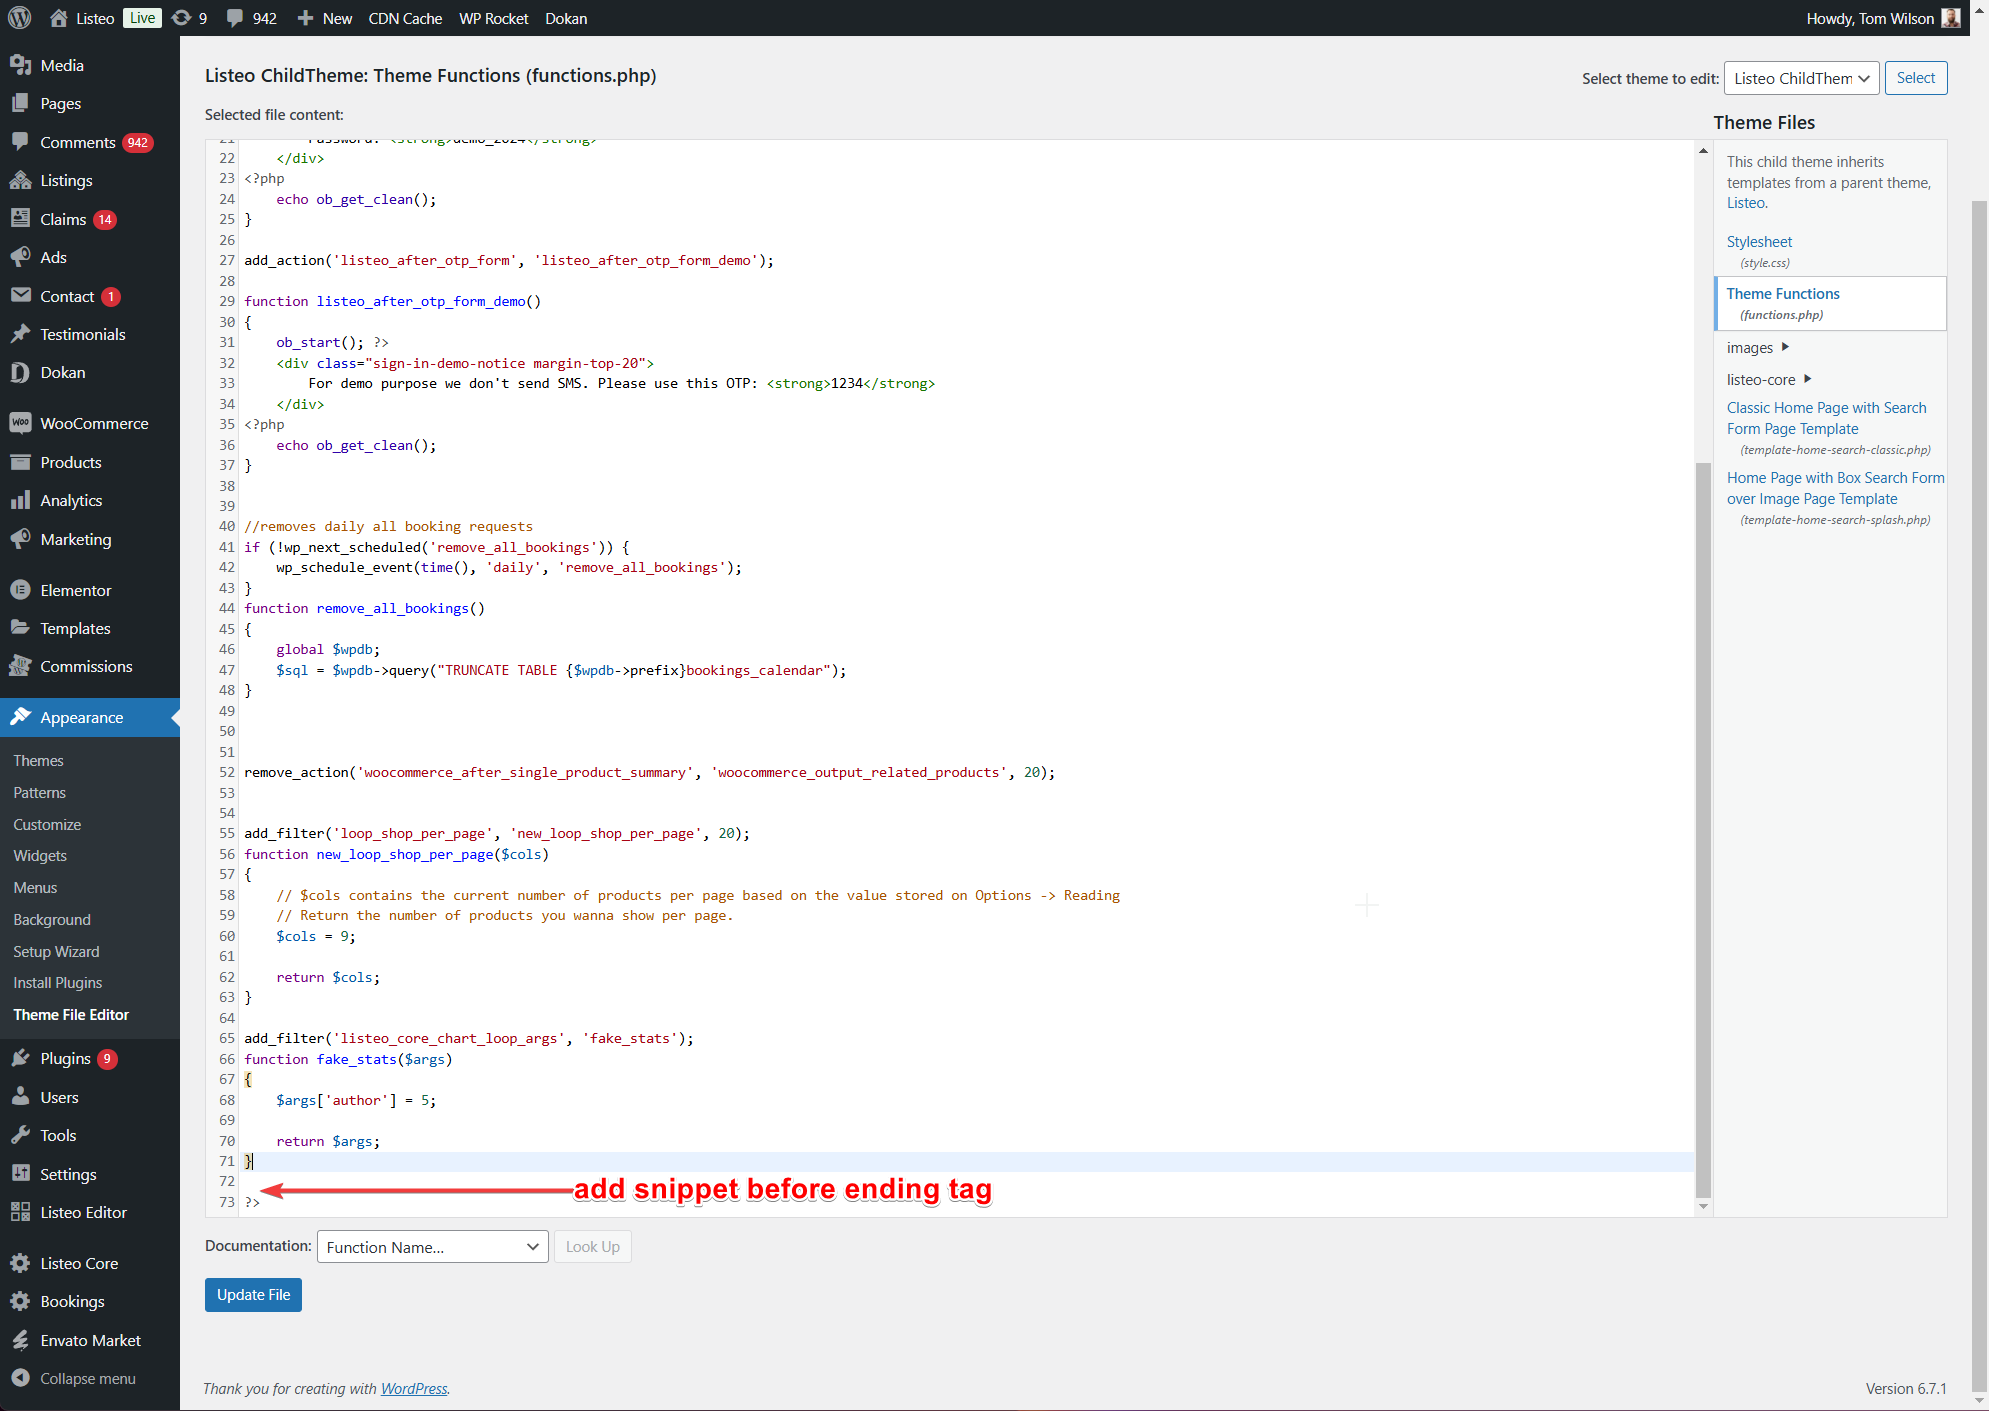
Appearance → Theme File Editor and select Theme Functions file in sidebar. Use child-theme otherwise snippet will be overwritten/lost after update.


WPCode plugin method

WPCode – Insert Headers and Footers + Custom Code Snippets – WordPress Code Manager

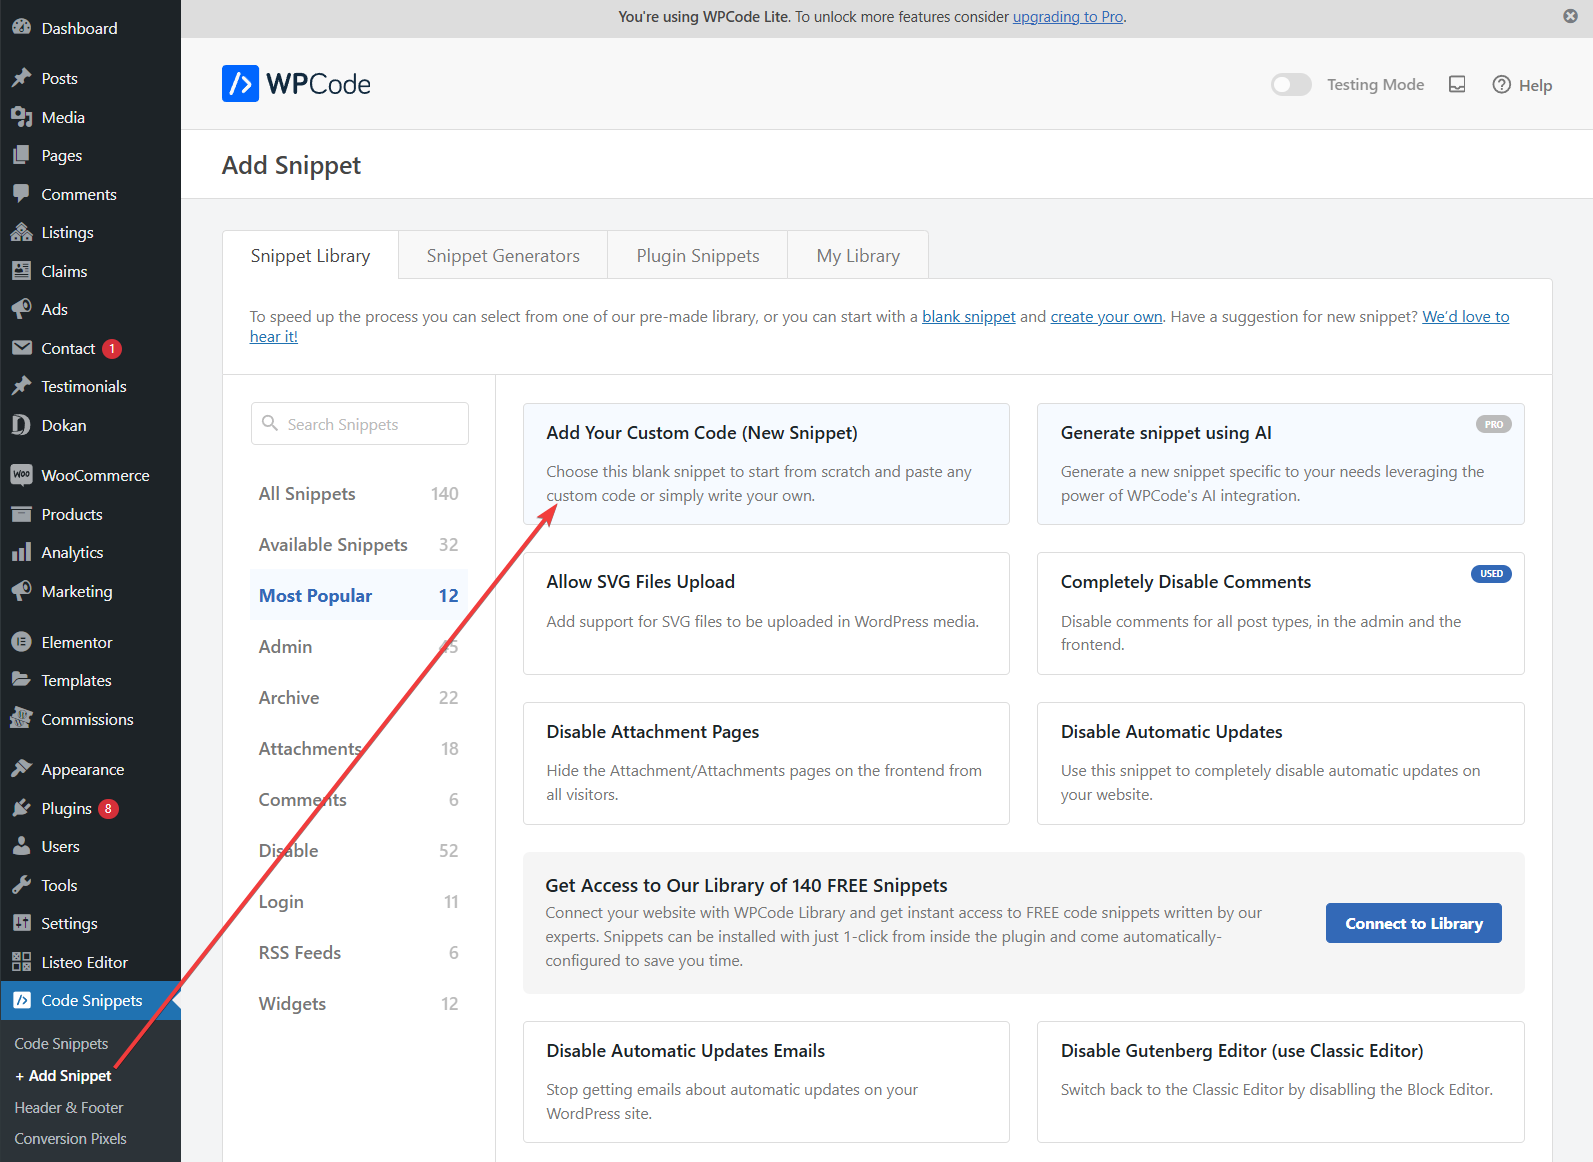
WP Code will be more suitable for most cases. Head over to WP Code, select Add Snippet and Add Your Custom Code (New Snippet)

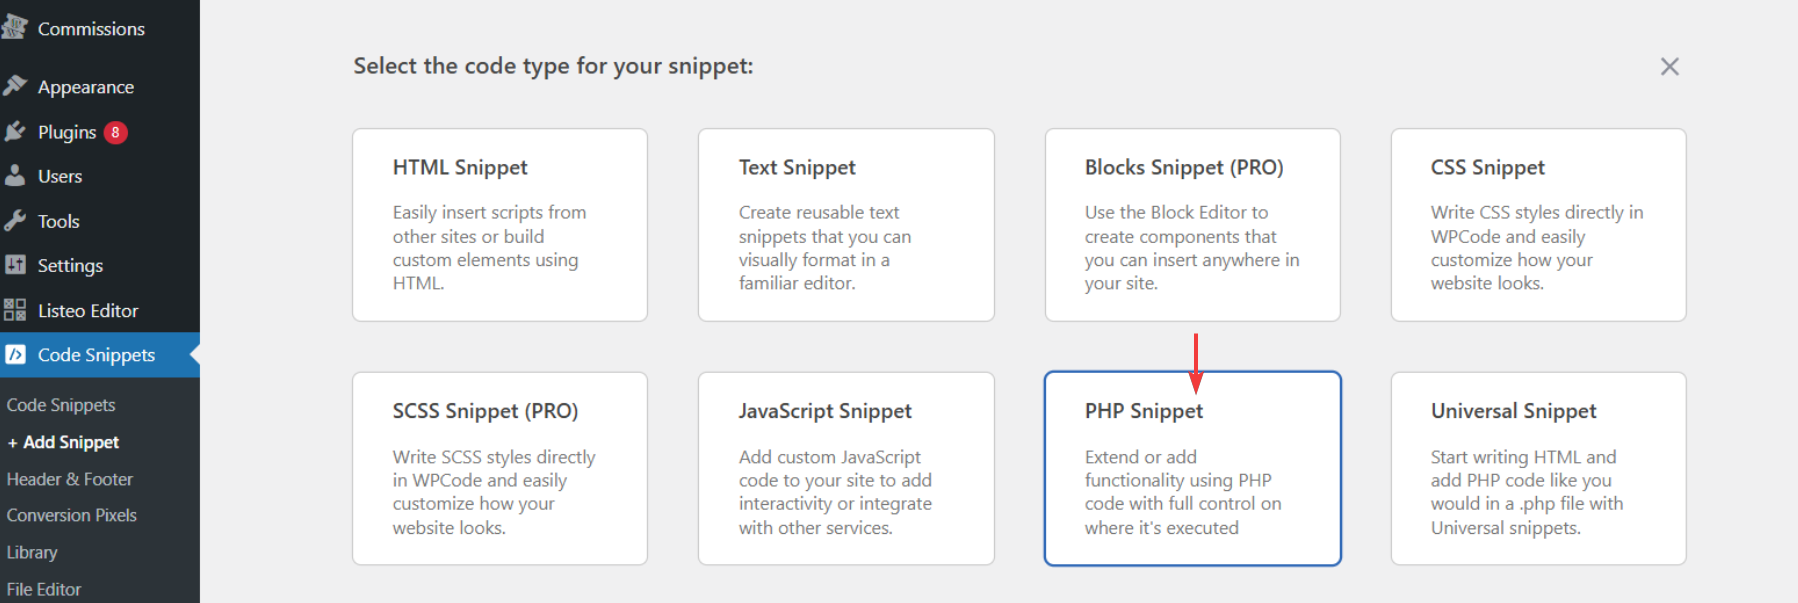
In next step choose PHP Snippet

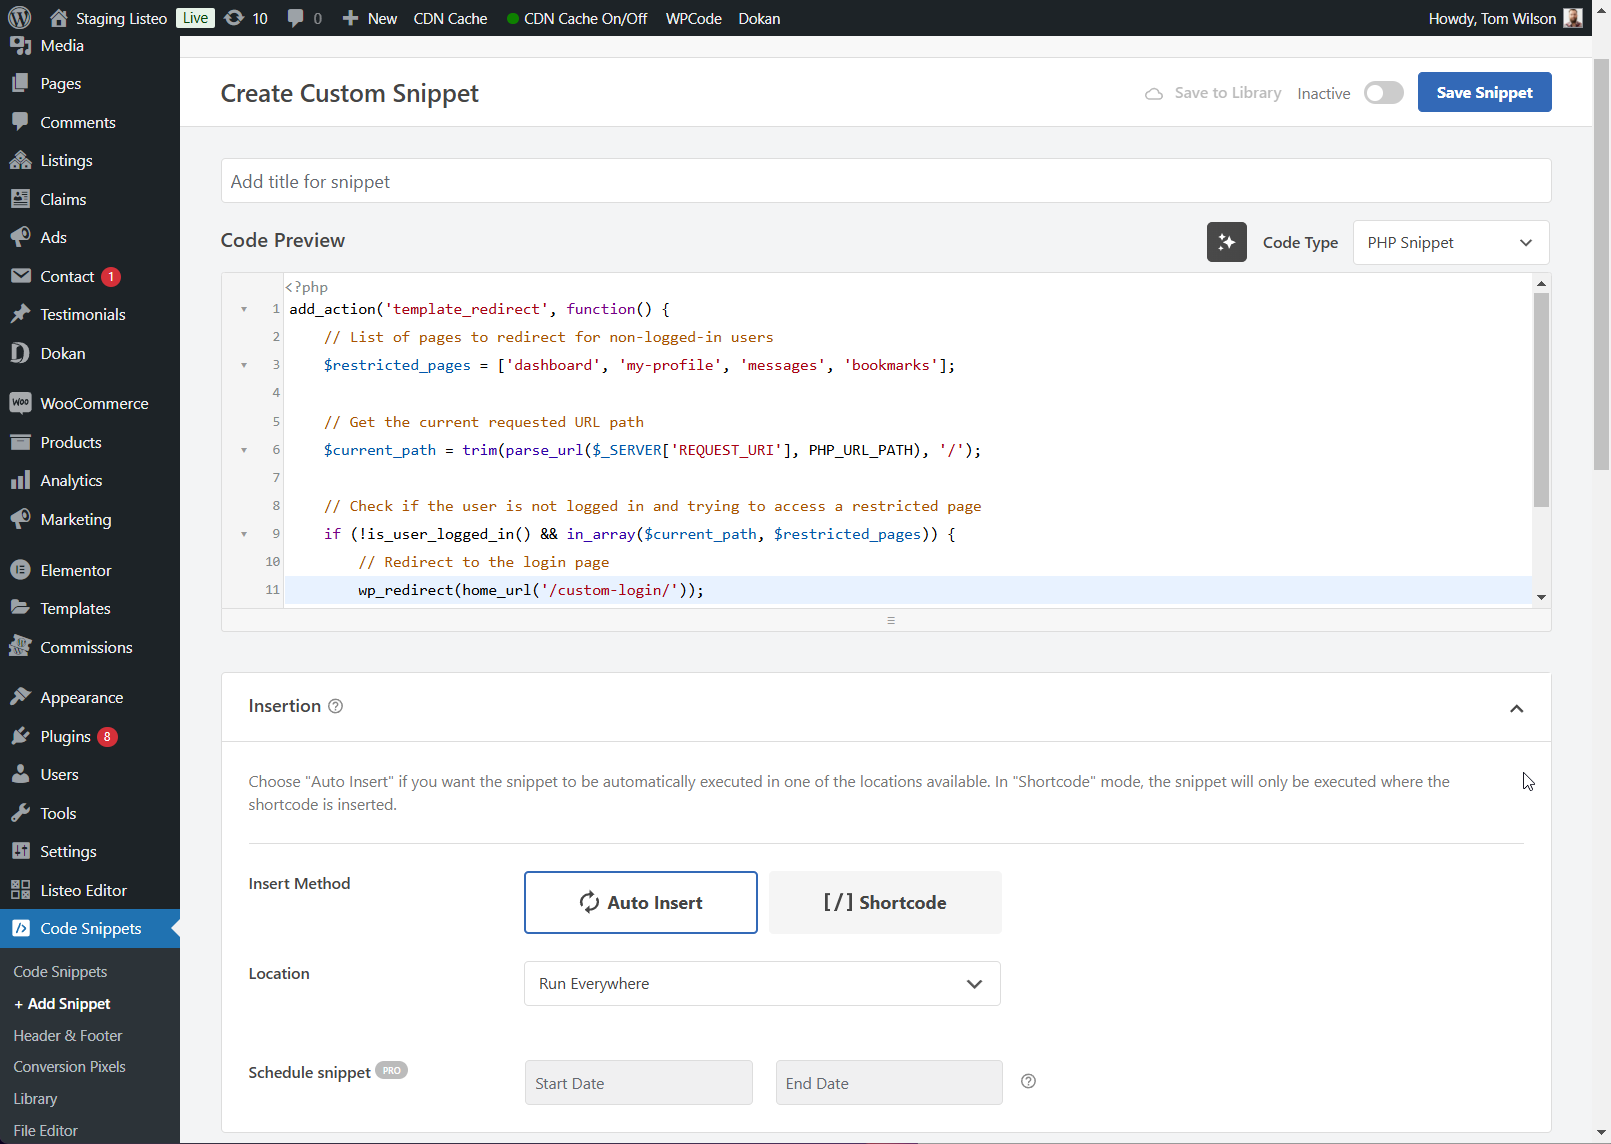
Paste snippet, toggle “inactive” to “active” button near Save button and Save

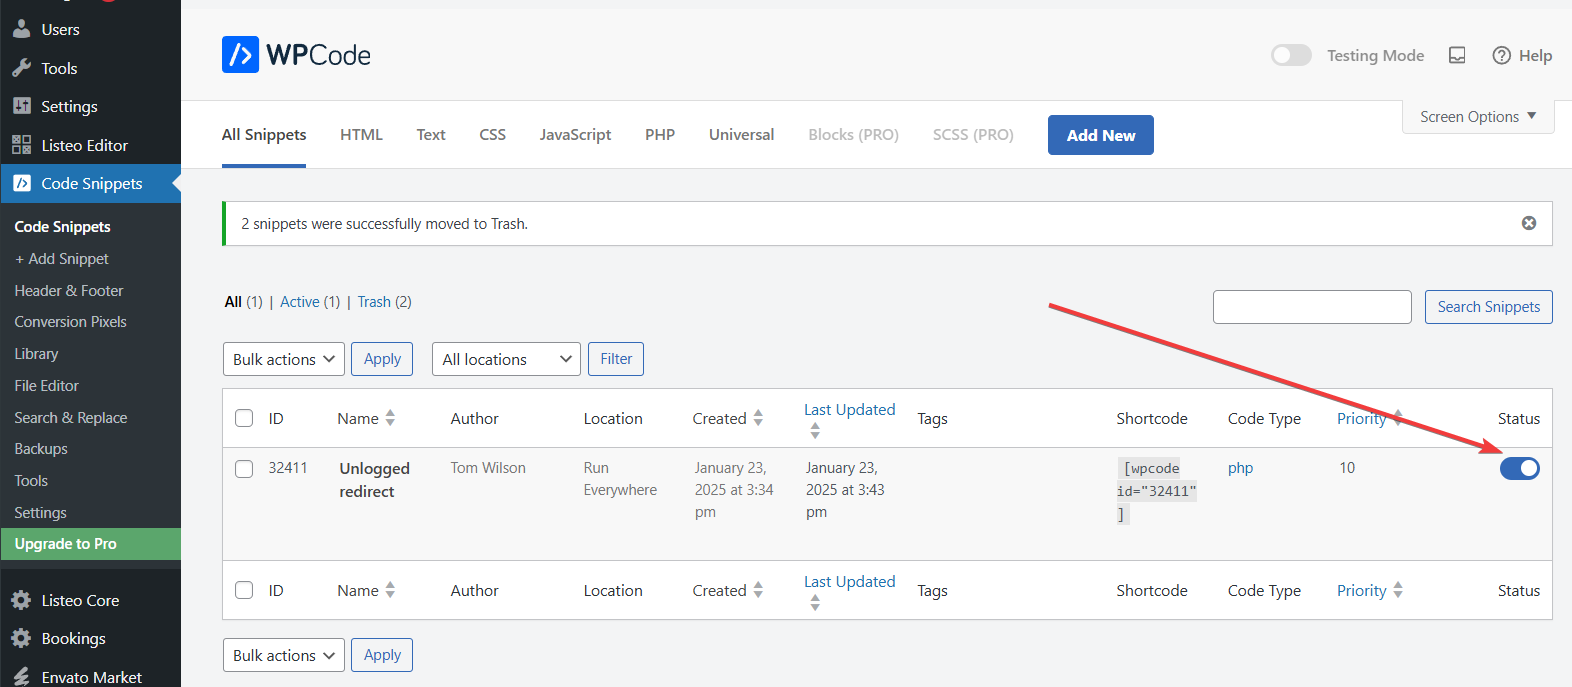
Done. Make sure it’s activated

Stripe Split Payments Support

[Discalimer] Listeo works with hundreds of WooCommerce payment gateways however split payment could be technically only with PayPal and Stripe. Without split payment you can use any payment gateway that works with WooCommerce. 🙂

Before you’ll raise a support ticket:
1. Ensure that the API keys and permissions are correctly configured in both WP and Stripe.
2. Verify that the Redirect URI in Stripe matches the one in your WordPress plugin.
3. Confirm that your Stripe account is fully verified (not pending).
4. Make sure you are not using account that is already connected to other platform
5. Clear any cache that might interfere with the connection.
6. Check https://docs.purethemes.net/listeo/knowledge-base/how-to-troubleshoot-stripe-split-payments/

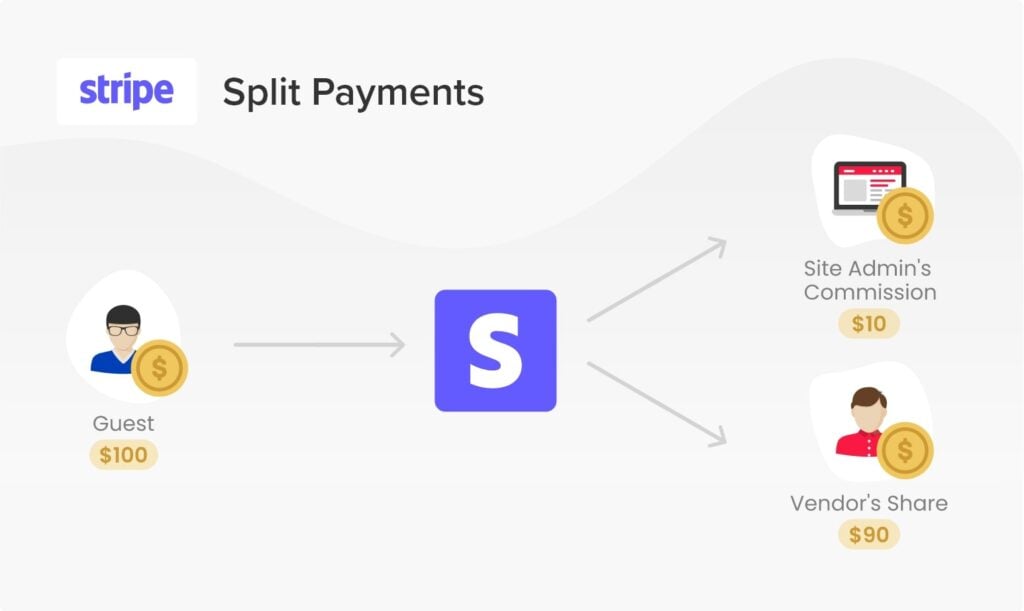
Listeo supports Stripe Connect, which automatically splits payments between listing owners and you as the site owner. Stripe Connect is a marketplace payment solution provider.

This requires the official WooCommerce Stripe Payment Gateway to be installed and configured—only payments made through this gateway will be split. Stripe accepts major credit cards (Visa, MasterCard, American Express, Discover, JCB, Diners Club) and Bitcoin, and is supported in 47 countries. Stripe Connect creates a platform where listing owners can sign up and connect, automating payments and simplifying site management.


How it works

You have to enable your Connect Platform in Stripe dashboard. After properly configuring both Stripe and WordPress according to instructions below, the Wallet page will have an option “Connect to Stripe“.

Any Listing Owner who will click this button will be going through the “onboarding” process where he will set his own Stripe account and connect it to your platform. From now on every booking that will be made using Listeo that will be paid with Stripe gateway will be automatically splitted and you as platform owner will get the commission and the Owner will get his earning directly to his Stripe account. The money is then payout automatically by Stripe based on the settings or rules (it’s different based on the country)


How to configure Stripe Connect in Listeo


Let’s get started
  1. Create a stripe account by visiting https://stripe.com/. You’ll be viewing a page that asks you to Activate Payments, click that button to fill out your business profile to accept payments
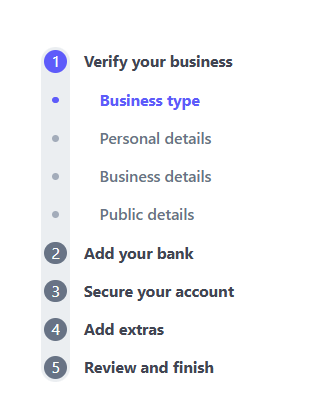
  2. Go through the whole process of onboarding https://dashboard.stripe.com/account/onboardingmake sure you haven’t skipped any field there.

    It’s very important to have all the items checked, you even need to set your own branding color or upload logo as without it it won’t let you set Connect accounts.

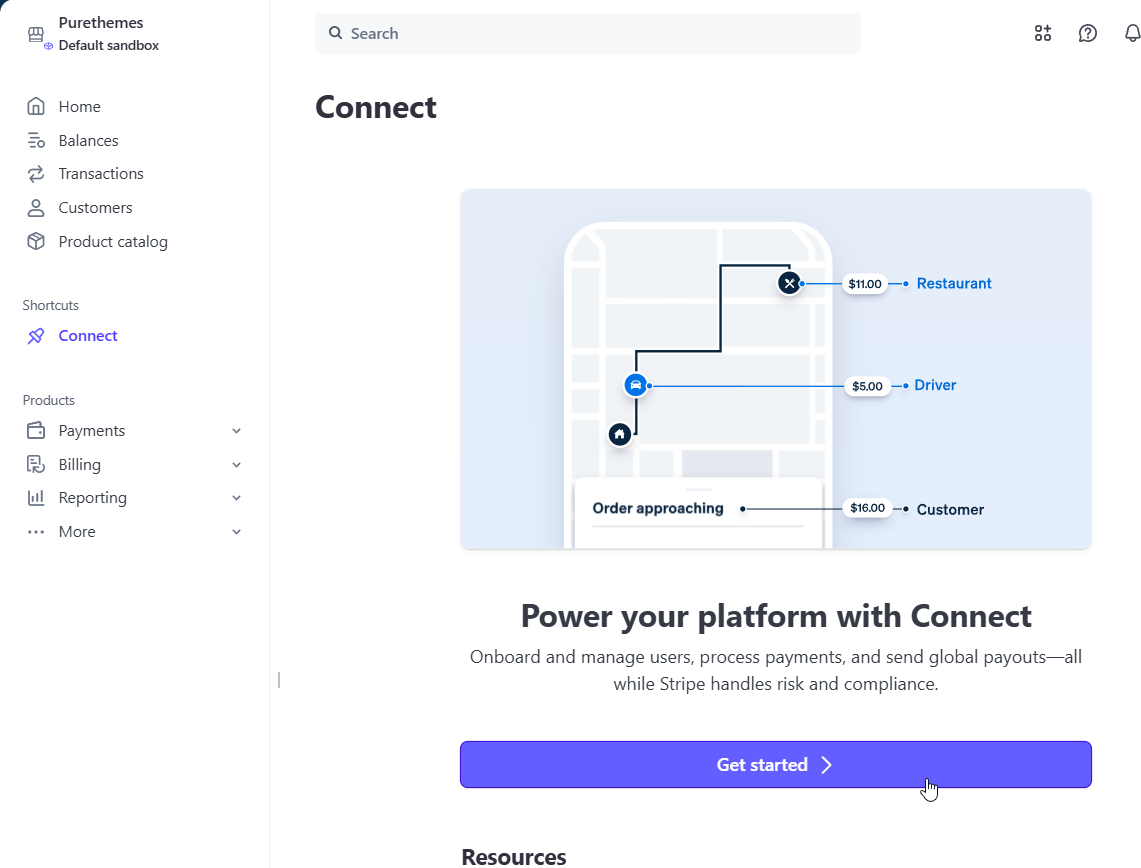
  3. Next step, open Stripe Dashboard go to Connect, then go to “Get started with Connect“, where you will be able to complete your platform profile and add required informations to enable payments on your account

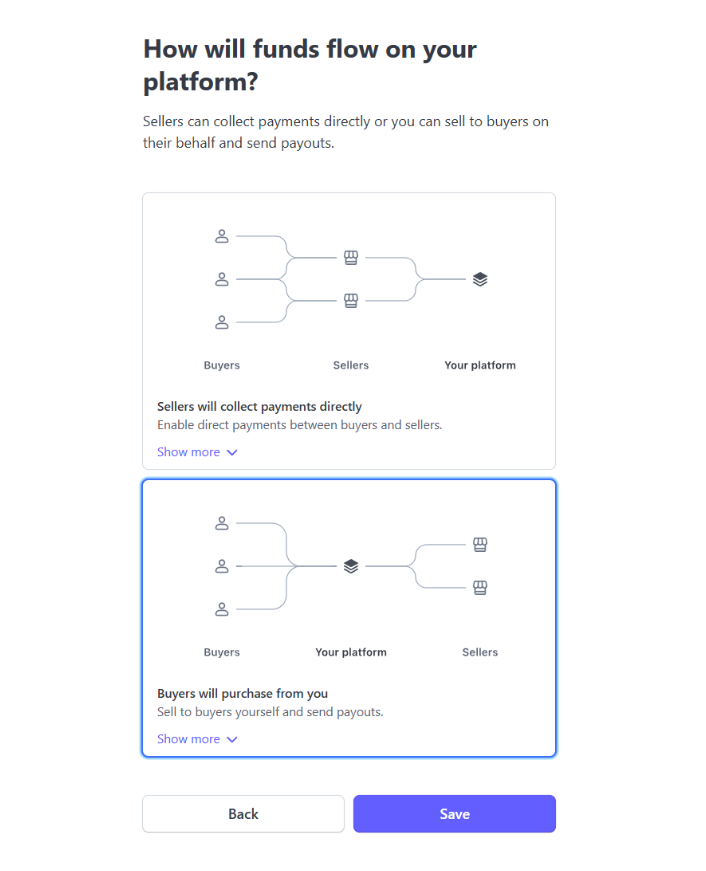
    Select “Buyers will purchase from you”

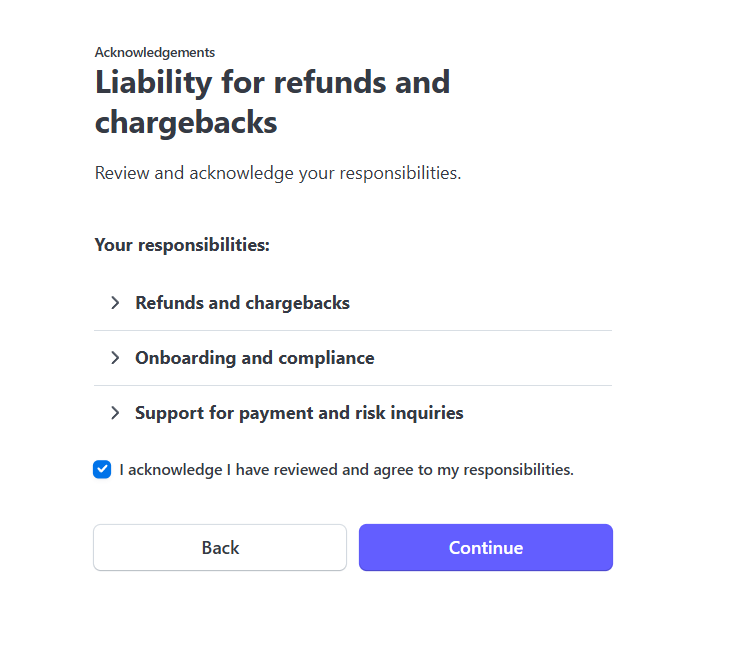
    Complete your platform profile and add required informations to enable payments on your account

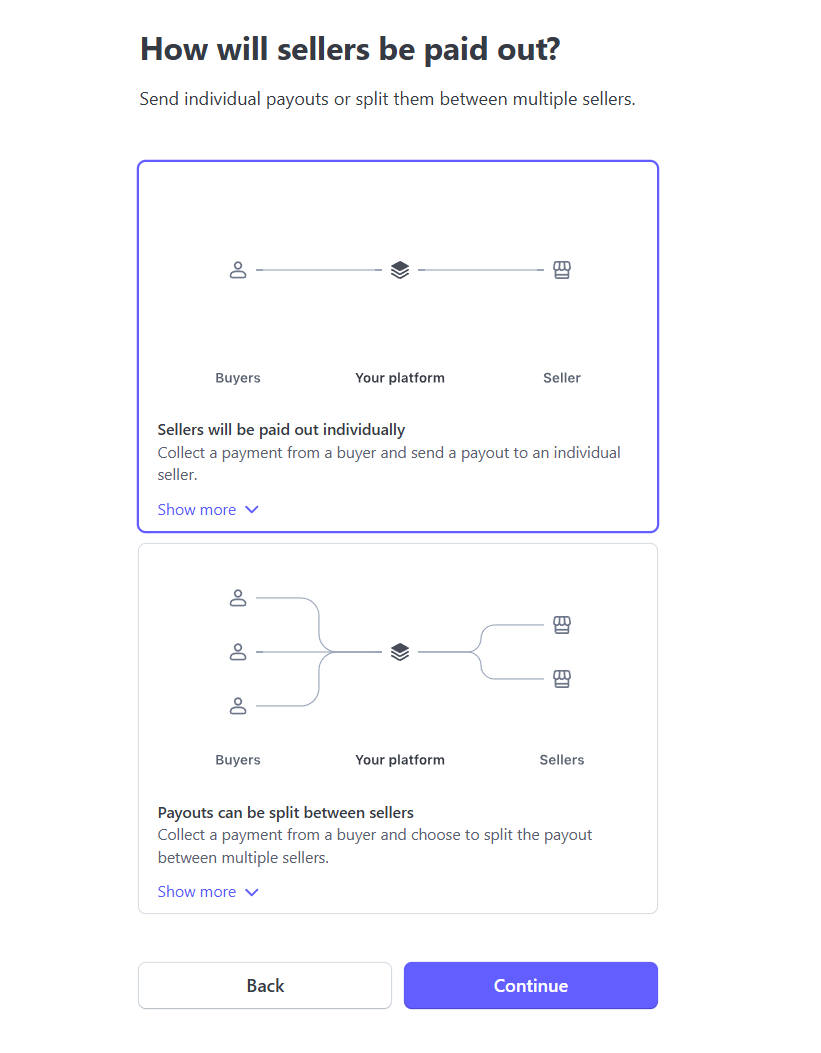
    Select “Sellers will be paid out individually”

    In next steps select “Onboarding hosted by Stripe” and “Express Dashboard”
  4. Follow next steps to finish setting up Connect.

    It’s very important to have all the items checked, you even need to set your own branding color or upload logo as without it it won’t let you set Connect accounts.

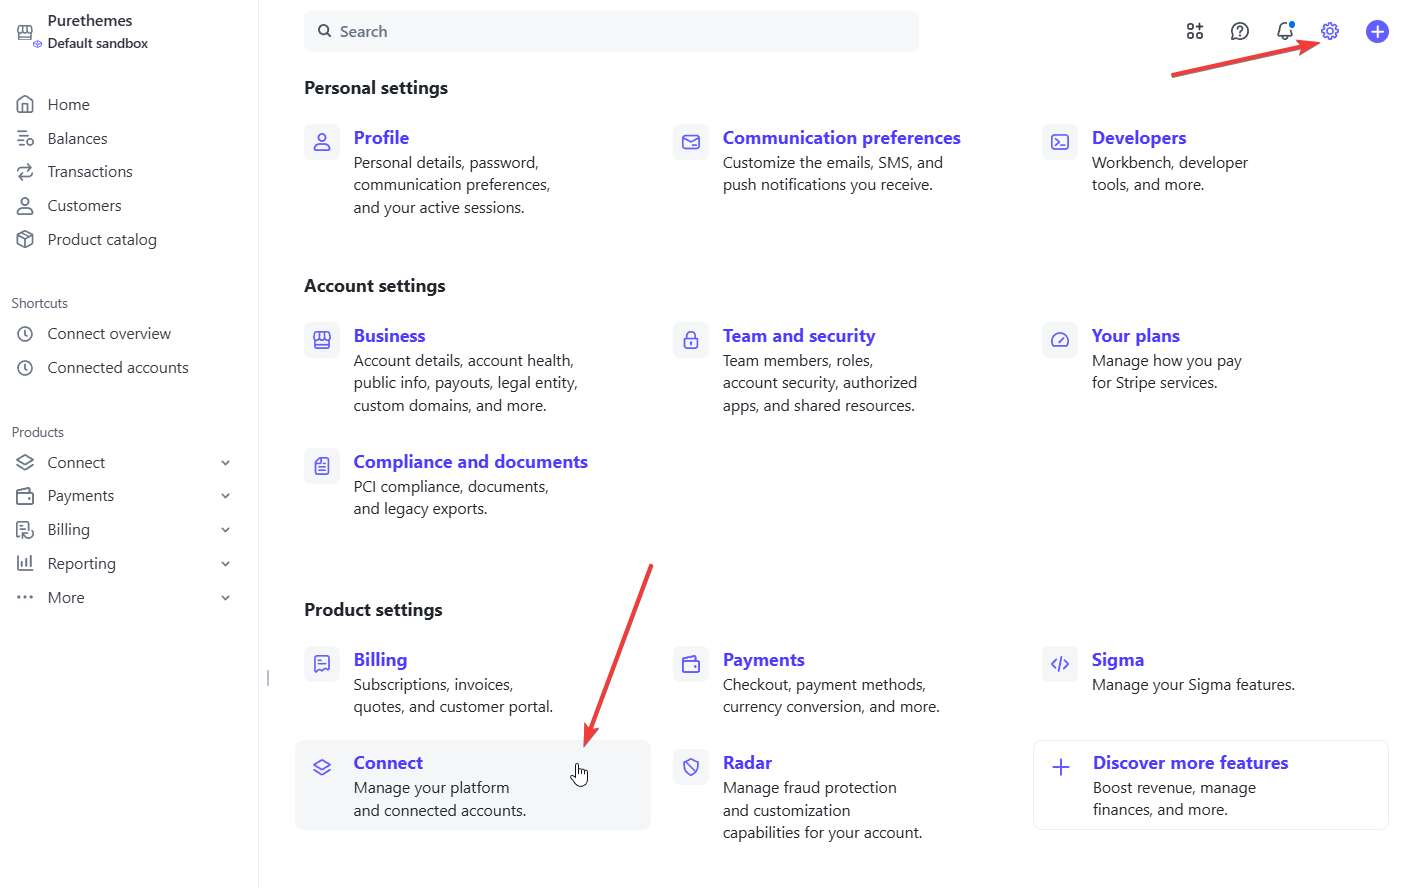
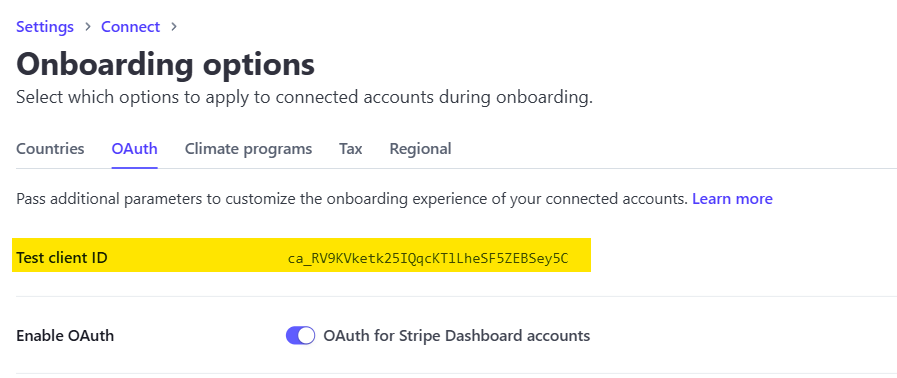
  5. Get Client ID. For that go to Settings scroll down to Product Settings → Connect box,
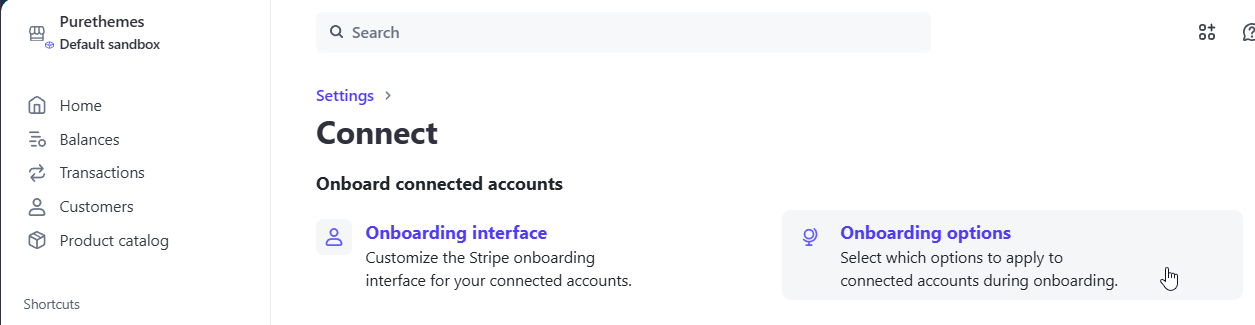
  6. Navigate to Onboarding Options
  7. Copy your Test mode client ID and paste it in Listeo Core → Stripe Connect → Stripe Connect Test Client ID.

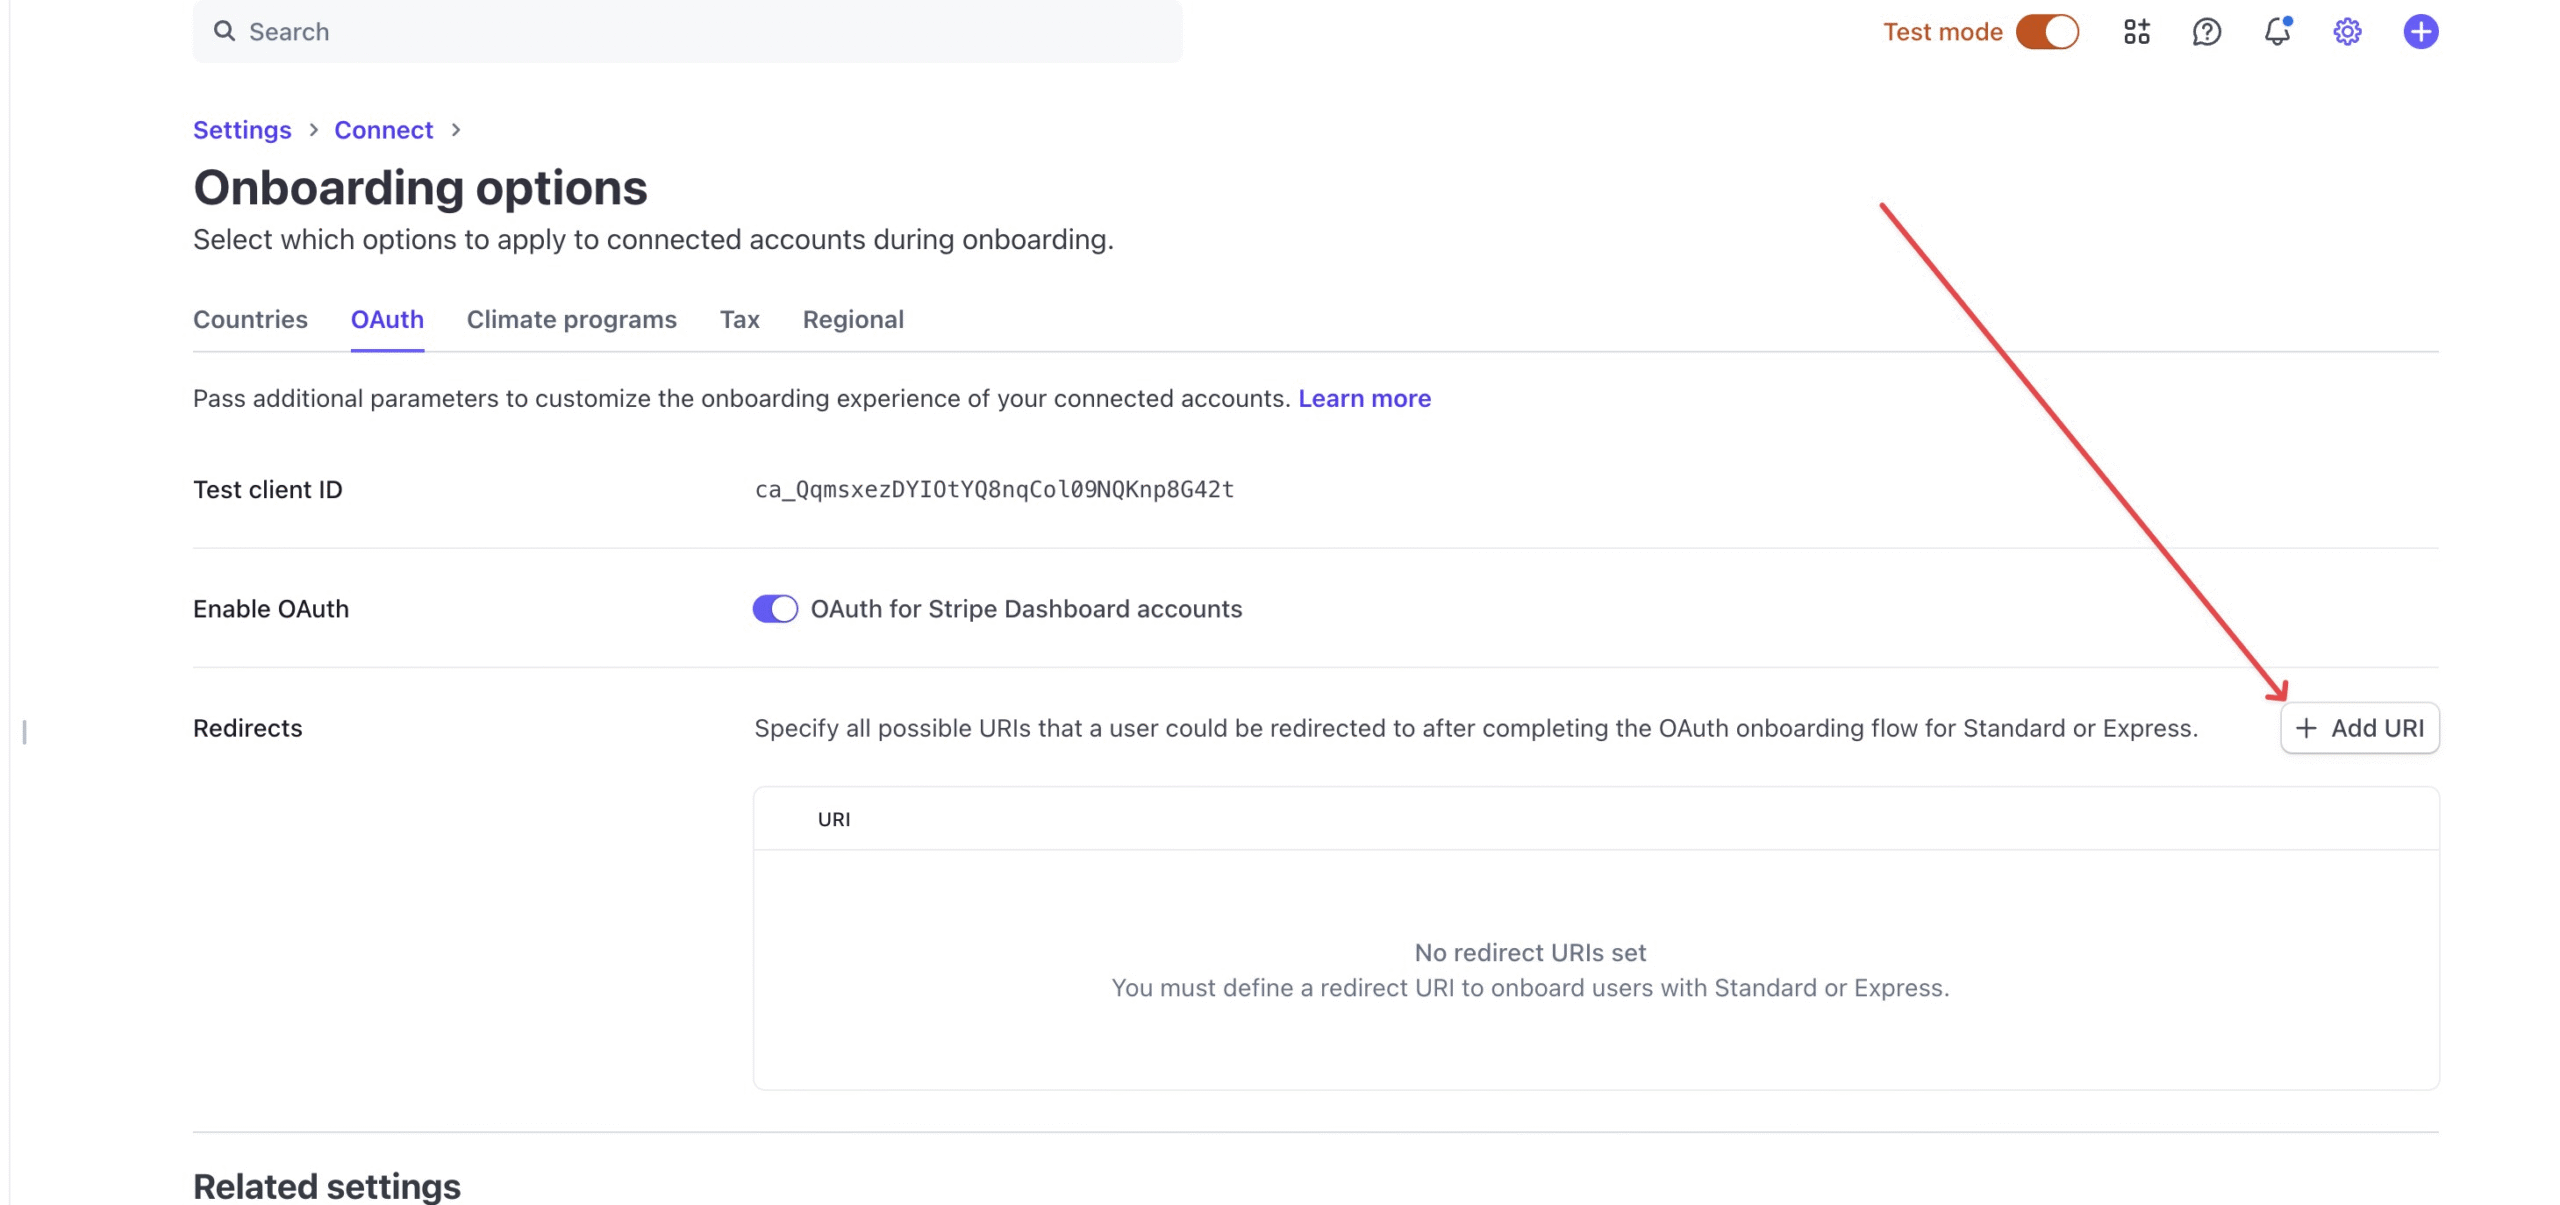
    and turn on OAuth Settings
  8. in Redirects section click +Add URL, and add there a link to your wallet page with /?stripe-setup=yes at the end, so the whole link would be
    https://www.yourdomain.com/wallet/?stripe-setup=yes
  9. Now Switch to Live mode and repeat those steps, get the Live Client ID to set it in Listeo Core, enable OAuth settings and add Redirect.
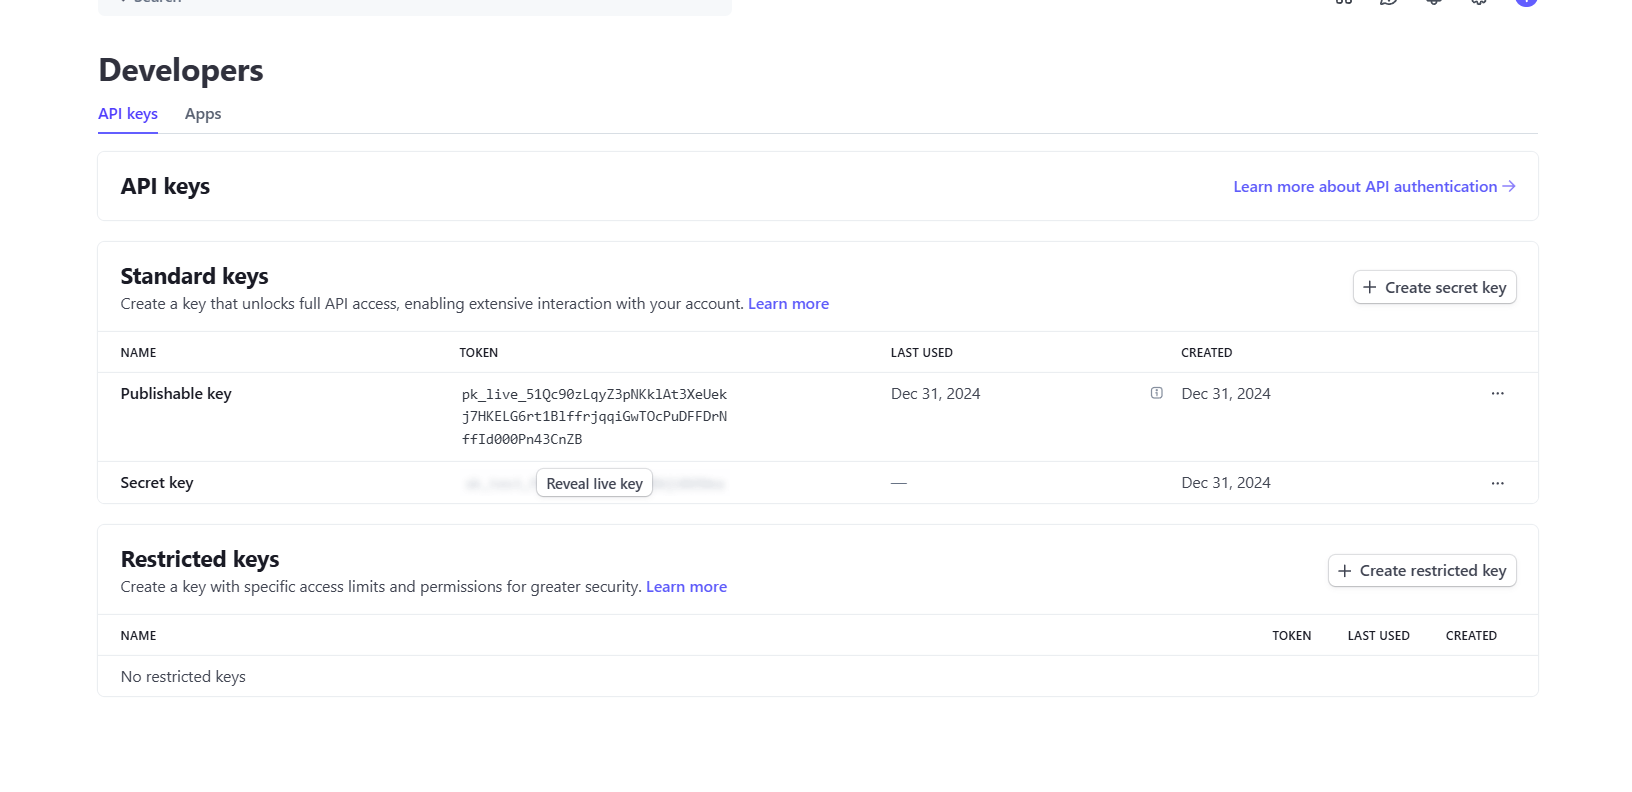
  10. In Stripe Dashboard →Developers you’ll find Publishable and Secret Key, copy them to Listeo CoreStripe Connect fields, there are inputs for both keys for test and live mode, and you need that to onboard users. If you can’t copy/reveal the Secret Key in Stripe Dashboard, you can create a new one using “Create secret key” button.
  11. Review all other options

Setting Up WooCommerce Payment Gateway

  1. Install WooCommerce Stripe Payment Gateway
  2. Go to WordPress AdminWooCommerce → SettingsPayments, find Stripe on the list, go to Manage and connect to your Stripe account you’ve just created in step before.

    It’s VERY important to not create a new account from that link in plugin, it has to be the one you already have and already has Connect enabled.

  3. It should automatically get all required API keys, but to be sure go to Settings, click Edit Account Keys and make sure both test and live keys are set.
  4. Set the webhook in your Stripe Account Settings as it’s explained in the popup. It’s important as this webhook is what is used to get data about payment. Make sure the webhook type is set to Account, not Connect.
  5. It’s important to know that this feature in Listeo is in its early stage and although we did a lot of testing we strongly encourage to run it in Test mode first to make sure everything works as expected. To do that go to wp-admin → WooCommerce → Settings → Payments → Stripe → Manage → Settings and check the “Enable test mode” checkbox

    After Connecting to Stripe, users will have a new box in Wallet page with few informations about his account and option to login directly to Stripe Dashboard to see all details about the payments to his account.
    Example view of Stripe Dashboard for Listing Owner

Before you’ll raise a support ticket:
1. Ensure that the API keys and permissions are correctly configured in both WP and Stripe.
2. Verify that the Redirect URI in Stripe matches the one in your WordPress plugin.
3. Confirm that your Stripe account is fully verified (not pending).
4. Make sure you are not using account that is already connected to other platform
5. Clear any cache that might interfere with the connection.
6. Check https://docs.purethemes.net/listeo/knowledge-base/how-to-troubleshoot-stripe-split-payments/


Why split payment works only with Stripe?

While we offer auto split payment support for commonly used gateway (Stripe), we are not able to provide support for every niche payment gateway from each country. If your website makes revenue maybe it’s worth hiring a professional who can implement a gateway that is popular in your country. Otherwise you can manage payouts manually.

Google Reviews Support

Important: API Usage & Costs
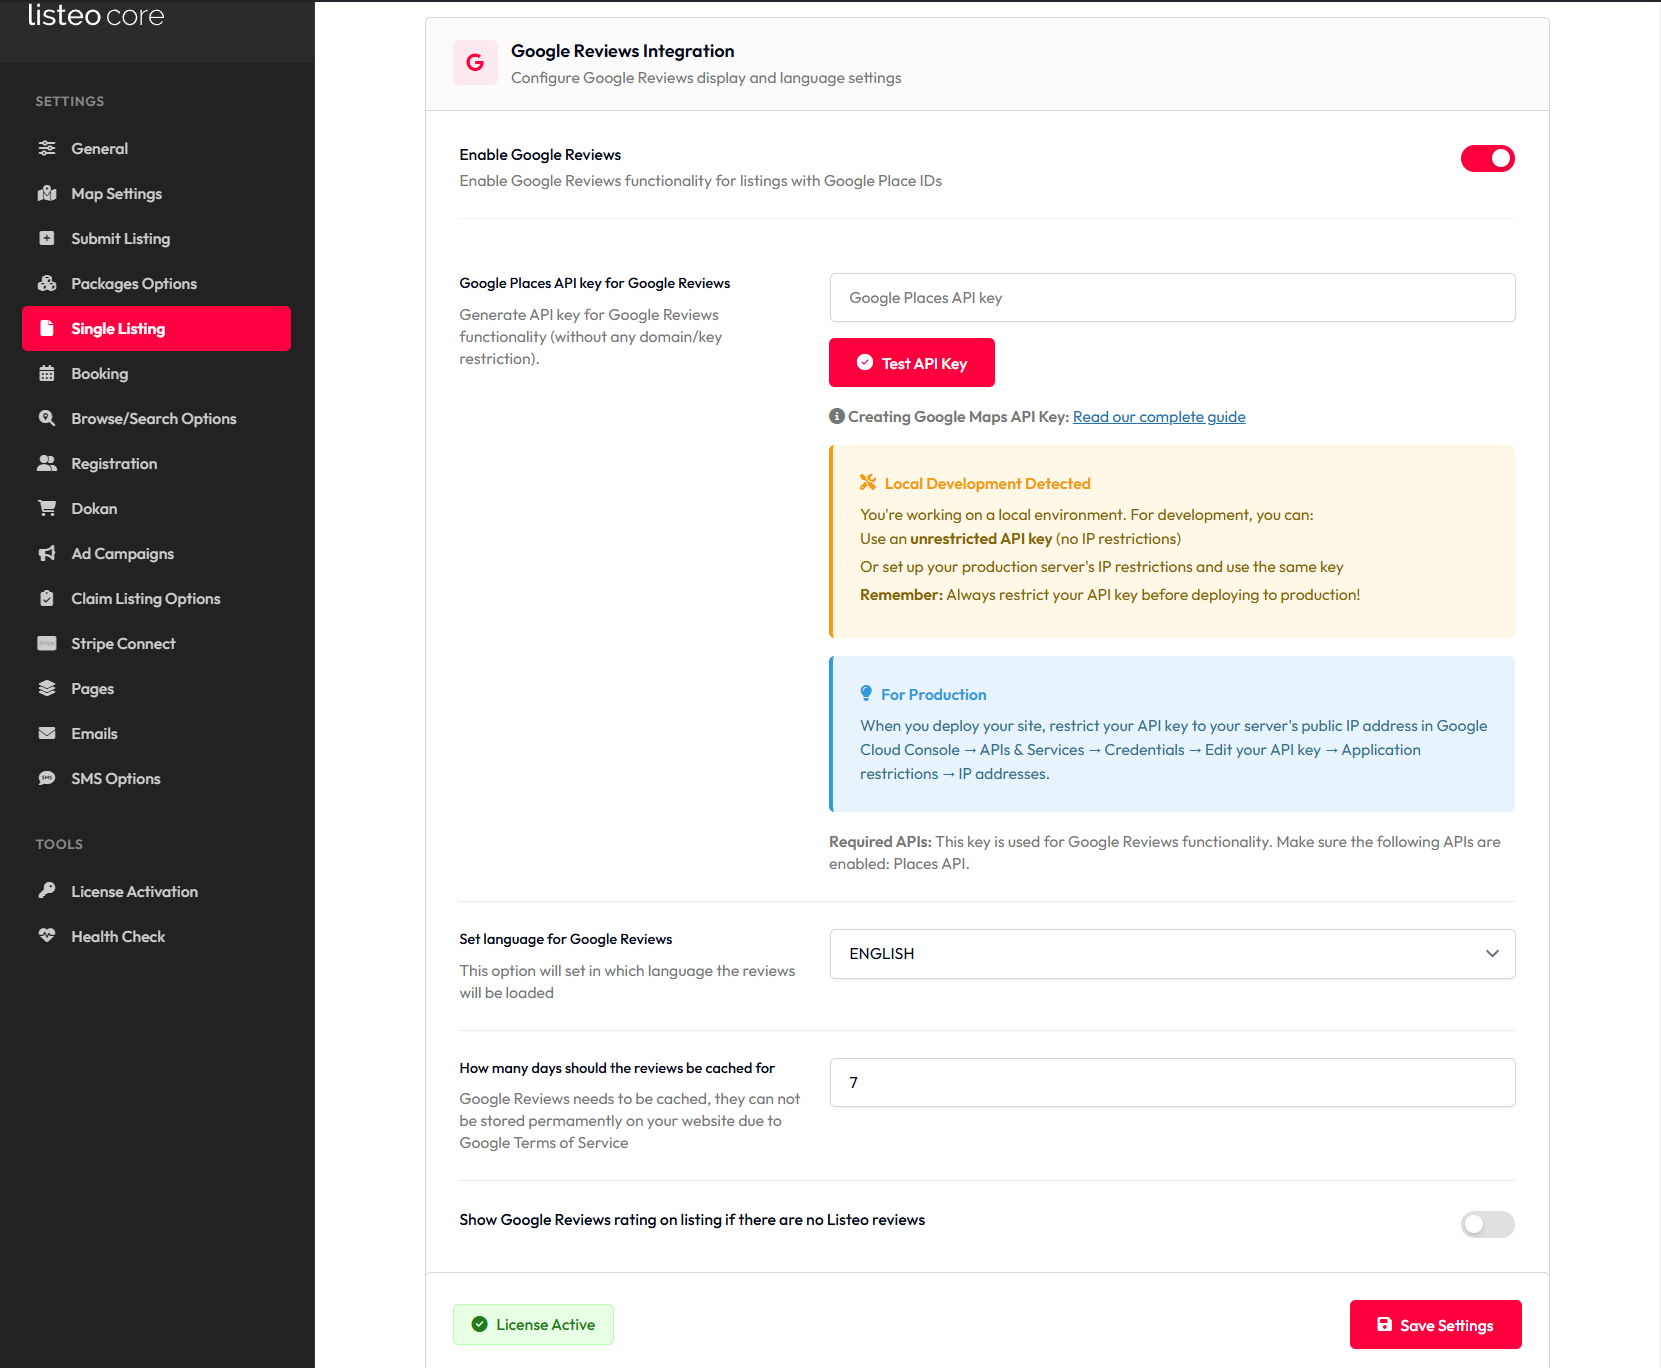
Google Places API calls are made only when visitors view listing pages and cached for 1 day (or more if you modified cache duration in Listeo Core). If you have many listing take into account that Google Reviews can result in API charges based on your usage.

Set up API quotas and billing alerts in Google Cloud Console →

To use that feature you need IP restricted API key added in  Listeo Core → Single Listing → Google Reviews).

https://docs.purethemes.net/listeo/knowledge-base/creating-google-maps-api-key/#radius-key

Listeo has option to show 5 latest reviews from Google Reviews for the listings.

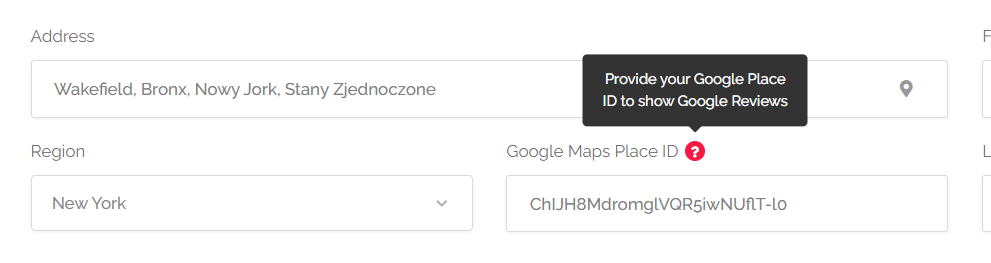
To use it, you have to provide Place ID for the listing. If you are using Google Address auto suggestion feature, this will be automatically set if you choose a business/establishment/place from the suggestion list (yes! we have now option to actually search for places, not just address).

If you are using other map providers, you can get the Place ID from Places ID-finder. You can also use this method if Places ID finder doesn’t work for you

Places API allows to show only 5 reviews from that, those results are cached for 48 hours to not generate additional costs for API. To use that feature you need to have API key set for radius search (Listeo Core → Map Options → Google Maps API key for server side geocoding).


Troubleshooting

Google Reviews are not displaying, what can I do?
  1. First make sure you Google API key is properly created (not restricted to domain). In Listeo Core → Single Listing Google Reviews Integration click “Test your API key“.
  2. The second most common reason reviews don’t show is using the Place ID for an address instead of the actual place. Searching by address alone gives an ID without reviews. To get reviews, use the place’s name and address. For example, “Via dei Tribunali, 32, 80138 Napoli NA” gives a different ID than “Gino e Toto Sorbillo, Via dei Tribunali, 32, 80138 Napoli NA.” You need the Place ID of the business, not just the address.
  3. Please also pay attention to the following options if google reviews are not displayed:
    – Show Google Reviews even if there are no Listeo reviews

Google Reviews API Rate Limiting

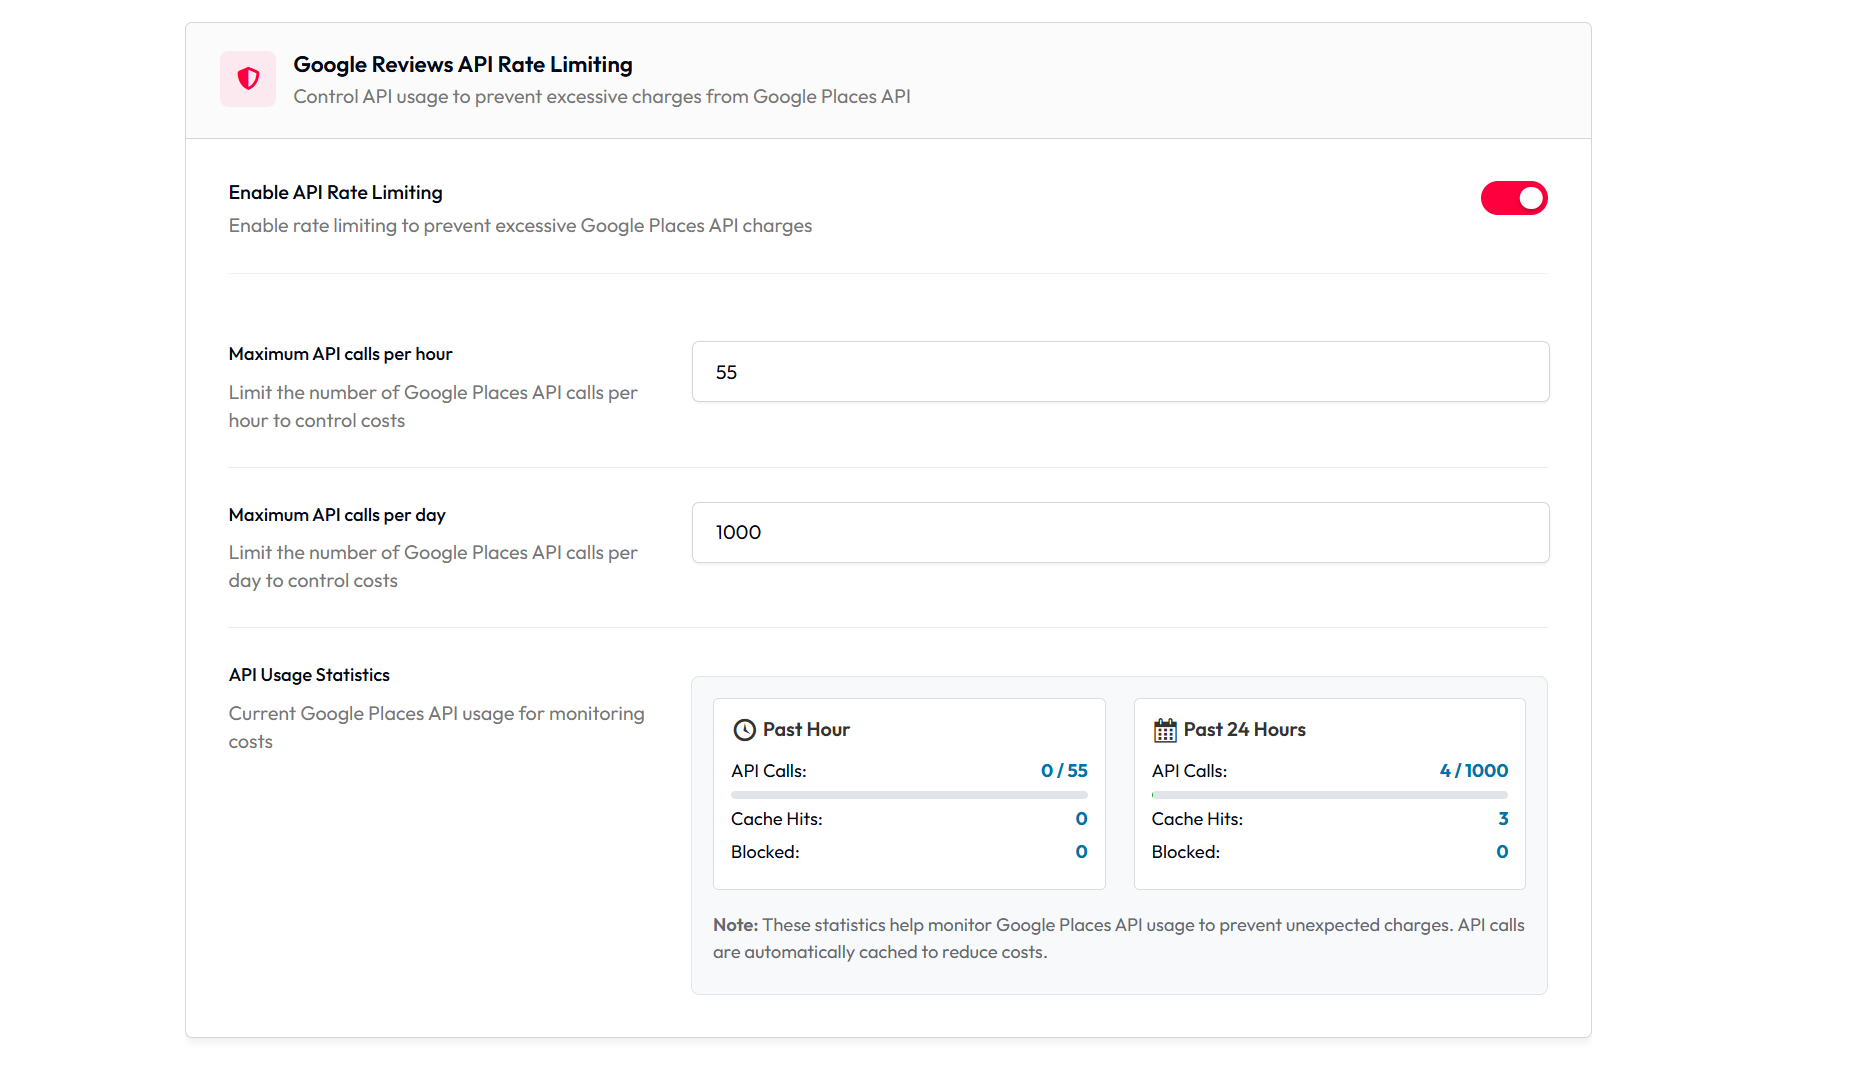
It is highly recommended to enable gateway for Google Places API to control API usage to prevent excessive charges from Google. Listeo Core → Single Listing → Google Reviews API Rate Limiting

Although the Listeo Core itself has a “API Rate Limiting” system, it’s always wise to configure quota limits directly in Google Cloud.

https://developers.google.com/maps/billing-and-pricing/manage-costs#set-caps
✅ SELECT the API in the drop-down menu (All Google Maps Platform APIs).
✅ SET requests/map loads/elements per day parameter according to what you are willing to pay each month.
✅ Click SAVE and repeat this process for any API you want to use.

Please set these limits to stay charge-free:
✅ Geocoding API → 320 requests per day
✅ Maps JavaScript API → 320 map loads per day
✅ Places API → 50 requests per day


When Google Reviews API is Called

  1. On listing page view but only when rating is not cached – transient cache expires by default: 1 day, configurable up to 999 days
  2. No cached data – First-time fetch for a listing with a _place_id
  3. Manual cache clear – Admin users can trigger cache reset for specific listing via ?clear_google_cache URL parameter e.g. https://www.test.com/listing/sample-listing/?clear_google_cache

Debuging

First, please verify this: I can’t see reviews! How to enable reviews? → 

For advanced users: you can use ?google_debug=1 parameter after listing URL and you will get derailed log in debug.log regarding Google Reviews fetching from visited listing, e.g:

[03-Oct-2025 13:08:39 Etc/GMT+0] === GOOGLE REVIEWS DEBUG - Listing ID: 560 ===
[03-Oct-2025 13:08:39 Etc/GMT+0] URL: /listing/test-listing/?google_debug=1
[03-Oct-2025 13:08:39 Etc/GMT+0] Gateway enabled option: on
[03-Oct-2025 13:08:39 Etc/GMT+0] Place ID: ChIJi-URiMdbFkcRejR0UEAeZtc
[03-Oct-2025 13:08:39 Etc/GMT+0] Gateway: ENABLED
[03-Oct-2025 13:08:39 Etc/GMT+0] TRANSIENT CACHE: EXISTS and VALID
[03-Oct-2025 13:08:39 Etc/GMT+0] Cache data type: array
[03-Oct-2025 13:08:39 Etc/GMT+0] Cache array keys: html_attributions, result, status
[03-Oct-2025 13:08:39 Etc/GMT+0] Cache status: OK
[03-Oct-2025 13:08:39 Etc/GMT+0] Result exists: YES
[03-Oct-2025 13:08:39 Etc/GMT+0] Cached Rating: 4.2, Count: 667
[03-Oct-2025 13:08:39 Etc/GMT+0] Number of reviews in cache: 5
[03-Oct-2025 13:08:39 Etc/GMT+0] RETURN: Cached data (from transient)
[03-Oct-2025 13:08:39 Etc/GMT+0] FINAL RETURN: array (status: OK)
[03-Oct-2025 13:08:39 Etc/GMT+0] Will display: 5 reviews
[03-Oct-2025 13:08:39 Etc/GMT+0] === END DEBUG ===

If there will be an issue e.g. with Google API limits you will see proper info, for example:

Error message in cache: You have exceeded your daily request quota for this API. If you did not set a custom daily request quota, verify your project has an active billing account: http://g.co/dev/maps-no-account

How to fix login stuck at “sending user info, please wait…”?

If you’re experiencing issues during logging in in and you get stuck on message ‘Sending user info, please wait…‘ there might be couple of issues:
  1. Most common cause of this problem are cache plugins active on your site. Try to disable them to see if that help. If it does – you may need to adjust plugin settings, as some may have aggressive optimization. For example, in WP Rocket, set the cache lifespan to 10 hours or less.
     
    If it still happens from time to time we suggest enabling “Skip additional login/registration security check” option in Listeo Core → Registration
  2. Another but less common reasonis often related to custom mod_security rules. Some hosting providers block login requests from non standard paths, so try to contact your hosting provider and ask them about it.
  3. And last but not least, you may experience this issue on nginx server, in that case, add the following lines to /etc/nginx/nginx.com
    fastcgi_temp_file_write_size 10m; 
    fastcgi_busy_buffers_size 512k; 
    fastcgi_buffer_size 512k;
    fastcgi_buffers 16 512k;
    client_max_body_size 50m; 
    proxy_buffer_size 16k; 
    proxy_busy_buffers_size 16k;

    if that won’t help, check if you have Nginx Content caching enabled, you might need to disable that to fix that problem

Why I have so many Products on my WordPress site?

Every time you create a listing, it creates a “shadow copy” of that listing in Products. So each listing has assigned its own product in WooCommerce -> Products. This is created to handle payments for Booking, so when booking request is confirmed, it creates WooCommerce order for that product, and user is able to pay for it.
Those products are set to product type “Listeo Booking”, they are not visible on front-end, and not indexed by google.

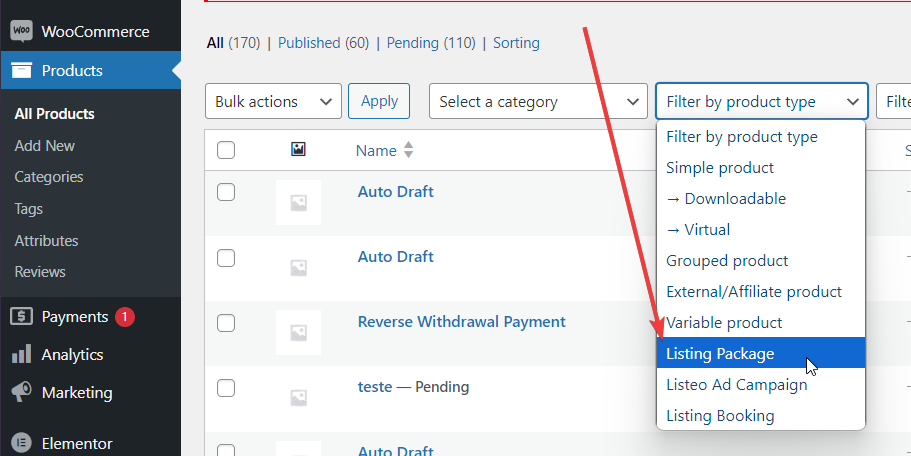
If you’re looking for only listing or ad campaign packages, please use the filter:

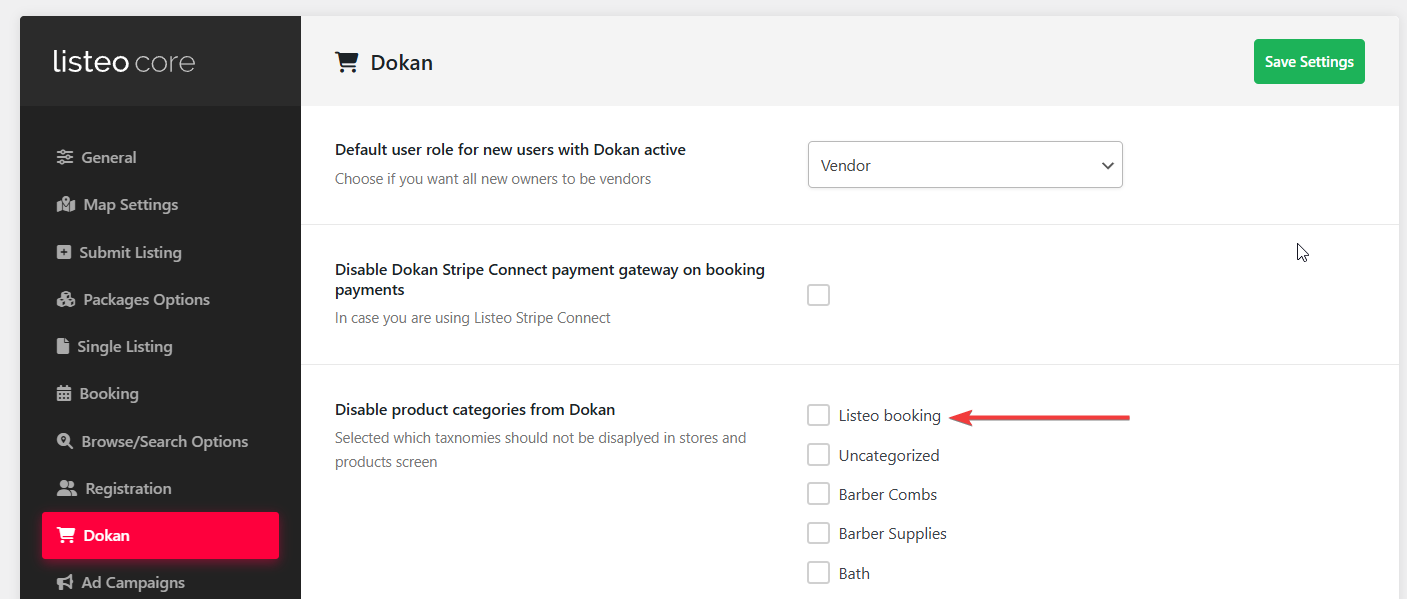
If you see these products on front-end shop you can disable then in Listeo Core → Dokan → Disable product categories from Dokan 

Search by date range

Until version 1.4.3 the “date range” field was used only to search for rental listing types. Since 1.4.3 we’ve added support for event type listing, but because of the way the search works, you can search for rentals and for events at the same time. For rentals, we’re looking for dates where the listing have no bookings made, and for event we search for dates which are in the selected range.


Setting Up date range

Go to Listeo Editor -> Search Form, choose the type of search form, if it already has Date range field click it to open, if no, drag the Date range field from Available searchable elements to the place in Search form, and click Save.

Now, click this new field to open its options. You should see this.

By choosing Rentals, you will limit Date Range only to rental listing type, and by choosing Event you will search only for events.

If you have both types and want to allow users to choose, select the last option, and drag from the Available searchable elements  the Listing Type field, that will allow user to select which listing types they want to search for.

You can of course remove service type as this won’t be returning any results. Date search for services is currently not available.

Coupons

How to add new coupon by owner

To add a new coupon, go to Dashboard → Coupons and click Add New Coupon. The opening screen will present you with the coupon code and other settings.


How to set up a coupon widget

If you would like to display a widget with coupon code and description first you have to add Coupon Widget in Appearance → Widgets for Single Listing Page

Then you can select specific coupon and enable widget for each listing in listing editor:


Managing coupons

From WordPress admin in WooCoomerce. Navigate to WP Admin → Marketing → Coupons. You can manage there both user coupons and own created by site admin.


Coupons do not work

If after all steps above you still can’t see coupons in listing pages and add listing form most likely you disabled them in  Listeo Core → Booking → Remove Coupons option from Booking widget and confirmation

Also make sure “Coupons” page is created with [listeo_coupons]  shortcode and assigned in Listeo Core → Pages → Coupons Manage Page


Categories and Sub Categories

This guide explains how categories work in Listeo. You can modify categories by navigating to WordPress Dashboard → Listings → Categories

Unlimited-Level Navigation, an example:
Level 1: Listing types (Services, Rentals, Events, Classifieds)
Level 2: Categories specific to each type (e.g., Restaurants under Services)
Level 3: Sub categories related to previous parent category (e.g. Italy Food, Asian Food under Restaurants)

User Flow:
1. User click drilldown field
2. Select listing type (e.g., “Services”)
3. Select specific category (e.g., “Restaurants”)
4. Can drill deeper into subcategories if available


Option 1 (Global Categories Drilldown)

This approach works best when listing types have common categories between them. By using Global Categories shared across all listing types, users start with the main shared categories at the surface level, then navigate through hierarchical subcategories as they go deeper.

Simply add “Any Categories” search filter, select “Drilldown Taxonomy” and add to the search form where you need it.

To avoid displaying both Global and Listing Type categories in add listing you need to disable “Register dedicated taxonomy” option


Option 2 (Listing Type + Categories Drilldown)

This approach works well for unrelated listing types with distinct category structures, using a hierarchical, multi-level dropdown menu. Users start with the main listing types at the surface level, then navigate through nested categories specific to each listing type at deeper levels.

Main advantage of this approach is the fact that you can edit for each listing type add listing form individually.

Requires Listeo at least Listeo v2.0

When creating custom listing type make sure to check “register dedicated taxonomy” – this will display listing type in categories page.

Add the “Choose Listing Type & Category” search filter to the search form using Listeo Editor.

To display  Listing Type categories in add listing you need to enable “Register dedicated taxonomy” option

You can remove “Global Category” dropdown in Listeo Editor in this case if you won’t use it and leave only “Listing Type Categories”


Bulk Add Categories

This feature in WP Admin → Listings → Bulk Add Categories allows you to quickly import multiple categories and subcategories at once using a simple text format.

Simply enter one category per line, use dashes to define hierarchy levels (- for subcategory, — for sub-subcategory), and optionally add FontAwesome icons using the pipe separator (e.g., Restaurant|fas fa-utensils).

You can AI assistants like ChatGPT or Claude to generate category lists – just copy the built-in prompt template and describe your business type. The feature supports all category types including global categories and listing type-specific categories like Service, Event, and Rental categories.