
WP Admin → Job Listings → Settings is the page where you can configure the plugin. You’ll see a tabbed interface showing available setting groups:

Plugins such as Job Alerts may add their own settings tabs here as pictured.
General Settings
The General tab contains the following settings:
- Date Format – Choose how you want the published date for jobs to be displayed on the front-end.
- Google Maps API Key – please refer to Step 6 in this tutorial
- Delete Data on Uninstall
- Bypass Trash for Job Listings
- Enable Usage Tracking
Job Listings Settings
The job listings tab contains the following settings:
- Listings per page – Controls how many job listings should be shown per page when using the [jobs] shortcode.
- Pagination Type – Determines whether to show page numbered links or a Load More listings button.
- Filled positions – If checked, filled positions will no longer be visible when using the [jobs] shortcode
- Hide expired listings – If checked, expired job listings are not searchable.
- Hide Expired Listings Content – If checked, the content within expired listings will be hidden.
- Categories – If checked, job categories will be enabled. These are used to group jobs by category and are also visible on the frontend job submission form if enabled.
- Multi-select Categories – If enabled, the category select box will default to a multiselect on the [jobs] shortcode.
- Category Filter Type – Determines the logic used to display jobs when selecting multiple categories.
- Types – Choose whether you want to enable types.
- Multi-select Listing Types – If enabled, each job can have more than one type.
- Salary – If enabled, this lets users add a salary when submitting a job.
- Location Display – If enabled, this displays the full address of the job listing location when it is detected by Google Maps Geocoding API. If a full address is not available, it will then display whatever text the user submitted for the location.
Job Submission Settings
The job submission tab shows options regarding the job submission process in WP Job Manager:
- Account required – If left unchecked, non-logged in users will be able to submit job listings without creating an account.
- Account creation – If checked, non-logged in users will be able to create an account by entering their email address on the job submission form. This is optional depending on the settings below.
- Account Username – If enabled, a username will be generated from the first part of the user email address. Otherwise, a username field will be shown.
- Account Password – When enabled, an email will be sent to the new user with their username and a link to set their password. If disabled, a password field will be shown and the new user’s email address won’t be verified.
- Account Role – If you enable registration on your job submission form, choose a role for the newly registered users. This defaults to Employer.
- Moderate New Listings – If enabled, new submissions will be inactive, pending admin approval. Only once approved by an admin (published) will they be visible on the frontend.
- Allow Pending Edits – If enabled, submissions awaiting admin approval can be edited by the user.
- Listing duration – How many days listings are live before expiring. Can be left blank to never expire. Published jobs will automatically be set to expire based on this setting. Please note that WC Paid Listings can override this setting.
- Listing Limits – How many listings are users allowed to post. Can be left blank to allow unlimited listings per account.
- Application Method – Choose the contact method for listings.
- Terms and Conditions Checkbox – this allows you to require employers to check a Terms and Conditions box before submitting the job listing. Note that WPJM does not create this page or it’s contents for you. Once created, the page can be set in Job Listings->Settings->Pages.
ReCaptcha Settings
WP Job Manager (and the Applications and Resume Manager add-ons) have ReCaptcha support built in. To enable it, you’ll need to set up a ReCAPTCHA key at Google’s ReCAPTCHA admin dashboard.
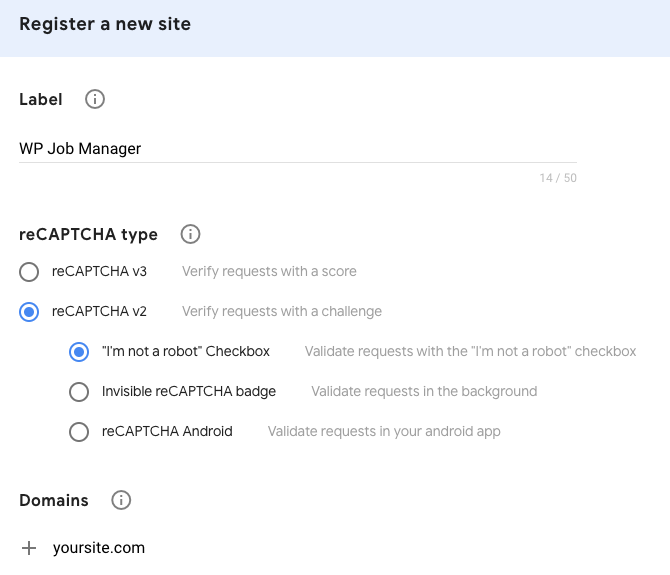
Note that WP Job Manager currently supports reCAPTCHA v2 only, so make sure you select that when registering your site.
You will then be provided with a site key and a secret key, which you can enter in the ReCAPTCHA settings page on your site.
- Field Label – The label used for the reCAPTCHA field on forms.
- Site Key – You can get this from the Google ReCAPTCHA admin dashboard.
- Secret Key – You can get this from the Google ReCAPTCHA admin dashboard.
- Job Submission Form – Enable this to display the ReCaptcha field on your job submission form.
Pages
The pages tab allows you to select the pages where you’ve inserted the main WP Job Manager shortcodes.
- Submit Job Form Page: Select the page where you have placed the
[submit_job_form]shortcode. - Job Dashboard Page: Select the page where you have placed the
[job_dashboard]shortcode. - Job Listings Page: Select the page where you have placed the
[jobs]shortcode.

