Webhook Automation turns your chatbot into a doer, not just an answerer. When a visitor asks for something like “cancel my order” or “book a callback”, the AI collects the details it needs, confirms with the visitor, then sends them to an automation tool such as n8n, Zapier, or Make to do the real work.
What it does
When enabled, the AI gets a single tool for triggering the actions you define. When a visitor asks for one, the AI gathers the required fields through conversation, asks for confirmation, then POSTs a JSON payload to your one webhook URL. Whatever the server returns (up to about 5 KB) goes back to the AI for its reply.
So your AI can create support tickets, register sign-ups, start a refund flow, or notify a team channel, all without the visitor leaving the chat.
Turning it on
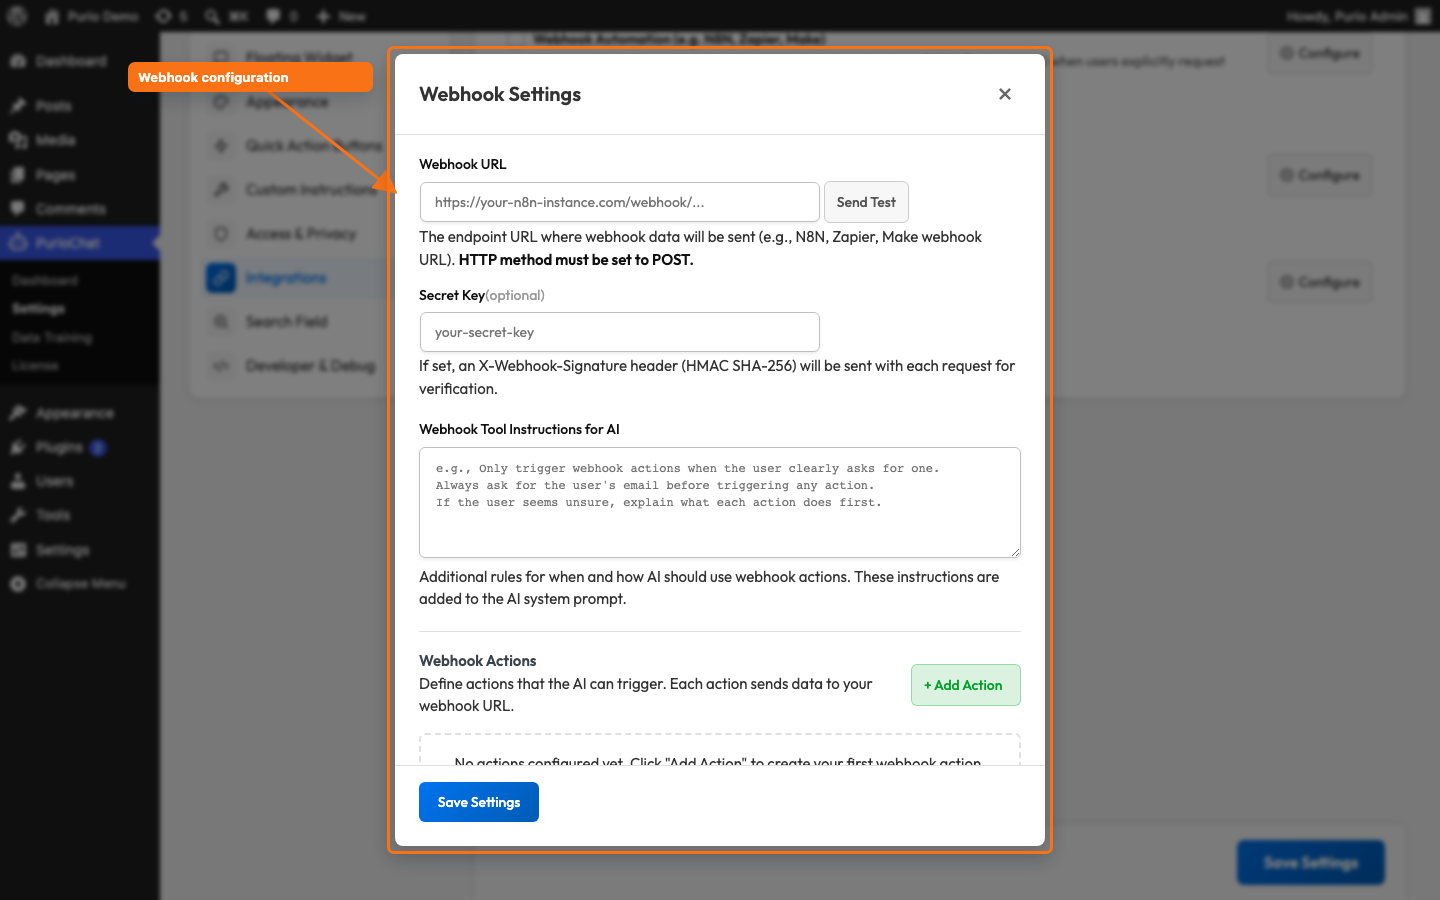
Go to PurioChat → Settings → Integrations, tick Webhook Automation (e.g. N8N, Zapier, Make), then click Configure to open the Webhook Settings modal where everything else lives.

The settings
Webhook URL
The single endpoint every action sends to. There is no separate URL per action, the action field in the payload tells your automation which one fired, so you can branch on it. Your endpoint must accept POST. Paste in the address from your n8n workflow, Zapier “Catch Hook” trigger, or Make scenario.
Secret Key (optional)
Set a secret and PurioChat signs every request with an X-Webhook-Signature: sha256=<hmac> header, an HMAC SHA-256 hash of the JSON body. Set the same secret in your automation tool and verify the signature there to confirm the request came from your site and was not tampered with. Optional, but strongly recommended for anything that performs a real action.
Tool Instructions
Use this field (up to 1000 characters) to set overall rules for how and when the AI uses webhook actions, for example “Only trigger an action after the visitor has clearly confirmed the details.” It is added to the AI’s system prompt and applies across all your actions.
Webhook Actions
This is where you define what your AI can do. Add as many actions as you need; each has three parts:
- Action Name — the human-friendly label the AI sees, such as “Cancel Order”. PurioChat generates an
action_idfrom it (lowercased, spaces become underscores), so “Cancel Order” becomescancel_order. You do not type the ID yourself. - AI Instructions — when to use this action and what to collect, for example “User wants to cancel their order. Collect their name, email, and order number.” Keep it concise (around 300 characters).
- Data Fields — a comma-separated list of the fields the AI must gather, such as
name, email, order_number. Spaces become underscores, so “order number” becomesorder_number. Snake_case is the safest format.
The JSON payload
When an action fires, PurioChat sends a payload like this to your URL:
{
  "action": "cancel_order",
  "action_label": "Cancel Order",
  "timestamp": "2026-06-06T14:30:00+00:00",
  "site_url": "https://yoursite.com",
  "data": {
    "name": "John Doe",
    "email": "[email protected]",
    "order_number": "12345",
    "current_page": "https://yoursite.com/contact",
    "user_id": 42,
    "conversation_id": "abc123-def456"
  }
}
The data object holds the fields you defined, plus context PurioChat captures automatically: current_page (the page the visitor was on), user_id (only if the visitor is logged in to WordPress), and conversation_id (when available). Use these in your automation, for example to attach the conversation ID to a support ticket.
How the response is used
PurioChat waits up to 15 seconds for your endpoint. Any 2xx status code (such as 200) counts as success; anything else is reported to the AI as an error. Whatever your server returns (up to about 5 KB) is fed to the AI, so your automation can pass information into the conversation, for example a confirmation number the bot then reads out to the visitor.
Rate limit
Webhook actions are limited to 5 triggers per hour to protect your site and automations from abuse. For website chat this counts per visitor IP address; for WhatsApp or Telegram it counts per individual (hashed) user instead. Once the limit is reached, further triggers are refused until the hour rolls over.
Test before you go live
Use the Send Test button in the Webhook Settings modal to fire a sample payload at your URL without involving the AI. It works even while the feature is disabled, so you can confirm connectivity first. On success you will see “Webhook received HTTP 200 — connection successful!”; any other code is reported so you can troubleshoot. If you set a Secret Key, the test payload is signed too, so you can verify your signature checking end to end.