What Pay Per Lead Does
Pay Per Lead is bundled with the Listeo Monetization Plus plugin.
Once enabled, two things can create a “lead”:
- A visitor fills out the native contact form on a listing.
- A visitor sends a booking request for a listing.
Instead of emailing the guest’s name, email and phone straight to the listing owner, Listeo masks that information. The owner sees that a lead came in, but not who it’s from. To see the full details, the owner pays to unlock the lead – instantly with prepaid wallet credits, or through checkout.
Where to Find It
Go to WP Admin → Listeo Core → Pay Per Lead. You’ll find four tabs:
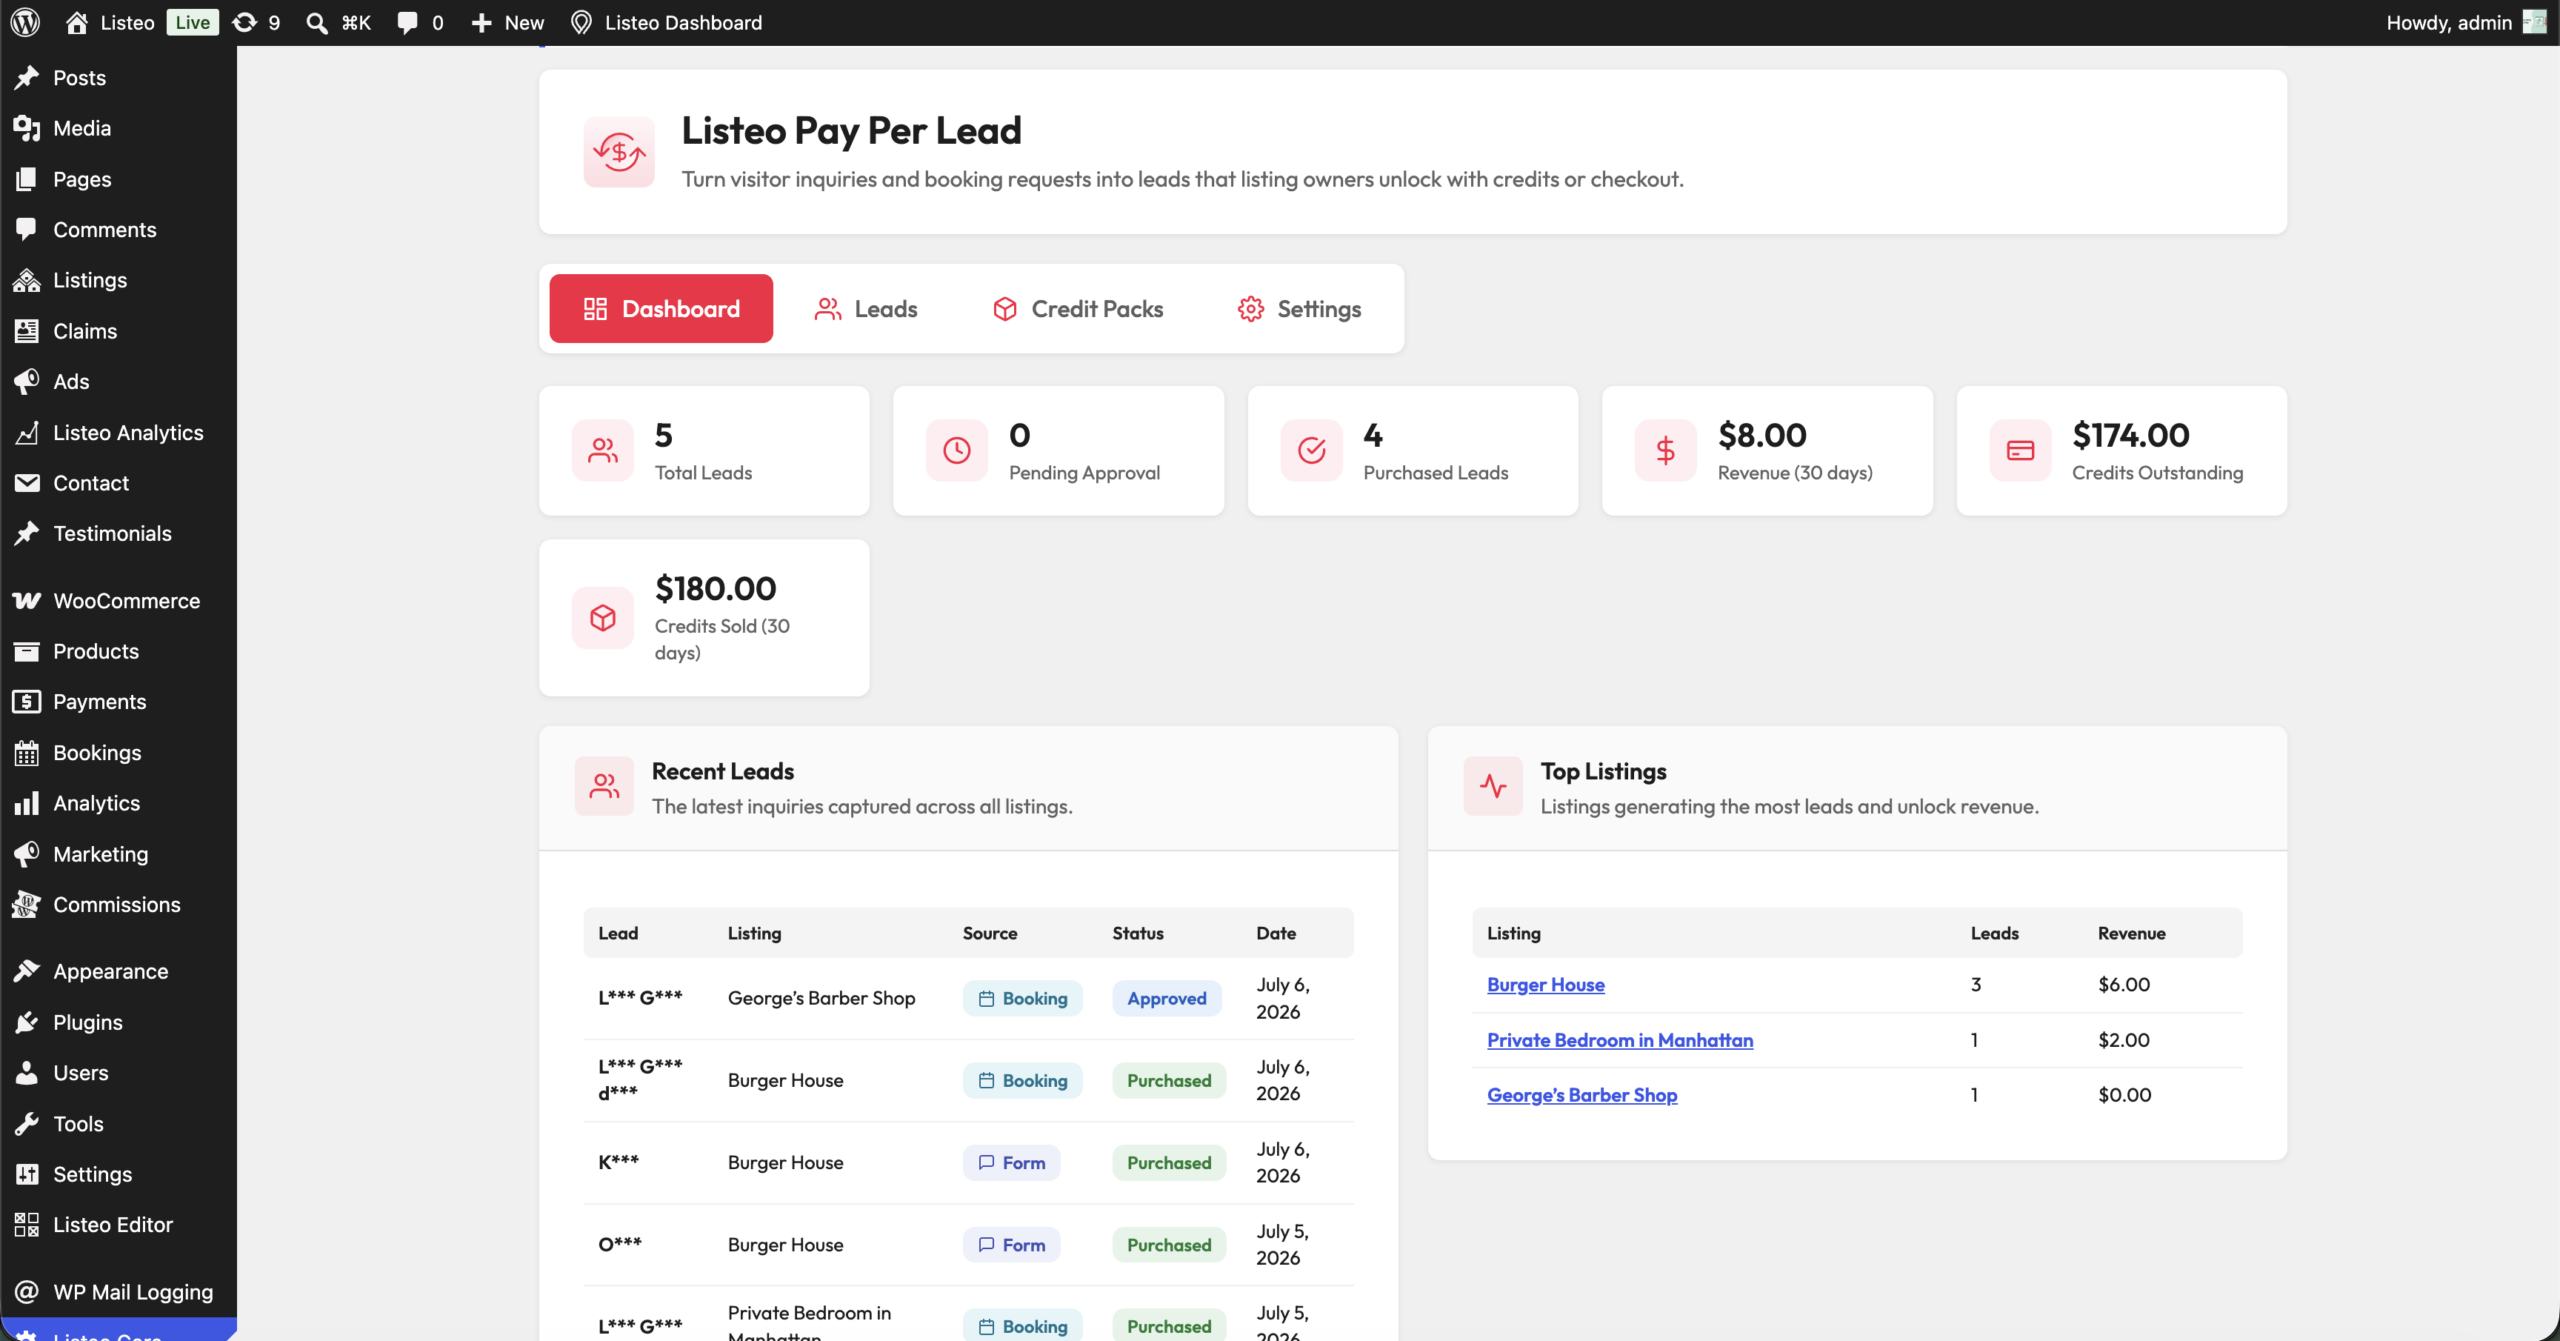
- Dashboard – stat tiles (total leads, pending approval, purchased leads, revenue), plus recent leads and top-performing listings.
- Leads – a filterable list of every lead (by status, listing, source), with a detail view and moderation actions.
- Credit Packs – create and manage the wallet top-up packs owners can buy.
- Settings – the master switch, pricing model, emails, spam protection, and advanced options.
Step 1: Turn It On and Choose Pricing
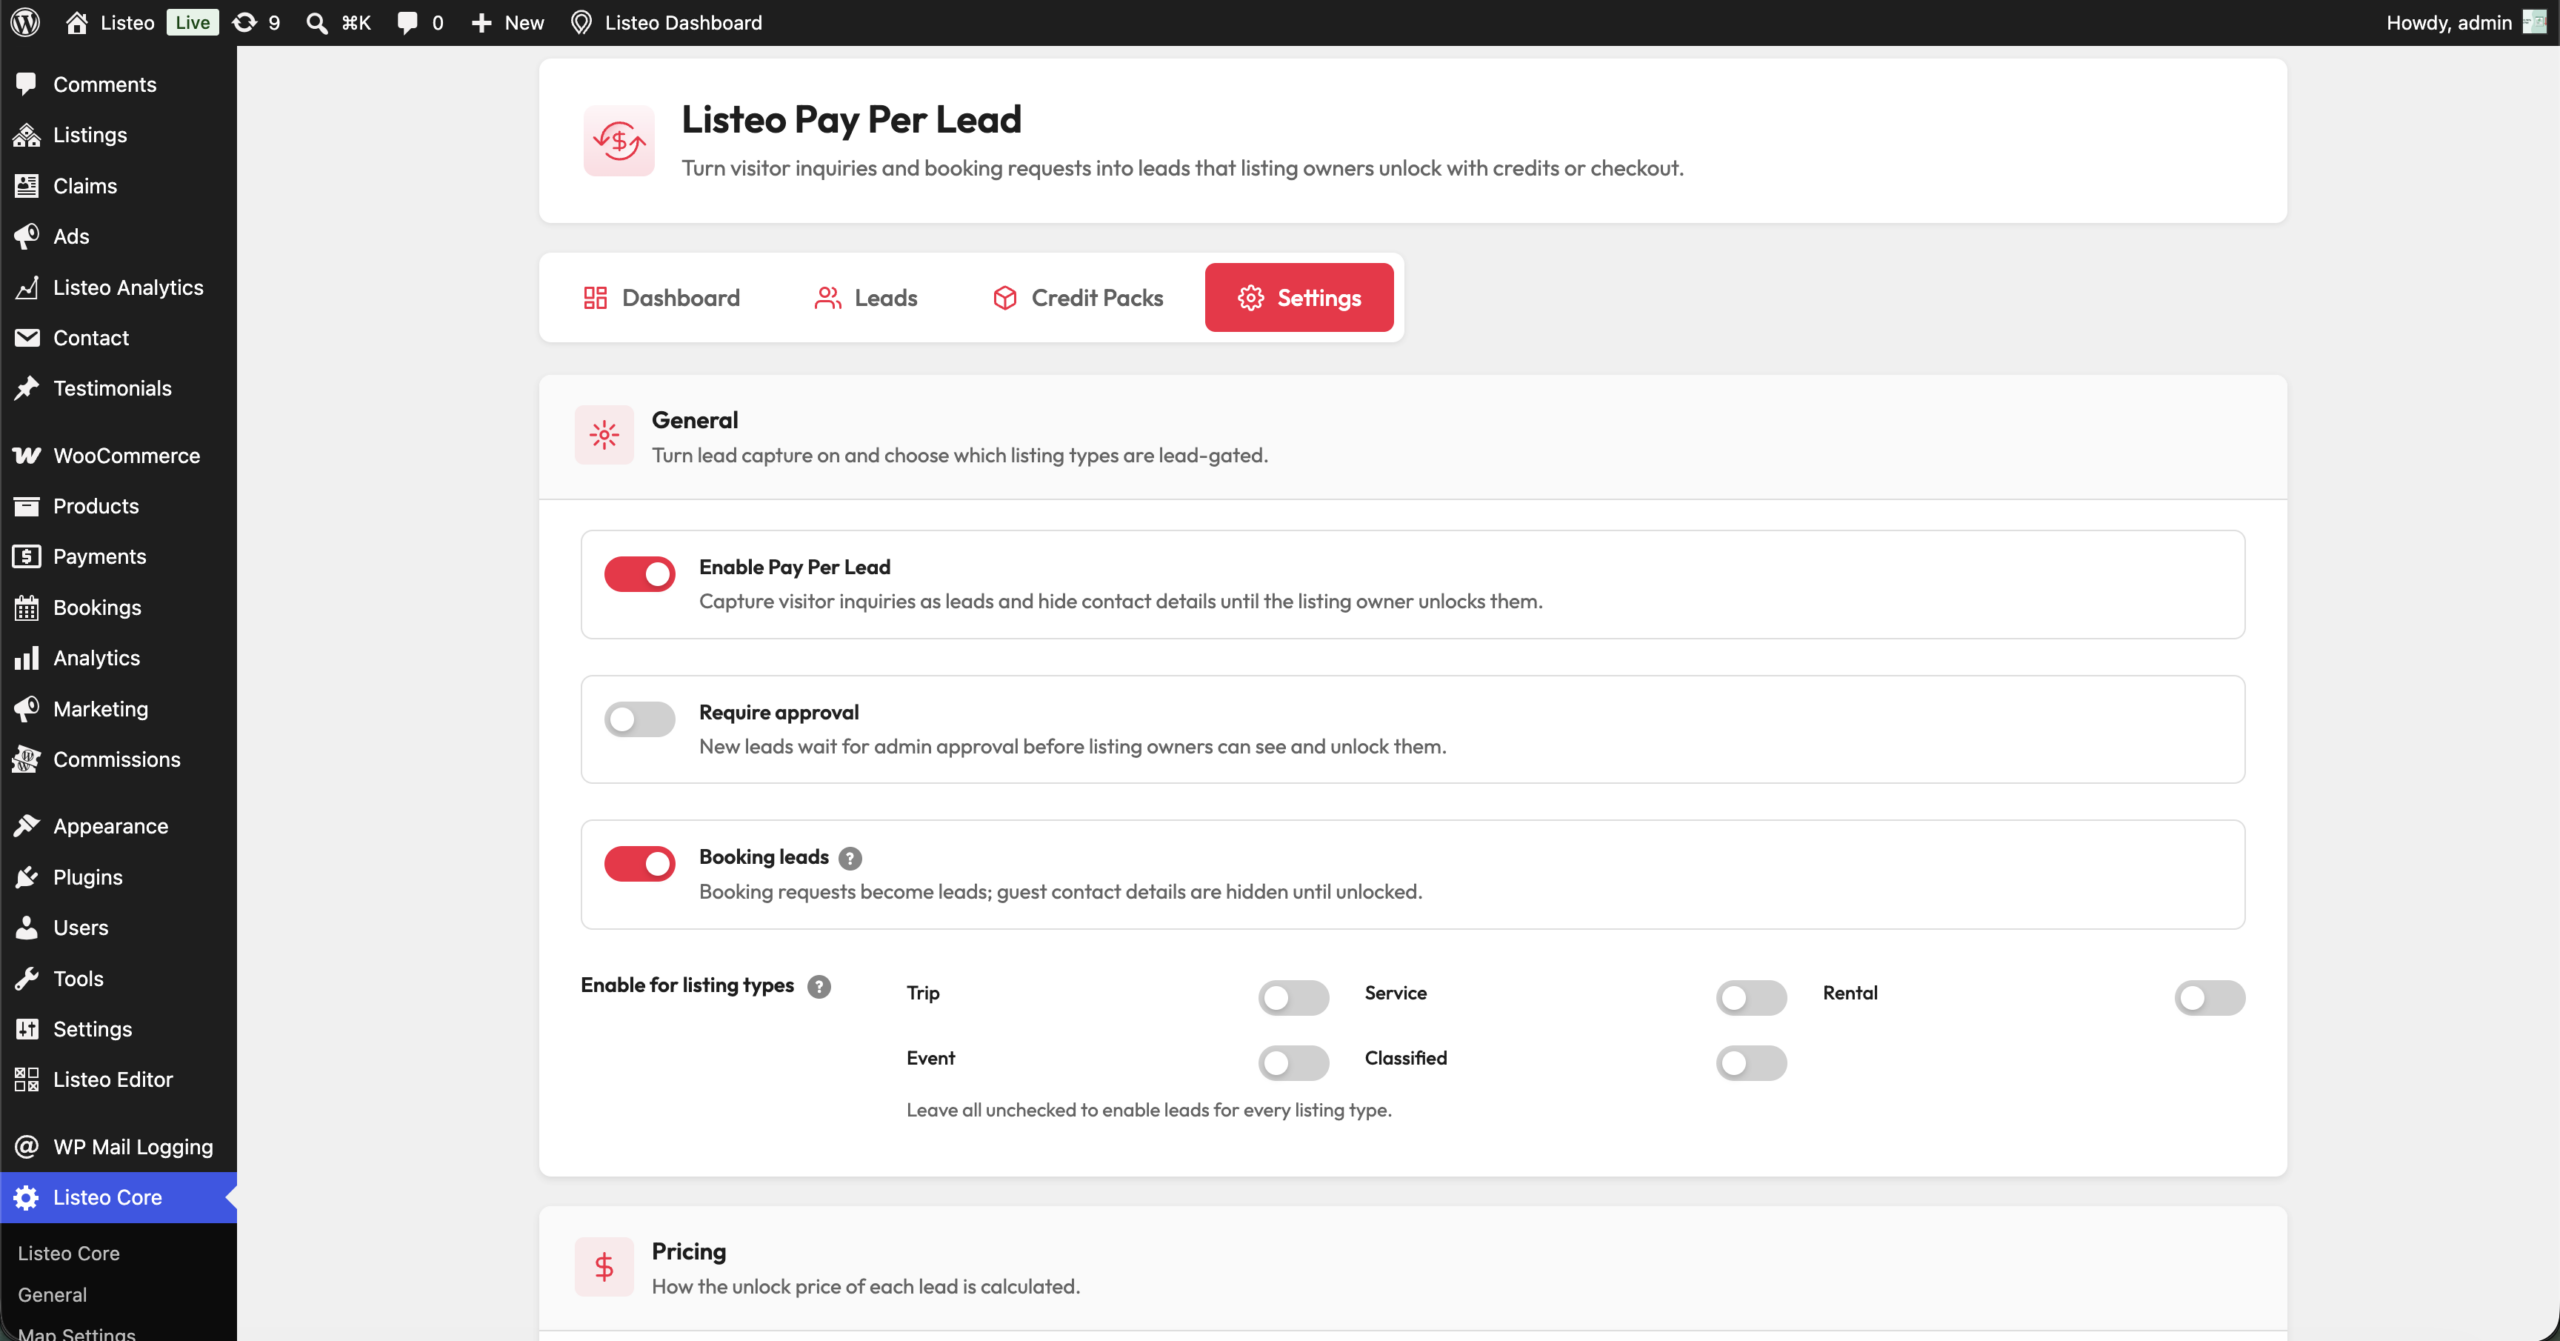
Go to WP Admin → Listeo Core → Pay Per Lead → Settings.
General Section
- Toggle on Enable Pay Per Lead.
- Decide whether new leads need moderation. Turn on Require approval if you want to review every lead before the listing owner can see or unlock it. While a lead is pending, the owner sees a message that it’s awaiting review instead of an Unlock button.
- Turn on Booking leads if you also want booking requests (not just contact form submissions) to become leads.
- Under Enable for listing types, check the listing types that should be lead-gated. Leave everything unchecked to enable Pay Per Lead for every listing type.
Pricing Section
Choose one Pricing model:
| Model | How it works |
|---|---|
| Fixed price | Every lead costs the same Default price. |
| Price per listing type | Set a different price for each listing type in a per-type table. Leave a type’s field empty to fall back to the default price. These prices can also be edited directly in the Listing Types editor. |
| Commission on visitor budget | Charges a percentage of the budget the visitor enters in the contact form, with a minimum price and an optional maximum (0 = no cap). Leads without a budget value fall back to the default price. This option works only with PPL Contact Form widget, and contact form needs a ‘budget’ field. |
Click Save Settings.
Step 2: Check Your Contact Form
Pay Per Lead reads the same contact form that ships with Listeo Core, built with the drag-and-drop form builder.
- Go to WP Admin → Listeo Editor → Contact Form.
- You’ll see a tab per listing type (for example “Service Contact Form”, “Rental Contact Form”, “Event Contact Form”). By default each tab includes Name, Email, Phone and Message fields.
- Add or rearrange fields as needed. Available field types are Text, Email, Phone, Textarea, Select, Radio, Checkbox and Header.
- For any field that contains personal information (besides the default Name/Email/Phone, which are always masked), check Is contact info. This masks that field’s value in the lead until it’s unlocked.
Make Sure the Widget Uses the Native Form
The contact form is displayed on single listing pages by the Listeo Contact Widget.
- Go to Appearance → Widgets, find the Single Listing Sidebar widget area.
- Confirm the Listeo Contact Widget is present.
- Open it and check the Form source setting: it must be set to Native Listeo contact form (the default). The other option, Contact Form 7 (legacy), bypasses Pay Per Lead entirely — submissions on that legacy form go straight to the owner’s inbox, unmasked.
The form is also available outside the sidebar via the [lppl_lead_form] shortcode, or as a Pay Per Lead Form widget in Elementor.
Step 3: Optionally Enable Booking Leads
If you turned on Booking leads in Settings, booking requests submitted through the classic booking widget or the Booking Plus popup also become leads.
What Changes for Owners
- In the owner’s Bookings dashboard, the guest’s name is masked (shown as something like
L···). - A banner reads “Reveal this guest’s contact details”, with a blurred preview of Guest name / Email / Phone and an Unlock · $X button.
- The owner can still Approve or Reject the booking itself for free — only the contact details are paid.
- The “new reservation” email sent to the owner is masked the same way until the lead is unlocked.
After the owner unlocks a booking lead, its card in My Leads shows a View Booking button linking straight to that booking.
Administrators always see full, unmasked guest details everywhere, regardless of lead status.
Step 4: Set Up Credit Packs
Listing owners pay to unlock leads either one at a time (checkout) or by buying wallet credits in bulk (a credit pack).
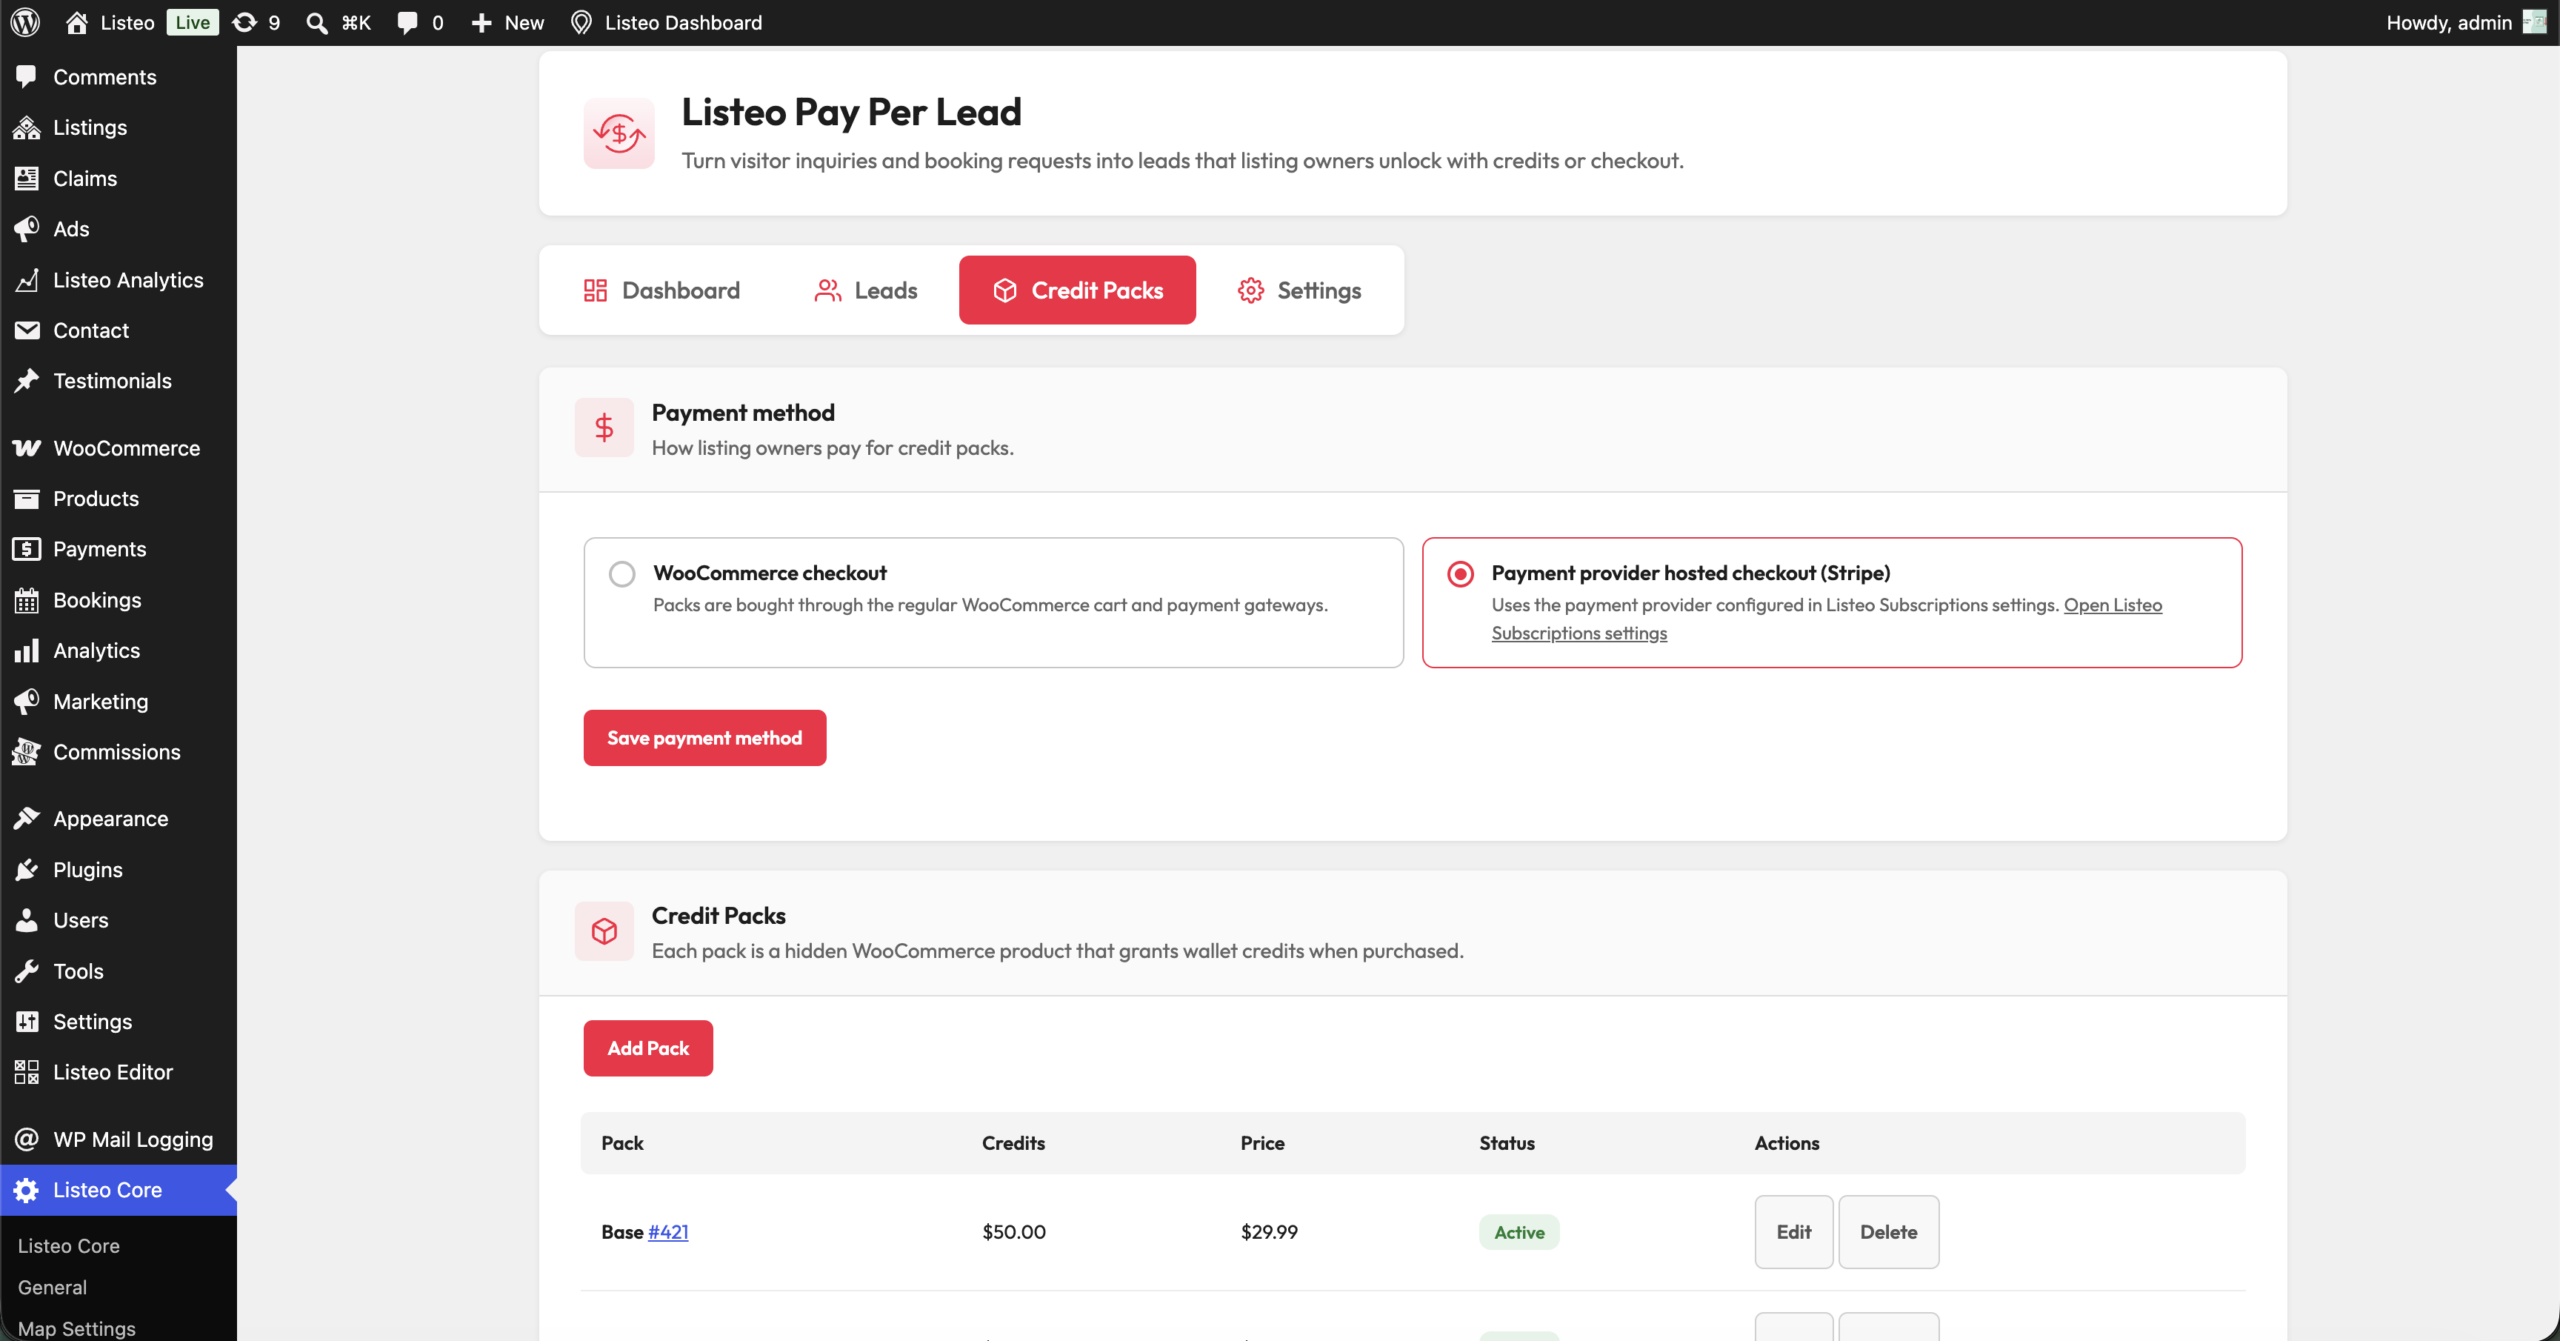
Go to WP Admin → Listeo Core → Pay Per Lead → Credit Packs.
Choose a Payment Method
At the top of the tab, pick how packs are paid for:
- WooCommerce checkout (default) — packs are bought through your regular WooCommerce cart and payment gateways.
- Payment provider hosted checkout — uses whichever provider is already configured in Listeo Subscriptions settings (Stripe, Paddle, Polar, or Dodo).
Click Save payment method.
Create a Pack
- Click Add Pack.
- Enter a Pack name (shown to owners and used as the WooCommerce product name).
- Enter the Credits amount — the wallet value granted per purchase.
- Enter the Pack price — what the owner actually pays. Set it lower than the credits amount to offer a bulk discount (for example, $100 in credits for $50).
- If you chose the provider payment method, also paste the provider’s one-time Price/Product ID for this pack.
- Click Save pack.
Packs are created as hidden WooCommerce products, so they won’t show up in your regular shop.
Step 5: Review the Emails (Optional)
Go to WP Admin → Listeo Core → Pay Per Lead → Settings → Emails.
Each email has its own enable toggle plus editable Subject and Content fields:
- New lead notification to the listing owner
- Confirmation to the visitor who submitted the inquiry
- Admin notification of a new lead
- Lead-unlocked notification to the listing owner
Each email lists the {tags} you can use in its content. Leave a Subject or Content field empty to use the built-in translated default. All these emails are sent through Listeo’s standard branded email template, so they match the rest of your site’s notifications.
Spam Protection and Advanced Options
Spam Protection
| Setting | Description | Default |
|---|---|---|
| Protection method | Honeypot (invisible, no setup) or Google reCAPTCHA v3 (needs site + secret key) | Honeypot |
| Allow spam reports | Lets listing owners flag a purchased lead as spam for admin review | Off |
Rate limiting is built in automatically: no more than 5 submissions per hour per IP address, regardless of which spam protection method you choose.
Advanced
| Setting | Description | Default |
|---|---|---|
| Remove data on uninstall | Deletes leads, the credits ledger and all Pay Per Lead settings when the plugin is uninstalled | Off |
How It Works
For Listing Owners
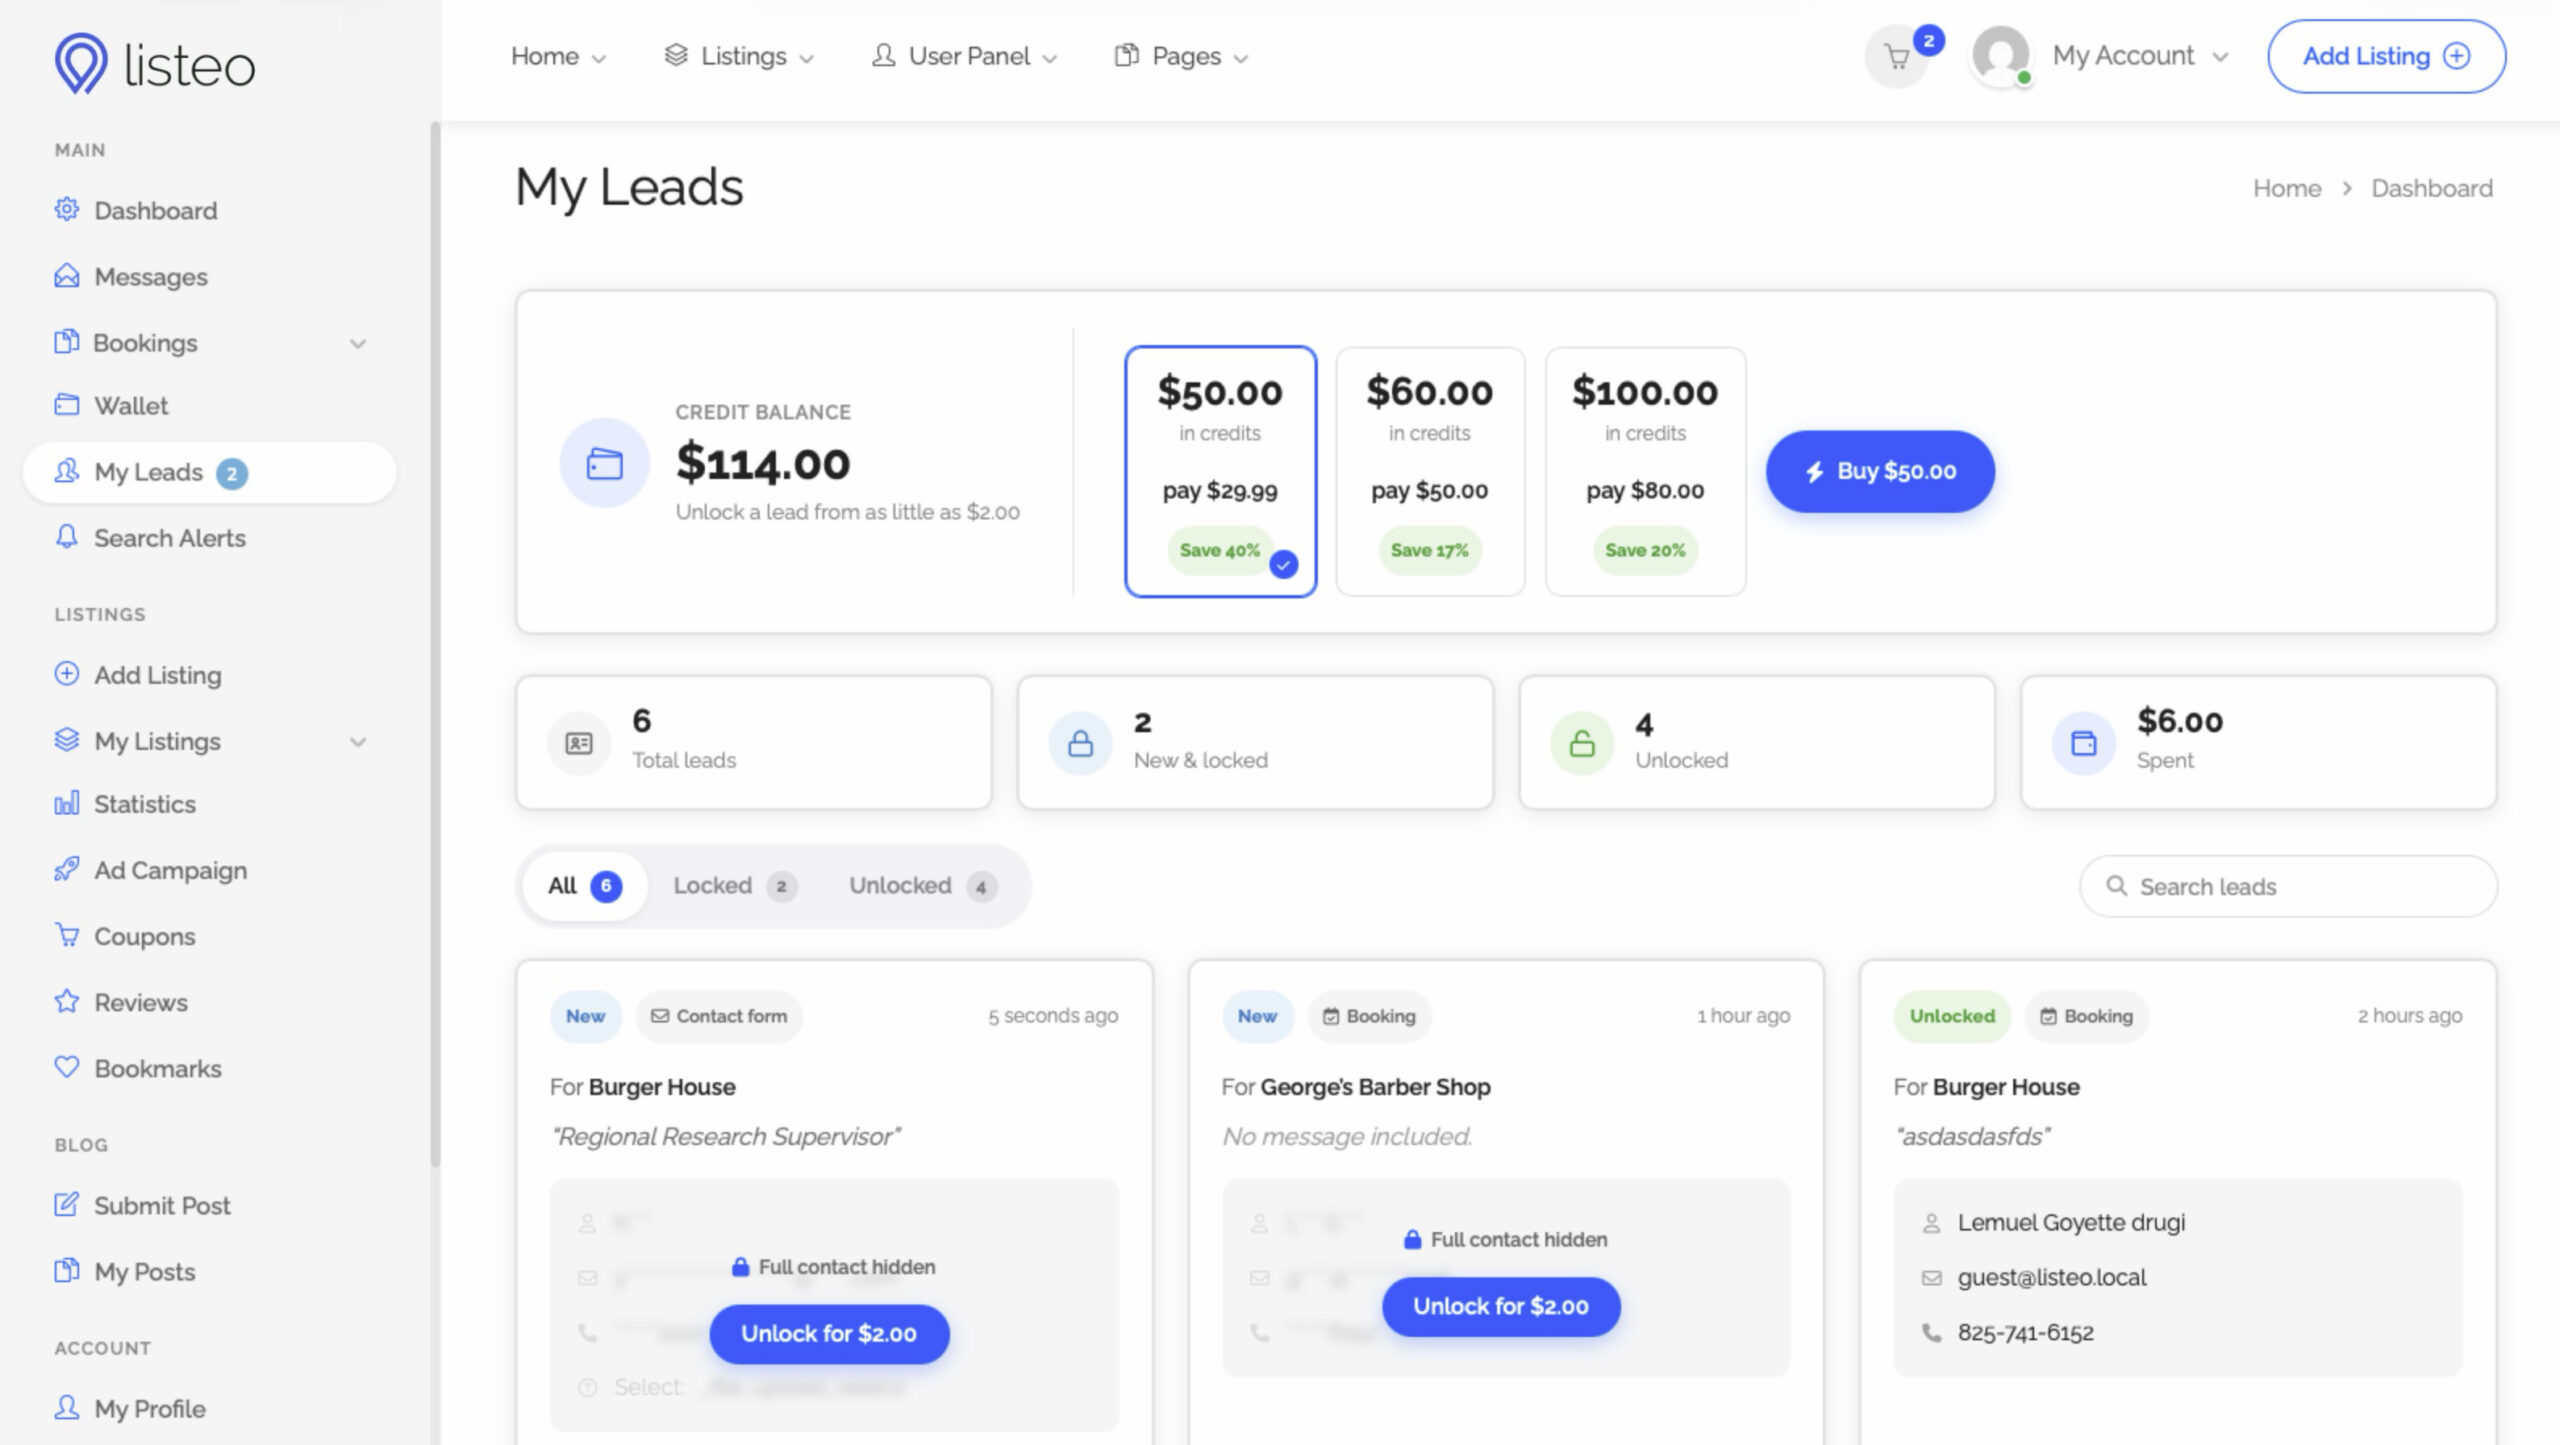
Owners manage their leads from My Leads in their dashboard (found under Main, with a badge showing how many locked leads they have). This page includes:
- A wallet strip with their current credit balance and available credit pack cards (each showing a savings percentage, with the best-value pack flagged)
- Stat chips: Total, New & locked, Unlocked, Spent
- All / Locked / Unlocked filter tabs, plus a search box
- Lead cards showing status, source (contact form or booking), a message teaser, a blurred contact preview, and an Unlock button
When an owner clicks Unlock:
- If they have enough wallet credits, the contact details are revealed instantly, right on the same card.
- If not, a dialog offers a one-time checkout for just that lead, or buying a credit pack.
For Visitors
Visitors don’t notice anything different. They fill out the contact form or submit a booking request exactly as before. Their submission is confirmed by email, and their contact details are simply held back from the owner until unlocked (or shown immediately, on listings that aren’t lead-gated).
Step 6: Test It
- Open a lead-gated listing in a private/incognito window (as a logged-out visitor) and submit the contact form.
- Log in as the listing owner and open My Leads. Confirm the lead appears with the contact details blurred/masked.
- Click Unlock and complete payment (with credits, or via checkout in a test/sandbox environment).
- Confirm the full name, email and phone now show correctly, and that a Reply/Message action is available.
- If you enabled Booking leads, repeat the test with a booking request and confirm the masked banner appears on the booking, and that Approve/Reject still work without unlocking.
FAQ
-
Can the listing owner see full contact details without paying?
-
Can I charge different prices for different listing types?
-
Can owners still approve or reject a booking without paying?
-
What happens if a provider checkout fails when buying a credit pack?
Troubleshooting
-
The listing owner sees full contact details instead of a masked lead
-
The Unlock button is missing from a lead
-
Buying a credit pack always goes to WooCommerce checkout, even though 'Payment provider' is selected
-
No leads are created from booking requests